How to properly lay tiles in the bathroom with your own hands
It is necessary to deal with laying tiles in the bathroom, strictly following a certain algorithm. Failure to follow the rules will lead to early deformation of the finish: chips, cracks and other defects. It is also important to take into account that the service life of the material depends on the type of tile. Therefore, before buying a tile, you should pay attention to the manufacturer's recommendations.
Layout Types
In fact, there are tons of layouts that can be used when installing tile in a bathroom. The main image is often used:
- Labyrinth;
- herringbone;
- chess board;
- rhombus and others.
When choosing the type of pattern, one should take into account the place where the tiles will be laid, the dimensions and features of the layout of the room. To facilitate this task, it is recommended to first apply the pattern to the walls and floor. The second important nuance is that you need to decide on the area where the tiles are laid. If the material is mounted on the floor, then in this case you need to take tiles with a rough surface. When choosing a design, it should be borne in mind that certain patterns and color combinations can both visually increase and decrease the size of the room. It also depends on the lighting in the bathroom.
Herringbone
This layout is considered the most popular. This option allows the installation of rectangular tiles at an angle of 45 degrees to each other.
Gap
This option involves the use of square tiles of different sizes and colors. Large ones fit with a slight shift to one side. Small tiles are then inserted into the resulting space.
Labyrinth
This installation method also involves the use of rectangular tiles, which form a square during installation. A smaller square tile is placed in the center of the resulting shape.
Classic
This is the standard installation option used in many tubs due to its ease of installation. The tiles in this case are aligned with each other.
Platform
This laying method is similar to laying parquet on the floor: in both cases, a rectangular material is glued to the treated surface at an angle of 45 degrees.
Rhombus
To achieve such an arrangement, it is enough to glue each rectangular tile so that one of the corners is directed towards the ground.

Chess
For this option, you will need tiles of two different colors, which alternate during installation (for example, white-black-white, etc.).
Modular
This option requires tiles of two different colors. Tiles in a dark shade are arranged in a zigzag pattern, and a light shade in a classic way.
Carpet
This method also involves laying two colored tiles. Clear tiles are mounted with a rhombus in the middle. This material is used to seal the remaining gaps. And the perimeter is laid out with dark tiles.
Criteria for choosing the right layout
Designers use the following principles to choose a layout:
- See. The horizontal layout visually increases the size of the room in width, vertical - in height. However, if a grout of a similar shade to the tile is used, the direction of installation does not play a fundamental role.
- Guides. To expand the room or increase the height, designers recommend in the first case to lay a horizontal strip of a light shade along the walls, in the second - a vertical strip.
- Border. This part is also used to increase the height of the room.
There are also other techniques that designers use. At the same time, when choosing a layout, it is worth taking into account the size and pattern of the tile, as well as the dimensions of the room.
The size
The final design obtained by installing the tile depends on the size of the tile. Therefore, it is important to decide on the type of layout before purchasing the material.
Plan
If a pattern is applied to the tile, the material must be laid in such a way that the pattern remains constantly in the field of view. That is, such a tile is mounted mainly at eye level. The patterned tile draws attention to itself.
Room size
In compact rooms, it is recommended to lay tiles of 15x15 or 20x20 centimeters. Too large or too small tiles visually reduce the size of the room. Both materials look harmonious in large bathtubs.
When decorating compact rooms, avoid dark tiles, preferring light-colored tiles with a glossy surface.
This finish also visually increases the size of the interior space. And in large rooms, you can use materials of other types, including bright or unusual colors. In addition, borders and other decorative elements are not recommended in compact rooms. Due to this, there is a feeling of stuffiness on the walls.
How to lay it with your own hands
Regardless of the layout chosen, before buying it is recommended to make a scheme of the future drawing, according to which the wall will be finished. The plan is drawn on a scale of 1:10. On the diagram, you should also indicate the location of plumbing fixtures, outlets, protrusions and other interior elements. Having a plan will allow you to accurately calculate the required amount of finishing material, choose the right pattern and size of tiles.
Preparation of the room
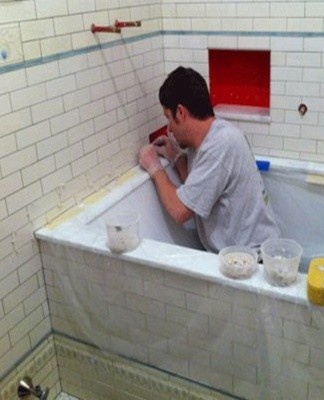
Before proceeding with the installation of finishes, it is necessary to prepare the room. To do this, remove plumbing fixtures (faucets, bathroom, etc.) and remove debris. If there is no finish on the walls, the surfaces should be leveled as accurately as possible. The cracks are covered with a cement-sand mixture. It is also recommended to additionally treat such defects with a putty.
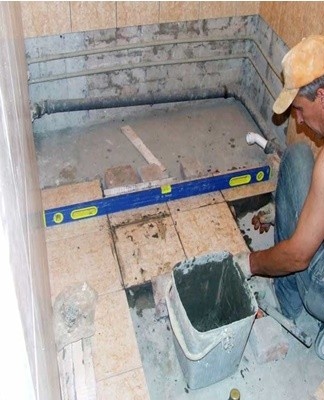
If you plan to lay tiles on the floor, the latter must be leveled using specialized mixtures, which will make it even easier to lay the tiles. At the end of the work, the surfaces are primed. To level the walls, plasterboard is often mounted on a pre-erected frame. This design hides part of the interior space. However, installation on plasterboard is easier. In addition, glue consumption is reduced in this case.
Tools and Materials Required
To finish the bathroom, you will need:
- construction mixer with a mixing tank;
- drill (screwdriver);
- straight, rubber and notched spatulas;
- soft sponge and rags;
- roller (brush);
- rubberized hammer;
- roulette;
- building level.
You will also need tile glue.If the material is laid on gypsum cardboard, in addition to the sheets of the latter, it is necessary to purchase a metal profile through which the frame is mounted. In addition, plastic stars are also needed, designed to form the seams between the tiles.
Removal of the old coating
A hammer drill may be needed to dismantle the old coating. A metal spatula is used to remove the remnants of the old glue. Plaster mesh is often hidden behind old tiles. Metal scissors help remove metal.

Align Surfaces
After cleaning the room, you can start leveling the surfaces. This step begins with the grouting of large defects. In this case, a plaster mix or plasterboard helps. The latter is used in situations where the base moves in waves.
If a plaster mixture is used, it is not necessary to carefully level the surface. Minor gaps are eliminated with tile adhesive.
Waterproofing
To waterproof a bathroom, we use:
- roller waterproofing (gluing);
- penetrating solutions;
- bitumen-based mastics.
Basically, when decorating a bathroom, the floor is waterproofed. In this case, you will need to purchase a material that will provide protection against moisture penetration into the concrete.
Special mix for concrete
To waterproof a concrete floor, penetrating dry mixes are used, which seal even minor defects.
Penetron
Penetron is a penetrating waterproofing material based on the substance of the same name. The product also includes quartz sand, cement and a number of chemical additives. Penetron has the following features:
- prevents the appearance of new cracks;
- able to close defects up to 0.4 mm;
- withstands strong water pressure;
- prevents corrosion of metal elements;
- protects against mechanical and chemical influences;
- improves the strength of concrete;
- does not harm human health.

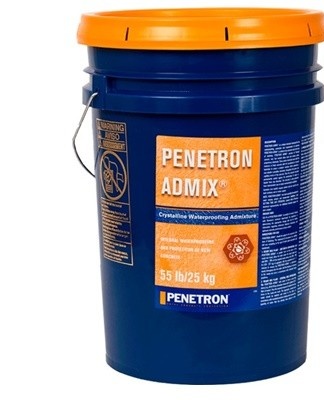
It is recommended to apply Penetron in two coats.
Lakhta
Lakhta penetrating waterproofing consists of the following components:
- quartz filler;
- Portland cement;
- Chemical additives.
In comparison with Penetron, Lakhta has a lower consumption: 0.8 against 1 kilogram per square meter. This waterproofing is able to penetrate the thickness of the material to a depth of 10-12 millimeters.
Hydrosmile
In addition to waterproofing concrete, Gidrosmile increases the strength of the treated material and frost resistance. The surface acquires these characteristics 20 days after the surface treatment. That is, the concrete remains frost resistant even if the waterproofing is removed after the specified period.
After treatment, the material also retains the same vapor permeability. Hydrosmile is harmless to humans.
Isopron
Isopron, like other waterproofing materials:
- resistant to strong pressure and reverse flow of water;
- provides vapor permeability of concrete;
- resists exposure to chemicals;
- tolerates extreme temperatures.
The main advantage of Isopron is its relatively low cost. This waterproofing does not provide adequate protection for porous concrete.
ribbon
If the walls and floor in the bathroom are unstable (which is typical mainly for plasterboard), then at the joints, as well as in the area of steps and thresholds, it is necessary to lay a tape sealing.
Idrobuild Giuntoflex 120
This waterproofing tape with reinforcing properties has an elastic structure. The product is made from copolymers which provide increased water resistance. The tape is used to seal deformations, fixed and moving joints.
Litoband-R
The 120 mm tape (sealing width 70 mm) is made of polyester fabric, one side of which is covered with thermoplastic elastomer. The latter offers water-repellent and vapor-repellent properties. The tape remains elastic even in the event of pronounced deformation and negative temperatures. Litoband-R is well tolerated by aggressive media, including alkalis and saline solutions.
cover band
Coverband sealing tape with a width of 120 millimeters belongs to budget products. This waterproofing is glued to a new layer of plaster or tile adhesive. The reinforcement layer additionally strengthens the joints. After installation, the tape is covered with another sealing material.
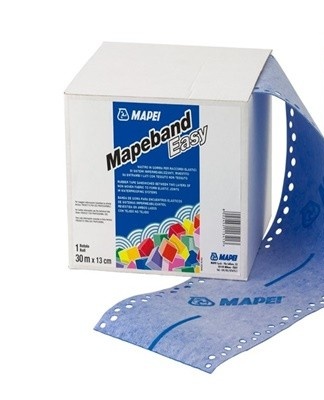
Mapeband
The most expensive waterproofing tape on the list. This product is based on a polyester nonwoven combined with an elastic layer. The tape is characterized by increased resistance to extreme temperatures, humidity and steam. Mapeband is able to stretch to 100% of its own width. In addition, the material tolerates contact with chemicals well.
Preparation of the adhesive
The adhesive is prepared according to the enclosed instructions. The following materials are used to decorate the walls in the bathroom with tiles:
- Cement glues. There are several types of this composition, differing in the scope of application and other characteristics.
- Epoxy adhesives. This material is available as a mineral mixture, a fine filler or a flowing type.
- Dispersion adhesives. This material is used for tiling plasterboard. Such a limited field of application is due to the fact that the dispersion adhesive does not penetrate deeply into the substrate.
It is recommended to select an adhesive composition, depending on the type of tile. For large-sized finishes, materials with a high degree of adhesion are suitable.
To reduce the amount of adhesive solution, it is necessary to prime the surface to be treated. The material is applied with a brush (roller) to the previously cleaned walls and floor. When applying, the primer should be pressed into the surface. Impregnation can be completed when a white foam appears on the walls and floor. The primer is applied in two layers.
How to get off to a good start
It is recommended to start laying the tiles by installing a metal profile along the lower edge of the wall. This backing will prevent the finish from slipping. To correctly mark the places of tile application, you need to perform the following steps:
- Measure the height of the bathroom at the corners.
- Find the lowest corner and mark in this area where the first tile will be laid.
- Using this point as a reference point, draw horizontal lines on the wall.

Basically, craftsmen start styling from the level of the bath. However, the location from which the process is conducted is chosen based on personal preferences. If you plan to lay tiles in the form of a complex pattern, then it is recommended to first lay the latter on the wall. And the finish before starting work should be laid out on the floor in the form of the desired pattern.
Installation material
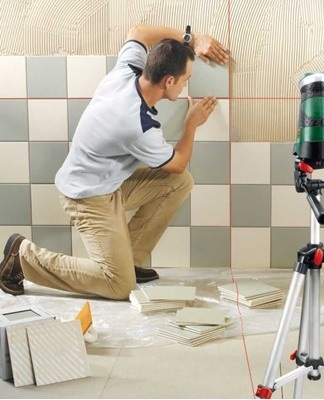
The adhesive is applied with a notched trowel to the back of the tile or to the wall and finished at the same time. The first option is suitable for cases where flat surfaces are treated. The second method is used when there are height differences on the walls. If tiles other than porcelain are used, be sure to wet the back of the finish before applying the adhesive. Thanks to this, the material will not absorb moisture, thereby deteriorating the quality of the hitch.
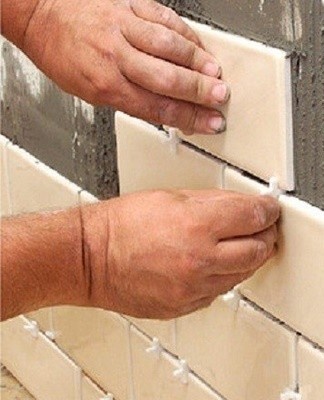
The tile laying algorithm is as follows:
- An adhesive is applied on the back.
- The tile is applied to the wall and lightly pressed.
- Using the building level, the quality of the masonry is measured.
- If necessary, the tiles are leveled with a rubber hammer.
A plastic cross should be laid between the tiles, which forms the future seam. After completing the installation of the first layer, you need to check the quality of adhesion and the level. Protruding adhesive should be removed from the surface of the finish immediately. If there are no problems with the quality of the coating, you can proceed to the installation of the second layer according to the described algorithm.
Craftsmen recommend laying each layer with tiles from one pack. This is because cheap coatings often have different sizes.
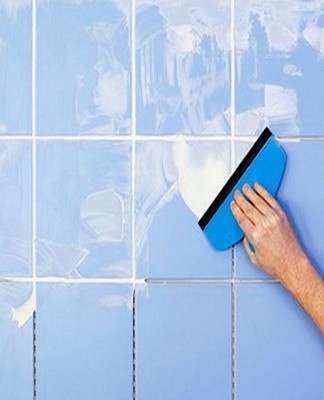
Grouting
Grouting is carried out after the glue has hardened. At this stage, specialized slow-drying mixtures are used. The material is applied with a rubber spatula, blending into the seam. After that, the grout is smoothed with a damp sponge.
How to cut correctly
To cut the tiles, a tile cutter or grinder with a stone disc or diamond dusting is used. To get an accurate fragment, you must first apply the marks to the material.Then cut the cladding without deviating from the drawn line.
Common Mistakes
When laying tiles, the following errors often occur:
- Tiles in the same row are not laid at the same level. To eliminate this defect, you need to find a place where the coating is not properly laid out. After that, you need to correct the lower seam with matches, and the upper seams - with crosses of different thicknesses.
- A tile has fallen from the row. To eliminate the defect, you need to insert a cross into the seam and connect the lining with adhesive tape to the adjacent material.
- The covering sinks into the wall. This defect occurs due to uneven application (in the corners or perimeter) of glue or the use of an insufficient amount of fixing composition. To align the row of cladding, it will be necessary to remove the defective finish. Then you need to reapply the adhesive in the correct amount.
At the end of the finish, hollows may appear in the seams. This defect is due to improper cleaning or the use of a liquid composition. To eliminate the gaps, you must remove the previously applied layer of grout and repeat the procedure.
Tips and tricks from experienced craftsmen
There are many nuances that need to be considered when tiling a bathroom. Therefore, novice finishers are advised to use plain tiles without borders. If materials with a pattern are used, the location of such a finish should be immediately noted on the wall. Before starting the installation of this tile, it is recommended to lay the covering on the floor and make sure that the chosen pattern matches well.
You should start working with the second row after the first drying. This helps to avoid distortions when laying tiles and to identify defects in a timely manner.Use only a rubberized mallet to level the coating. In addition, masters recommend immediately removing excess glue from the surface of the tile. Hardened mortar is more difficult to clean.