DIY rules and step-by-step instructions for creating slopes of drywall
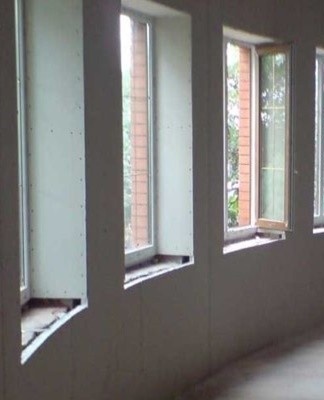
Installation of slopes is a necessary step in the installation of plastic windows. Such structures ennoble the appearance of the interior, hiding the fasteners under it. Installers use various materials to install the slopes with their own hands, but the best finish is obtained from drywall. This is explained by the fact that such sheets are easier to attach. And on the finished surface you can immediately apply the finish.
What you need to work
The algorithm for mounting slopes practically does not change depending on the selected material. To install such a structure, you will need:
- a knife for cutting drywall;
- tape measure, level and pencil for marking;
- Bulgarian;
- puncher.
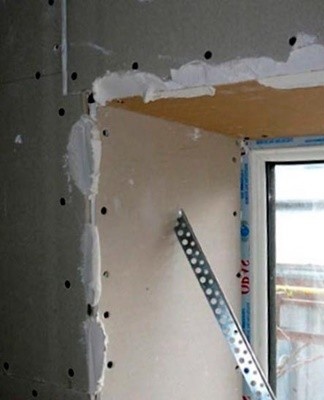
Plasterboards are mounted on metal profiles that are fixed directly to the wall.With the help of the frame created with this material, the slopes are leveled even at the installation stage.
When buying drywall, it is recommended to take sheets with a margin. This material is easy to cut. Therefore, excess drywall pieces can be removed after the work is completed.
Tools
The type of tools must be chosen according to the conditions of the work to be carried out. In some cases, when installing embankments, you can limit yourself to a conventional drill and not take a hammer drill. To speed up the work, it is also recommended to take a screwdriver.
Bulgarian
A grinder is needed to cut the metal profiles. Instead of this tool, you can take a hacksaw for metal.
puncher
The hammer drill is used to drill holes in the wall, into which dowels and fasteners are then inserted.
drywall cutter
A utility knife is typically used to cut drywall.
metal square
This tool makes it easier to install the metal frame under the drywall because it helps you accurately measure the corners.
The indicator
A tape measure is required at all stages of slope installation.

Building level
The tool is used to level the metal frame.
Materials (edit)
To install drywall slopes, you will need:
- wall primer;
- plaster;
- acrylic enamel or water-based paint;
- NP 28x27, PP 60x27 and L profiles;
- silicone sealant;
- polyurethane foam (mineral wool);
- 6x60 mm dowels and 35 mm self-tapping screws;
- hardware "bug" 9 millimeters.
When installing slopes, it is recommended to use moisture-resistant plasterboard with a thickness of at least 12 millimeters.
Preparatory work
The reliability of fastening and the durability of the entire structure depend on the quality of surface preparation. At this stage, it is necessary to lay communications (mainly wires) under the future structure. You will also need to remove excess polyurethane foam to which the window is attached, seal the cracks with putty and remove traces of mold.After that, you need to clean the opening from debris.

Take window measurements
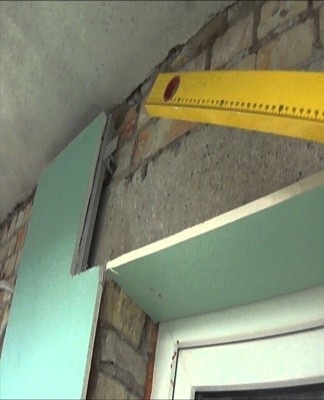
To make the structure as flat as possible, for this, using a metal square, you need to measure the distance from the window to the wall. It is recommended to carry out the procedure along the entire perimeter, marking the length at each of the corners and in the center at the top and bottom.
Plasterboards should be adjacent to the window. That is, it is necessary to ensure the coincidence of the planes of the slopes and the plastic frame. To do this, on the window sill and the window you need to apply the appropriate marks along which the plasterboard will be installed.
Preliminary surface preparation
At this stage, it is necessary to remove the moss and debris that interfere with the installation of the embankments. You should also apply a coat of primer to prevent future mold growth. Without the last procedure, after a few years you will have to break the structure and re-treat the surface. It is also recommended to apply the primer to the back surface of the plasterboards.
Remove the layer of plaster
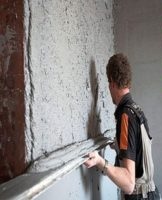
It is recommended to carry out the installation of slopes on "clean" walls. That is, the metal frame to which the plasterboard sheets are fixed must be installed on a surface that has been previously cleaned of plaster.This procedure is due to the fact that the cement mixture collapses over time, which in the future will lead to a violation of the integrity of the slopes. The plaster layer is removed with a hammer and other tools such as a chisel.
Leveling and filling
Before installing the slopes, it is necessary to seal the defects of the walls, which can become "bridges" of cold. In winter, frost enters the apartment through similar holes in the walls. To seal such defects, a conventional sealant is used.
Surface leveling is necessary in cases where drywall is attached to adhesive or polyurethane foam. This stage can be neglected if the work is carried out using a metal profile. However, the frame itself must also be aligned at building level.
How to do it right
Installation of plasterboard slopes is carried out by the following methods:
- on a metal frame;
- on glue;
- on polyurethane foam.
The choice of method depends on the conditions under which the work is carried out.
Wire method
This option is chosen mainly in cases where, in addition to window openings, the walls are covered with plasterboard. Thus, repair work is accelerated. The main disadvantage of this method is that the metal frame reduces the size of the window opening. However, this design allows for the laying of an additional thermal insulation layer.
Slope installation work using this method is carried out in several stages. First, a metal frame is formed in the opening from the guide profiles. In this case, it is recommended to take a thin material. The profile is fixed to the wall with self-tapping screws, which are screwed into pre-embedded dowels.
It is recommended to place the frame at a distance from the wall, since due to the close location the material is constantly exposed to temperature extremes and high humidity. These two factors have a detrimental effect on the condition of the material.
The voids between the metal frame and the plasterboards are filled with mineral wool. After completion of the described work, all joints and caps of self-tapping screws are coated with putty. This must be done relative to the corners. After drying, the putty must be sanded with sandpaper.
glue method
This method preserves the dimensions of the window opening. Plasterboard in this case is fixed on a specialized mastic or adhesive.The latter is produced in the form of a dry mixture, which must be diluted with water before starting work.
Before beginning the installation, the walls and the back of the drywall must be primed. Without this composition, it is impossible to achieve the desired adhesion (level of adhesion of the material to the surface). After mixing, the adhesive is applied to the back of the drywall. Then each sheet is attached to the opening and aligned. If the distance between the surface and the slopes is too large, thin strips of drywall are installed on the adhesive composition. After drying, the cut sheets are installed on top under the slopes.
On polyurethane foam
This option allows you to create both straight slopes and structures located at a certain angle. To do this, it is necessary to cut the mounting foam, which is attached to the window, to the thickness of the plasterboard and to a depth of one centimeter. Further, the finishing material is inserted into such holes around the entire perimeter and leveled.It is recommended that the top strip be installed last. This sheet of drywall will hold up the sides.
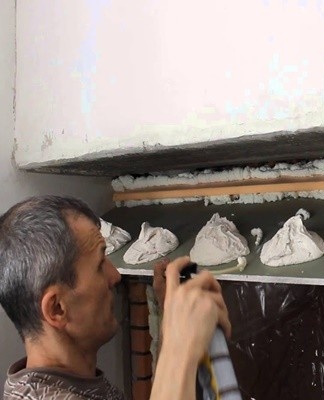
A small amount of polyurethane foam is applied deep into the gap, between the finishing material and the wall, which will fix the structure.
After that, you need to lay mineral wool, filling the voids no more than 2/3.
The next step is to secure the drywall to the wall with masking tape, keeping it level. At the end, the remaining voids are filled with polyurethane foam. The material should be applied in sufficient quantity, but not in excess. In the latter case, the foam will push out the drywall. At the end of the work, the frozen material is cut along the walls and coated.
Finishing work
All joints between the drywall and the window frame should be sealed with sealant. After that, the inner corner is glued in these areas. In addition, the slopes are putty in one or two layers. In the end, wallpaper or other finishes can be applied to the drywall.
Varieties and characteristics
Drywall is a relatively inexpensive finishing material, which consists of a layer of gypsum, covered on both sides with cardboard. Due to this feature, these tiles are used to decorate rooms with different configurations. However, for some rooms, special types of materials will be required.
Moisture resistant
Moisture resistant plasterboards are available in green color. The material acquires such properties due to impregnation, which additionally protects against mold. It is best to use moisture-resistant drywall when installing slopes.
flame retardant
Light gray plasterboard, due to a special impregnation and a reinforcing layer, does not ignite under the influence of open fire, but is charred.
Moisture resistant
This material combines the properties of the two previous ones and is labeled GKLO and GKLVO.
Soft
These plasterboards are supplemented with fiberglass threads, thanks to which flexible structures can be created without violating the integrity of the material.
Advantages and disadvantages
Drywall, compared to other materials used in the installation of slopes, has the following advantages:
- low price;
- long life expectancy;
- suitable for any window structure;
- creates a flat surface;
- ecological;
- does not require plastering;
- protects the room from temperature extremes and loud noise;
- prevents the appearance of mold.
Plasterboard is easy to install. The material stabilizes the humidity in the room. However, despite the described advantages, drywall is not always used to form slopes due to the following disadvantages:
- fragility;
- destroyed by direct sunlight;
- significantly reduces the size of the opening;
- in case of damage, you must put a new sheet.
When working with drywall, it is necessary to use personal protective equipment for the face, because when cutting, gypsum dust gets into the air, which is harmful to the eyes and the system respiratory.
How to do it yourself
Installation of drywall slopes is carried out by one of the described methods. But cutting the material often causes problems for novice installers. To get the segments of the required length, you need to draw the required length and width on the sheet and draw twice along these lines with a clerical knife.Then you need to lift the drywall, push it and break it into 2 parts. In the end, it remains to cut the bottom layer of cardboard.
Common Mistakes
Inexperienced installers often install conventional drywall. However, in this case, it is recommended to take moisture-resistant ones. Often, when installing the structure, too much foam is poured, which causes deformation of the slopes. In addition, the edge of the drywall should go beyond the profile of the plastic window.
Additional tips and tricks
In order for the structure to serve for many years, it is important at the installation stage to accurately measure the perimeter of the window opening. All joints must be sealed with a putty or putty. For this, adhesive tape is also used. It is recommended to fix the plasterboard to the metal profile using self-tapping screws designed for this material.
After finishing, it is not recommended to fix ceramic tiles or other heavy materials on the slopes. Drywall does not tolerate increased loads.