How to make wooden paths in the country with your own hands
Wooden paths in the country are very popular. This is due to the availability of materials and the ease of creating such structures. Using a tree as a base allows you to create tracks of different shapes and configurations. However, this material has certain requirements in terms of operation. Therefore, it is necessary to build wooden paths on the site, strictly observing the recommendations described.
Advantages and disadvantages of wooden paths
Wooden blanks, as the basis of paths on the site, have the following advantages:
- full environmental friendliness (provided that the material is not treated with paint);
- availablity;
- relatively low cost;
- ease of fabrication of structures.
Wood offers many possibilities for creating tracks of different configurations. At the same time, the material dries quickly, which is especially important after snow and rain melt.
The main disadvantage of hemp tracks and other similar blanks is their short service life.This is due to the fact that the wood does not tolerate prolonged exposure to the sun (cracks), rots and is afraid of fire. In addition, wet materials become slippery and insects such as ants are able to gnaw the paths. Therefore, before laying, the wood must be treated.
How to make from saw cuts?
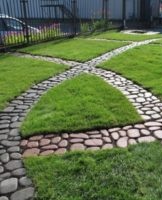
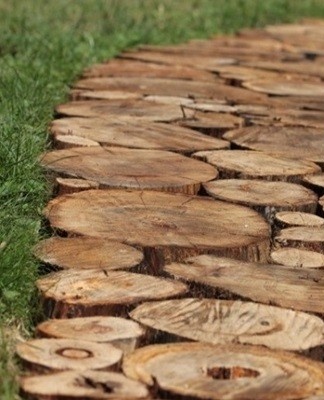
For garden paths, logs with a longitudinal or transverse saw cut are used. Both options allow you to save on the construction of such structures. The use of saw cuts is also justified by the fact that this type of material is easier to lay. These paths are appropriate in a rustic landscape. The spaces between the cuts are usually filled with crushed stone, gravel or earth. In the latter case, lawn grass is also planted.
Cuts are also used when creating steps or structures that support the towering floor.
Material preparation
To lay tracks from saw cuts, you will need:
- level;
- twine (any thick yarn);
- gloves;
- roulette;
- brush;
- chain saw;
- mallet;
- shovel.
It is also necessary to prepare equipment for compacting the earth. For these purposes, you can use the tools at hand. Before laying garden paths, it is recommended to clean the bark from cuts. This extends the life of the material. Small diameter pieces should be placed between larger stumps.
In addition, the wood must be treated to prevent rotting before laying. For this, drying oil or antifungal agents are first applied to the material. After drying, the part of the saw cut that will be hidden under the ground is additionally treated with resin. In this case, it is recommended to use a mixture of bitumen and gasoline.If necessary, copper sulfate can be applied to the tops of the stumps. This material ages the wood.
Larch, oak, pine, birch or hemp are used as the base for the paths.
Larch
It is considered optimal possibility of making garden paths... Larch, with proper preparation, will last at least 30 years. However, this material is expensive.

Oak
The lifespan of oak walkways is 10 years. This material is cheaper than larch.
Beech
Beech, like larch with oak, is a hardwood. Therefore, the material has a long service life.
Pine
Pine is used less often, since the service life of this material does not exceed seven years. In addition, hemp gives off a sticky resin the first year.
Birch
Birch is an average option. In terms of service life, the material is slightly superior to pine, but it costs significantly less than larch or oak.
How to pack?
For the manufacture of garden paths, beams with a height of 150-200 millimeters are suitable. At the same time, it is not recommended to take logs with a diameter of less than 100 millimeters, since such a piece will eventually stick out of the ground.
markup
Before applying the markings, it is necessary to draw up a detailed plan of the garden plot in advance and draw the center lines of the paths on the drawing. Next, you need to decide on the width of the passages. For comfortable movement on the site, this parameter should be more than 80 centimeters. If the tracks are used by one person, the width is 35 centimeters or more.
After that, the center lines are marked on the site, along which the pegs are hammered.A string is then drawn between them, which marks the future paths and determines the areas of excavation of the earth.
Trench
When digging a trench, you need to focus on the size of the wood blank. When calculating the depth of the pit, you need to take the height of the hemp, add 50-100 millimeters. The width of the trench is chosen depending on the dimensions of the future track.
Waterproofing and base
After preparing the trench, the work is carried out in the following order:
- A waterproofing material is covered at the bottom (you can use a plastic film that covers the greenhouses).
- The film is covered with a layer of gravel or fine gravel necessary to create drainage. The latter protects the wood from constant contact with moisture. The height of the drainage layer is half the depth of the trench.
- Crushed stone (gravel) after backfilling is well embedded.
- The drainage layer is leveled.
If a curb is planned along the path, then this structure is erected before laying the cuts. In this case, wood and bricks, sheet metal, stones and other materials are used. After laying the curb, a layer of sand is poured in the same volume as the drainage. Then the base of the future path is watered abundantly with water.

Styling
The cuts are laid according to a previously prepared drawing. To prevent the wood from stepping underfoot, the stumps at the base are reinforced with dowels (you can use metal dowels). After that, the material is driven in and leveled with a mallet. The voids between the stumps are filled with earth or rubble.
Make tracks from planks
To create garden paths, a boardwalk with a thickness of 25-30 millimeters is used.All wood materials used are pre-treated with an antiseptic. In the event that the paths will be used for the transportation of heavy loads, it is recommended to use more powerful blanks.
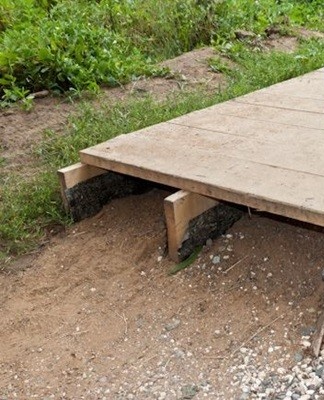
You can make a trench and lay the base according to the described algorithm. On both sides of the dug hole, you need to install a beam of 100x50 millimeters on the edge. Also, in the middle of the path, an additional lag is placed, which increases the bearing capacity of the structure being erected. The wood is necessarily wrapped with waterproofing.
Then, with a step of 1.5 meters between the lags, transverse struts of 40x40 mm are laid. You can use nails or screws to connect the materials.At the end of the described works, the trench is covered with sand, which is tamped with water.
Then 150 millimeter wide boards are laid along the lag and nailed. The gap between the materials should be 5-10 millimeters. This is necessary for the natural flow of water.
Installation of the decking
Garden parquet, or decking, is more common overseas. This material is produced in the form of square or rectangular tiles of various sizes, consisting of lamellae, which are fixed on a lattice base. For the connection there are locks on the sides of the parquet. On garden plots, it is recommended to lay tiles with gaps between the lamellae.
This configuration allows natural water drainage. The parquet is made up of different types of wood. But, despite the type of material chosen, the terrace is significantly more expensive than the above options.
The laying of garden parquet does not require any special skills. Each tile has pointed tabs underneath that dig into the ground and hold the bridge in place.Some models of garden parquet require the laying of logs, to which the boards are attached by means of self-tapping screws. In this case, it is recommended to prepare the concrete base in advance.
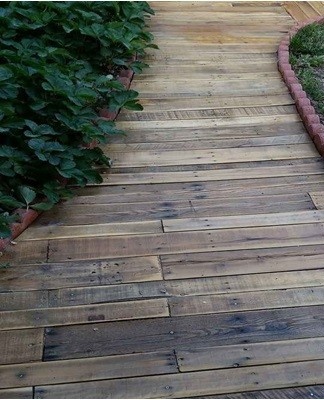
DIY Pallet Garden Path Master Class
In order to manage with low costs when creating a garden path, you can use ready-made pallets. Pallets, like other wooden materials, must be treated with an antiseptic before installation. Pallets can be mounted on any base. To speed up the work, it is recommended to use a rubber conveyor belt, which will serve as a waterproofing layer. In this case, the logs to which the pallets are attached must be wrapped with roofing material.
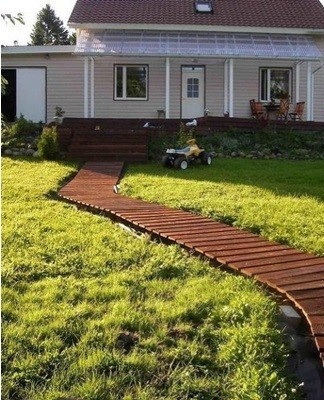
How to make a multi-level model?
Tiered paths will be required where the site has a natural slope. To achieve such a construction, you must:
- Mark the area and drive in the stakes.
- Dig a trench along the dowel. At this stage, it is necessary to form platforms that will serve as wide steps.
- Insert the beams into the trench and attach the logs to the last (boards placed on the edge). Each of these constructions is the next step. The side joists should rest on the next plank attached to the bottom rails.
- The frames of each site are fixed to each other by means of corners.
- The boards are sewn onto the prepared frames.
As in the previous cases, all wooden materials are treated with an antiseptic. It is also recommended to sand the boards so that you can walk barefoot on the walkway.
Combinations with wood
Wood blends well with other materials.Additionally, cuts and boards can be painted in any suitable color, giving the landscape an interesting look. When choosing a material for garden paths, it is recommended to take into account the features of a particular site and the location of the path.
Concrete
When arranging wooden paths, concrete is used in two cases: to create a base or a border. The pavement in this situation becomes stronger and better withstands increased loads. Concrete as a support is mainly used when the tracks are made of pallets. This material is recommended to be used to reinforce the walls of the paths laid out with cuts of wood.
Gravel
When laying wooden garden paths, gravel is also needed in two cases: when creating a drainage layer and filling voids between cuts. This material can be used to arrange a decorative border along the perimeter of the path.
Mulch application
This economical option is suitable for cases where decorative or rarely used paths are arranged on the site. Mulch cakes quickly and requires constant litter. This material adheres to the soles and spreads over the area. When laying mulch, it is necessary to arrange a border along the path. Otherwise, the material will scatter to the sides and the track will lose its original appearance.
To create a path from mulch, you will need:
- Remove the top layer of soil 50 to 100 millimeters thick.
- Dig boards or install other fencing structures along the perimeter of the trench.
- Spread mulch along the trench.
- Smooth the mulch.
Because mulch is recycled tree bark, paths made from this material are well permeable to water.
Working examples
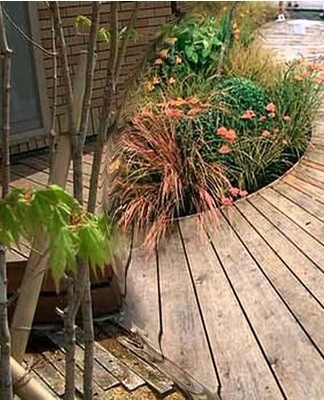
Using wood as a base for paths, you can create various paths, including curved, multi-level and others. The main thing is to draw up the layout scheme on the site in advance before starting work.