How to properly glue a home bike camera using a repair kit
People often wonder what is the best way to seal the bike camera with a repair kit. There is a clear sequence of actions that must be followed to achieve tangible results. To achieve a good effect in vehicle repairs, it is recommended to properly remove the wheel, prepare the tire and apply adhesive.
Content
- 1 Types and causes of bike camera damage
- 2 How to stick a bike camera at home
- 3 Composition of the repair kit
- 4 Preparation of tires for repair
- 5 How to remove a tire from a wheel with your own hands
- 6 How to quickly find the puncture site
- 7 How to stick a rubber patch on a bicycle inner tube
- 8 How to wind the wheel
- 9 How to avoid punctures in the inner tube
Types and causes of bike camera damage
The inner tube can suffer from tears and punctures. Discontinuities are defined as defects that have visible edges. This is due to the shock loads that occur during aggressive driving. At the same time, quality characteristics are of great importance. Sometimes a rupture of the chamber is observed at the same time as the tire.
There are also these types of damage:
- Snake bite. It is a very unpleasant type of puncture which appears when the wheel is insufficiently inflated or hits an obstacle violently. In this case, the inner tube is bitten between the edge of the tire and the rim. As a result, 2 nearby holes appear.They look like a snake bite.
- Perforation of the interior of the chamber. Its appearance is due to the spoke protruding inside the rim. In this case, after changing or repairing the camera, it is worth checking the correct location of the protective tape, which is inside the rim.
- Cutting. With a small length of such a defect, it can be easily glued. If the cut is large, the repair will be ineffective. In such a situation, it is recommended to use the camera to make patches.
- Perforation at the seam of the camera. This type of damage requires sanding the puncture area with sandpaper. This allows you to remove the excess seam. If no abrasive material was found on the road, it is permissible to use a stone. Also, an emery coating can play its role.
- Perforation at the base of the air valve. This kind of cut cannot be glued. This camera should be discarded. Such cases are caused by metal burrs located along the edges of the rim holes. It is in them that the valve of the chamber is inserted.
How to stick a bike camera at home
Not all means can be used to eliminate damage. Therefore, it is important to choose the right composition. To do this, apply the following:
- Special repair kits. Many brands engaged in the production of bicycle parts produce special kits. They include a case-like box. It contains chalk to mark the perforation area, a grinder and glue. Patches are also included. They differ in shape and size. The tool is designed to work with the patches included in the bundle. Therefore, its use for fixing other coatings may not give effect.
- Chinese repair kits.Red Sun kits are very popular. They are very reliable - they do not fall off and do not leak. The price of such products is lower than the sets of well-known brands. The disadvantages include the difference in the amount of glue and patches.
- Homemade patches. They can be made from an unnecessary camera. Any plastic compound for rubber is used as an adhesive. They are often fixed with superglue. However, the reliability of such a patch leaves much to be desired. When using homemade patches, it is forbidden to use glue, which after hardening bursts in the bend areas.

Composition of the repair kit
The repair kit contains the following components:
- Cycling first aid kit. It includes an adhesive and a set of patches.
- Plastic fastener for mounting. This helps in removing the wheel and putting it back on. If necessary, it is allowed to use a universal key or a screwdriver. However, plastic is less damaging to the rim.
- Pump.
- A small piece of sandpaper. It should be of medium grain size. This material is not included in the standard set, but it is very useful.
- A small fragment of chalk. It is necessary to mark the puncture area.
Preparation of tires for repair
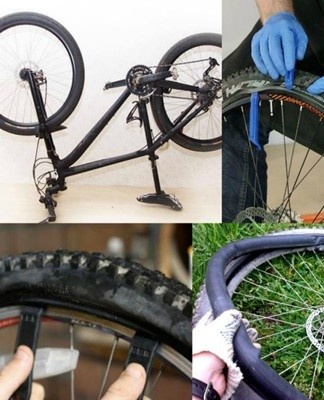
The first step is to remove the damaged wheel. To do this, it is recommended to perform the following actions:
- Release the rim brakes and remove the fenders that block access to the wheels.
- Flip the bike.
- Remove the bolts securing the bushing.
- Pull the wheel carefully. If you have difficulty with the rear wheel, it is best to orient the axle towards the saddle first. It is recommended to hold the chain during this operation.Then it is worth picking it up and removing it.
After the preparatory work is completed, you can proceed to the next actions. It is recommended to wipe the area to be repaired with alcohol or solvent.
After that, wipe the place with emery paper, on which the patch should be glued later. This should be done as carefully as possible. Thanks to scraping, the adhesive adheres better than on a smooth texture. This makes the connection more durable.
How to remove a tire from a wheel with your own hands
The most difficult action is considered to be removing the camera from the assembled wheel. This requires proper skills and tools. It is recommended to disassemble the wheel by means of a mounting device or other means. Their role can be played by screwdrivers or keys. Sometimes even coins are used.
To carry out the manipulation, it is necessary to do the following:
- Lower the camera. First, unscrew the coil from the nipple. On high-quality rubber, this is done by means of a groove in the cap. In more affordable products, it is recommended to hold the coil with your hands until all the air is released. Sometimes this procedure is done before the wheels are removed, as the wide rubber will cling to the frame and brakes.
- Select the area behind the bike wheel. It should go from the nipple to the beginning of the bead.
- Place the bead between the tire and the rim. It should point down. When doing so, it is important to try not to touch the inner chamber.
- Step back 10-15 centimeters from the first and drive the second.
- Gently lift the tire until a small piece falls on the outside of the rim.
- Remove the tire with your hands.
- Carefully pull the valve out of the rim groove. Then you can remove the camera.

As a result, it will be possible to obtain a disassembled wheel. His tire should be on the edge of the rim and the free room should be ready to be repaired.
How to quickly find the puncture site
Finding the puncture site can be difficult. It depends on where the puncture is detected. To simplify handling, keep in mind that in 90% of situations, the area affected is located on the contact area of the wheel and the road. This is usually observed no higher than 2/3 of the height of the camera. The exception is rim lesions. Also, a different picture is observed when the tire is damaged by crawling metal wires. Therefore, the following methods will help identify the puncture area:
- Immerse the camera in water. This is the easiest and most affordable way. To do this, it is enough to have a small container, the depth of which makes it possible to lower the camera by at least 2/3 of the height. It must be twisted until air bubbles appear, which will rise. The camera can then be removed, the punctured area can be found, and the repair can begin.
- If there is no water nearby, fine dust can be used. It is often found on dirt roads. The pressure in the chamber must be increased. This will help increase airflow out of the damaged area. Then you need to bring the wheel to the dust, trying not to touch it. The camera should be turned and the coating carefully observed. In the area of the puncture, dust will begin to fly in different directions.
- Place the camera near a wet wrist. It is important to keep the skin moist. This will make your search easier. To make the method more effective, it is recommended to increase the pressure.
- If there is a strong perforation, it can be detected by ear.
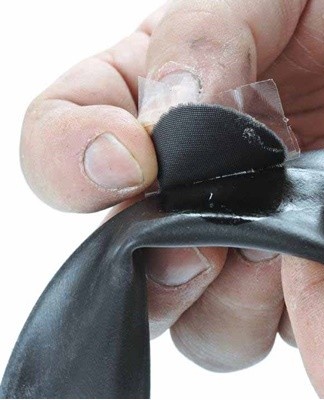
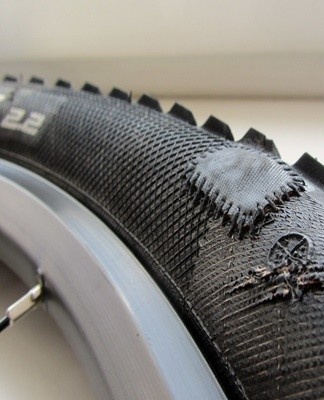
How to stick a rubber patch on a bicycle inner tube
To repair a wheel using a special kit, you need to perform the following steps:
- Remove dirt from the surface and degrease it. To do this, you need to use gasoline or acetone. On the road, just wipe the surface with a clean cloth.
- Sand the product with sandpaper.
- Remove the protective film from the patch.
- Apply glue. In this case, you must follow the instructions on the packaging. The composition covers one or two sides at once.
- Press the patch firmly against the camera and hold it, being careful not to move the parts.

After that, just wait for the glue to harden. This can happen immediately or after a quarter of an hour. Quality kits usually include fast-acting modern glue. However, the standard Moment is often used, which freezes for a long time. The specifics of using the substance are described on the packaging of the repair kit.
In addition to using non-specialized kits, you can use a patch made from an old camera. It is recommended to ensure that the rubber is intact and cleaned properly.
How to wind the wheel
After assessing the condition of the camera, it is allowed to assemble the wheel and put it in place. To do this, you need to follow these steps:
- Look at the condition of the insulating tape in the rim. Usually it is not fixed or moves easily during manipulations.
- Place the tube carefully into the rim. It is recommended to start with a valve. At the same time, it is important to control the absence of creases.
- Fill the tire.At first, it is recommended to slightly inflate the tube so that it does not press against the rim.
It is recommended to fully inflate the assembled wheel for checking, then it is allowed to start installation. For the front wheel, locate the arrow marks on the tire. Sometimes it is complemented by the Drive brand. It indicates the direction of rotation of the wheel. It is recommended to install the product correctly to ensure the normal operation of the protector.
How to avoid punctures in the inner tube
In most cases, punctures can be avoided. To do this, it is recommended to follow these rules:
- When you turn on the camera for the first time, it is important to keep it dry. It is recommended to sprinkle it with talc.
- The tire should be free of stones or other debris.
- Examine the wheel carefully. It should not have protruding spokes. It is important that the safety tape retains its integrity and adheres well to the rim.
- The valve of the chamber must be screwed into the rim perpendicularly. It is important to avoid the fixing curve.
- Experienced riders can see the distance of 5-7 meters while riding. They are able to detect shards of glass, boards, wires, sharp stones. If you can't avoid them, it's better to get off your bike and cross the dangerous section of the road.
- If a bottle shard comes out from under the front wheel, it's worth rocking the bike. This will help prevent damage to the rear wheel.
- Jumping off curbs is not recommended as it puts a lot of stress on the rear wheel. This is especially dangerous when you have a lot of weight.
Sealing a bicycle tube is not that difficult.To achieve good results, you must choose the right repair kit and carefully follow the instructions for use.