DIY step-by-step instructions for making crafts from plastic bottles for the garden
Anything can be made from a plastic bottle. Fans of the Crazy Hands section of the famous morning program are well aware of this. Toys and useful devices are made of plastic. You can make interesting crafts from bottles to decorate the garden: animals, birds, paths, traps and even a gazebo or a pond. To work "according to the method of Andrey Sanych Bakhmetyev" you will need scissors, a plastic bottle and imagination.
Content
- 1 Advantages and disadvantages of using plastic
- 2 General recommendations and instructions for making plastic products with your own hands
- 3 Interesting ideas for giving
- 3.1 The sun
- 3.2 wasps
- 3.3 peacock
- 3.4 Palm
- 3.5 Original flowerbeds
- 3.6 Planters and pots
- 3.7 Alcove
- 3.8 Decorative curtains
- 3.9 Figures of animals and insects
- 3.10 Bird figures
- 3.11 garden path
- 3.12 Sinks and chests
- 3.13 slippers
- 3.14 Against pests
- 3.15 Tool boxes
- 3.16 knee pads
- 3.17 Candlestick
- 3.18 Broom
- 3.19 Funnels
- 3.20 Feeders
- 3.21 Greenhouses
- 4 Master class on creating animals
- 5 Make and decorate the gazebo step by step
- 6 How can you use corks for decoration
- 7 Tips and tricks from experienced craftsmen
- 8 Working examples
Advantages and disadvantages of using plastic
Why choose plastic for crafts:
- it is easy to get it;
- plastic, easy to cut and melt;
- moisture resistant, suitable for outdoor use.
By not throwing away plastic containers, but recycling them into useful and beautiful appliances, you can help protect the environment.
Negative qualities:
- fuse;
- the unpainted fades, becomes dirty;
- retains odors.
White plastic will be covered with dust and streaks after rain, so it is better to take a dark material or paint the product with acrylic paints.
The container should be washed well so that the sculptures in the garden do not attract neighbors and insects with the smell of beer or soda.
The material is not resistant to high temperatures. It is rarely used in the manufacture of lampshades. The plastic cap will withstand a low wattage bulb and melt from a bright bulb. One option is to create floral and leafy decor on heat-resistant glass.
General recommendations and instructions for making plastic products with your own hands
Basic principles of work:
- cut parts out of small containers with a clerical knife;
- use auxiliary materials - pipes, wires, plastic plates, cups, CDs, fabric, plastic bags, metal, corrugated pipes, polystyrene;
- after burning the detail with fire, curls are obtained;
- tree trunks are made according to the same pattern, planting parts on top of each other, the shape of the leaves is different;
- for weight, sand is poured into the sculptures, pebbles are placed.
Crafts and accessories from plastic bottles are a popular invention. You can find an interesting solution or a path of improvement during the independent work of a "crazy" thought.
Interesting ideas for giving
Animal and bird sculptures, farm buildings, flower beds are made from recycled plastic.With the help of a plastic bottle and your common sense, you can clean up the trash in your yard and get rid of moles.
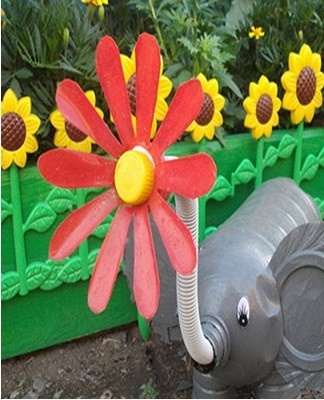
The sun
The sun is constructed from two large bottle bottoms. The rays come from small bottles. They are inserted with their necks into the solar circle. A small sun will come out of the connected bottoms of bottles or a bottom. The combs are cut from the middle of the container and inserted into the slots.
wasps
How to make a simple wasp:
- paint an entire bottle with black and yellow stripes;
- draw eyes on the lid;
- cut out the blades-wings from a transparent container;
- insert into torso slots.
Complicated option:
- connect the rounded and tapered neck together;
- attach a stocking to the smaller neck - you get an elongated head;
- attach the head to the torso.
Color the wasp in stripes. Paint the head yellow and paint the eyes black.
peacock
For crafting you will need:
- a bottle with a volume of 5-6 liters;
- bottle with a capacity of 2 liters;
- 1.5 liter bottles for the tail;
- plastic bags of any color;
- foil;
- stapler;
- Scotch;
- thread;
- acrylic paints;
- varnish.
How to make feathers:
- cut off the bottom and neck of a 1.5 liter container;
- cut vertically and unfold the middle part;
- divide into several strips;
- round the top of each feather-like strip and cut out the leg underneath, for which the feather will be attached to the body;
- trim the edges with a fringe along the entire length of the part;
- cut cups out of bags and foil;
- place a polythene circle in the center of the top of the pen, overlapping a circle of aluminum foil.
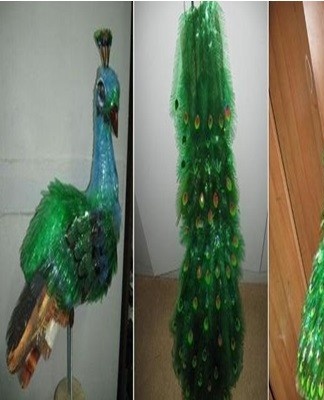
For a lush tail, you will need an average of 26 feathers.From the wall of the bottle you need to cut out a semicircle and attach the feathers in three tiers with a stapler, leaving space at the bottom.
How to make the torso and head:
- cut off the top of the bottle and the bottom of the 2 liter bottle;
- connect them to the cut sides with adhesive tape - you get a torso and a neck;
- remove the wire from the neck, cut and form a funnel with a pointed end - a beak;
- close the wide part of the funnel with a bottle bottom of a suitable diameter and fix it with adhesive tape;
- glue the finished head to the neck with adhesive tape;
- stepping back slightly from the bottom of the bottle, make a slit and insert a semicircle with a tail.

To dress a plastic bird with feathers, you need to cut the bags into strips and lay them in layers. Wrap the muzzle in polyethylene, paint the beak and eyes with paints. For balance, fill the body with sand.
Palm
You will need brown and green 2 liter bottles, wire.
The quantity depends on the height of the palm tree:
- cut the bottom of the brown bottles and insert them into each other with the neck down;
- form the crown from a green container;
- cut off the bottom and cut the middle part into strips;
- bend them in different directions to make palm fronds;
- for structural strength, run a thread through the bottles.
Both thin and thick barrels are made from bottles of different volumes, 6-liter bottles. To make a tall palm tree, the growth of the original, you need to tie several thin "trunks" with wire.
The sheets are formed from bottles cut into strips, which are inserted necks into each other.The remaining funds are strung on a thread, and at the end they put on a piece of a bottle with a neck.
Original flowerbeds
A plastic flower garden is built from bottles without a neck. The bottom figured from above resembles a flower. A multi-colored container is planted in the ground with the cut side. The backgrounds and walls, painted with silver, gold and metallic paint, reinforce the visual effect of a flowery glade. Similarly, they build a fence around the flower bed.
Planters and pots
A bottle cut across gives two details:
- with a neck - cone-shaped pots;
- with a bottom - cylindrical.
By cutting the bottles at different heights, we obtain pots of different depths. A wire and string are threaded through the holes made with a hot punch and hung.
Seedling pots are made from 6 liter plastic bottles:
- put the container on its side and cut out the wall;
- pour soil into the hole and plant plants;
- wrap the pot with knitted corrugated paper with lace fabric.
Another way to make a jar is to make vertical slits in the sides of the bottle and bend the strips outward. Pour soil at the bottom and plant small flowers that will stretch the stems through the gap.
Alcove
For the construction of buildings, bottles of the same volume are required. To keep the plastic house firmly in the wind, earth or sand is poured into it. For fastening, screws and a wire frame are used. The walls are draped in fabric and painted.
From the outward appearance of some kiosks, one cannot guess that they are made of plastic bottles.
Ways to form walls:
- place the bottles horizontally, like logs;
- place the neck or buttocks out of the house;
- put the bottomless containers on top of each other with the neck up, the resulting columns are placed in rows.
By alternating necks and bottoms of different diameters, they create textured walls. An arched open gazebo can be made from cut bottle walls, fixing the plates with screws or a stapler. The overlapping of the brown plates will make a "tiled" roof.
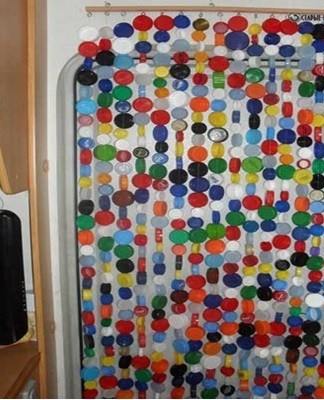
Decorative curtains
Manufacturing methods:
- thread stockings and collars on threads through side holes to make stripes from circles;
- connect the bottoms of the bottles with a checkerboard thread.
Details are selected in monochrome, multicolor, same or different size. Beautiful flower panels are obtained using a checkerboard method. Air curtains decorate the windows, close the house wall from the outside, and use it as a shower curtain.
Figures of animals and insects
Plastic animals are made according to the same scheme:
- the body is formed from a large bottle, the halves of the bottles bound together with adhesive tape;
- the head is made of a neck rolled up in a cone, attached at the bottom;
- legs are obtained from necks with lids, cones, which are inserted with pointed ends into the body.
Legs, wings can be cut from the walls. The easiest way is to make a ladybug: the bottom is the shell, the cap is the head, the wire is the antennae. It remains to paint black dots with paint.
Bird figures
Birds are constructed by analogy with a peacock. To make a long neck, take 3 bottomless bottles, cut the walls into thin strips, fold them up and put them on top of each other.
Two bottles without a cap - a ready-made body for an owl or a parrot.
garden path
From the painted halves of the bottles, glued upside down, beautiful colorful paths, fences along the paths are obtained. A plastic fence can be used to separate flower beds and flower beds with real flowers.
Sinks and chests
To make a travel or garden sink, cut off the bottom of the bottle, turn it upside down, and hang it somewhere convenient. Pour some water inside, slightly unscrew the lid and wash your hands. For convenience, you can integrate a tap into the lid. In such a bottle, plastic bags, paper towels and napkins are stored.
slippers
For the slippers you will need:
- cut linoleum, rubber mats;
- plastic liter bottle;
- silk threads;
- hole punch;
- Hook.
How to make plastic shoes:
- cut out a stencil of the foot from cardboard along the leg;
- cut a linoleum or carpet sole according to the pattern;
- cut two strips of the bottle wall along the width of the legs;
- punch holes in strips along the entire length at an equal distance from each other, round the corners with scissors;
- drill holes along the edge of the sole;
- combine strips and soles, tie with threads through the holes.
Instead of linoleum and a carpet, you can use the sole of old sneakers. The holes on the stripes are decorated with beads, pebbles.
Against pests
How to make insect traps:
- Cut the neck, pour the syrup on the bottom, insert the neck into the bottle with a thread, wrap the trap with paper.
- Cut the windows in the upper part of the container and pour the jam and beer inside.
Mosquitoes, wasps, moths and cabbage spoons fall on traps hung near the house and in the garden.
How to make mole repellent:
- cut off the valves in the walls of the bottle, bend them outward;
- insert a metal tube from below;
- pour pebbles, nuts into the container;
- insert the device into the wormhole.
The wind will rock the device and the roar of the stones will be transmitted through the pipe. Moles are sensitive to noise, so they will leave the site.
Tool boxes
For drawers, flat plastic canisters are suitable. They are laid flat, a wall is cut out. It turns out a box with a neck handle. A bedside table with shelves for them can be made from chipboard sheets.
knee pads
To facilitate the weeding of beds, shields are cut from plastic bottles on the knees:
- from a bottle with smooth walls, cut the top and bottom, cut along - you get a wide strip;
- cut out stencil or eye shields;
- the part should cover the part of the lower leg below the knee and protrude above;
- from the inside, a fabric lining is glued or fixed with a stapler;
- the wide straps and the straps are threaded into the slits on the sides.
The strings should be positioned so that they tie below the knee. Then it will be comfortable to walk, move on the knees. The plastic outer part is easy to clean, so you can work with knee pads after the rain.
Candlestick
For crafting you will need:
- the scissors;
- glue;
- acrylic paints;
- ribbons, beads for decoration.
How to do:
- cut off the rounded upper part with a neck of the bottle;
- paint the room in one color, draw patterns;
- glue a cord border along the edge;
- glue the ribbon to the neck wire.
The scheme for making a New Year's candlestick:
- paint the top of the bottle red or green, you can draw red and white diagonal stripes, like on a lollipop;
- cut stars, snowflakes from foil and glue them to the workpiece;
- decorate the bottom with thin spruce twigs, cones.
You can cut the heads of a deer, a snowman, Santa Claus, Snow Maiden, any character out of cardboard, paint and put up double-sided tape.
To make voluminous candlesticks, it is good to use scrapbooking trimmings.
Broom
Materials and tools needed:
- 9 bottles of 2 liters;
- handle of an old mop, broom;
- thread;
- 2 screws;
- 2 self-tapping screws;
- Screwdriver;
- paper cutter;
- the scissors;
- punch.
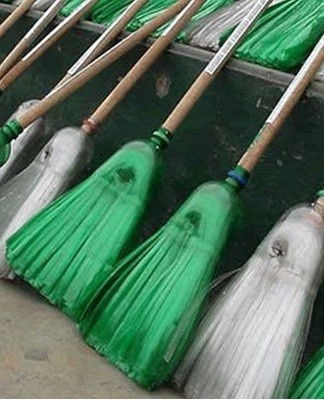
Manufacturing instructions:
- cut the threaded neck and the bottom of a bottle with a knife;
- cut the middle into strips 1 centimeter wide, leaving 6 centimeters intact at the top;
- do the same with the rest of the containers, except for the last two;
- cut off the bottom of one of them and cut the middle into strips;
- put all the other parts on one part with a collar - you get a whip;
- cut the last bottle in half;
- on the upper part, make two notches facing each other to the middle;
- put the top on the panicle;
- make two opposite holes in the solid part of the panicle with a red-hot punch;
- fix the layers with screws.
Insert the handle into the neck and secure it with self-tapping screws. The broom is ready.
Funnels
The cut top of a plastic bottle with a neck is a ready-made funnel. It is inserted into bottles with a wider opening.
To pour liquid from containers with the same neck diameter, make a special funnel:
- a flat top is cut into two caps;
- connect them with insulating tape - you get a wide waterproof jumper;
- on one side, a funnel is screwed into it;
- the other side is screwed to the container in which you want to pour the liquid.
To make a funnel for a very narrow hole, you need to cut the cordless neck lengthwise and roll it up with a cone, leaving a hole in the sharp top of the required diameter. Secure the walls with glue or a stapler.
Feeders
A simple option for making a feeder: cut a hole in the wall of the bottle, drill holes in the neck, thread a string and hang it on a tree branch.
To make a practical bird feeder, you will need:
- a bottomless bottle;
- plastic plate;
- wooden or plastic sticks;
- rope.
Manufacturing diagram:
- cut the lower edge of the bottle figuratively into rounded waves;
- punch two holes in the plate with a hot punch;
- thread a string through them, pass it through the container and fix it on the neck - you get a pallet on which food will be poured through the cutouts;
- make holes in the walls of the bottle at different angles;
- insert the sticks so they go through the bottle and stick out like perches.
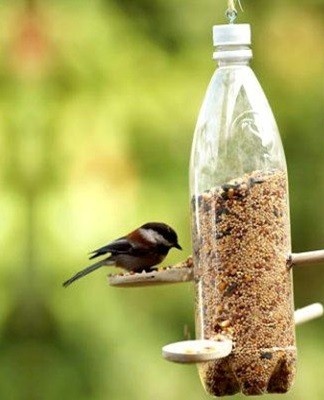
Instead of a plate, a container with low sides or a bottle bottom with a larger diameter will do.
To protect birds from rain and snow, you can attach a "roof" from the bottom of a 5-liter bottle to the top.
Greenhouses
The greenhouses are constructed from plastic bottles with no bottoms or straightened middle parts of the bottles. To build a greenhouse wall, the container is strung on a wooden or metal rod.Then they build a wooden or metal frame, insert the rods so that the bottles fit snugly against each other. The plastic sheets are ironed through the cardboard to align. Then they are sewn with an overlap with a cord thread or fastened with a stapler. For greater strength, the roof is covered with several layers of sheets or polycarbonate is laid.
Master class on creating animals
To make a beautiful cat, you will need:
- 13 x 2 liter dark bottle bottoms;
- 8 necks with lids;
- strips of bottle walls;
- flexible thin pipe;
- thread;
- glue;
- white acrylic paint.
Work scheme:
- cut the edges on 9 wave bottoms, cut into small fringes, make a hole in the center;
- hold the stove over the lit burner so that the fringe curls up - you get wool;
- cut the ears from the bottom triangular ribs;
- connect two bottoms with even edges with cuts, inserting ears between them;
- in the remaining part, make a hole in the center, insert a flexible pipe - tail;
- cut long teeth into 4 necks, flame, make holes in the eyelids;
- cut the strips with a fringe on one side.
Torso assembly:
- thread two glued parts on the wire;
- screw two wires for the legs and one for the head;
- thread the following parts and glue;
- tie the threads for the hind legs before the last piece;
- tie a part with a tail on the back;
- put your head and fix with glue;
- glue the pipe tail with an overlap with fringed strips;
- grease the uncut necks with glue, insert into the leg parts with the covers outward;
- put the resulting legs on the wire and glue them above to the body;
- paint to highlight ears, mustache, ragged edges.
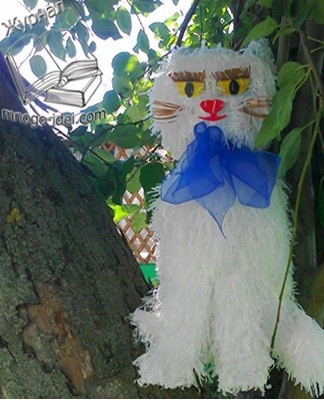
The plastic cat is ready.
Make and decorate the gazebo step by step
For the construction you need to collect 400-500 bottles of 0.5 liters, of the same color and shape. Pour sand into the container to weigh it and close with corks. Bottles will replace bricks.
Instructions:
- dig 4 metal support pipes in the cleared area;
- cementing the foundations of the supports;
- lay out the bottoms of bottles in layers outward or inward, plastered with cement;
- tie each row with wire to the brackets;
- arrange the bottles in a checkerboard pattern;
- fix the metal corners above the brackets;
- put a roof of plywood sheets.
The polycarbonate roof lets in more light. Any lightweight material will do. It is also easy to make furniture for a gazebo from bottles by placing them vertically, folding them horizontally and wrapping them with tape. The floor can be decorated with mosaic covers.
How can you use corks for decoration
Mosaic panels are laid out from the covers. To calculate the number of necessary traffic jams, they base themselves on the embroidery pattern. You can also make a curtain, a rug from the blankets and decorate the lampshade with them.
Tips and tricks from experienced craftsmen
Before starting work, the container must be cleaned of labels. So that there are no traces of the label, you need to soak the bottle in warm water for a couple of hours. The paper will come off easily. When painting animals, it is more convenient to apply the main color with spray paint and cover it with transparent acrylic on top. Large parts are painted before assembly.Small elements are cut out according to a cardboard template, painted after assembly.
In addition to acrylic, enamel and stained glass paints are used for painting.
Working examples
The thin food grade plastic is suitable for making all kinds of crafts. The finished carvings show no bottle origin.
Interesting examples:
- a colored cork panel representing poppies;
- snowmen from bottles with the bottom facing outwards;
- a two-bottle owl with CD eyes;
- garden pond with inverted bottom water;
- a beehive consisting of a bottle painted with yellow paint with a split entrance and a thatched roof made of broom;
- cat jars with ears cut into the bottom of the bottle;
- hanging utility bottle pockets with a round opening in the top half and a hook in the lid;
- a feeder from a 5-liter bottle with slots.
Crafting plastic bottles is creative work that doesn't have clear instructions. When composing a model of an animal, bird or building from different parts, spatial thinking works. Building houses from recyclable plastic develops children's creativity and fine motor skills.
If there are a few plastic bottles in the house, the child will still receive crafts for school.