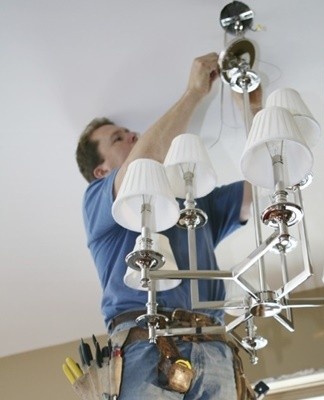
Step-by-step instructions on how to properly hang a chandelier from the ceiling
The difference in options for chandelier fastening elements and design features cause a number of difficulties for many. If you want to repair the light source yourself, you need to figure out in detail how to hang the chandelier from the ceiling.
Coaching
When you plan to hang a chandelier, you need to prepare properly. Before proceeding with the installation of the light source, you will need to find a set of tools and carefully read the sequence of work.
Ladder
A stepladder is an integral part of the installation work.It is important to choose a ladder of such a size so that it is comfortable to reach the ceiling and you do not have to get up. It is better to choose a step stool with a support on top, on which you can comfortably lean on your elbows when lifting the luminaire.
Electric hand drill or hammer drill
A hammer drill or power drill is used to attach the mounting strip to the concrete ceiling. The bracket is applied to the ceiling surface and marks are made at the drilling points. To make the job easier, it is recommended to use a dust proof hammer drill to help reduce waste when drilling a ceiling.
Otherwise, you can use the vacuum cleaner, remove the handle from it and replace the hole with the crumbling dust.
Pliers and cutting or side cutting pliers with insulated handles
The need to use pliers with insulated handles is due to the connection of the wires during the installation of the luminaire. The tool helps you easily handle wires and perform various other actions with maximum safety.
Various screwdrivers
To attach the fasteners, you will need screwdrivers with different sizes and types of bases. It is recommended to take several Phillips and flathead screwdriver options.
Multiple mounting blocks
Mounting blocks are a type of terminal block. Attachments are required when working with fixture wires.
Fixings required
There are several types of chandelier brackets. As a rule, the fixing element is supplied with the luminaire. When choosing and buying a device, you should immediately pay attention to the type of fasteners in order to take into account other features of the installation work.
Study instructions
Having prepared a set of tools and accessories, you can familiarize yourself with the instructions. Printed installation rules can be supplied with a chandelier. Otherwise, it is recommended to study the basic steps of the process to avoid common mistakes.
Types of fasteners and how to do it yourself
Different types of fasteners have distinctive characteristics and design features. The installation process of the luminaire depends on the chosen support.

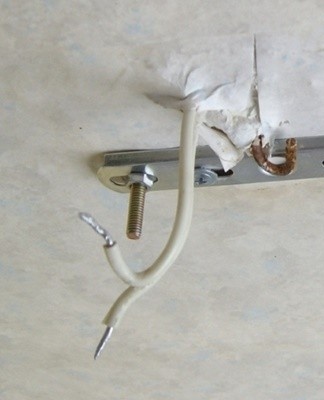
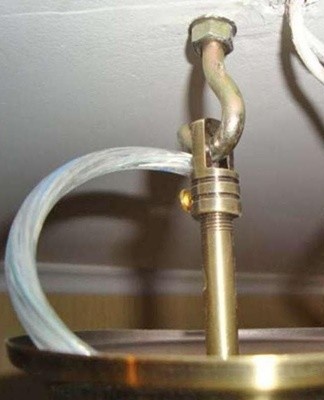
Hinge on reinforcement
The hinge on the fixture allows you to hang the chandelier from the built-in hook. This mounting option is the most common. The base of the hinge should be very secure. In particular, concrete floors are suitable.
As a rule, a hook for mounting lighting fixtures is built into the ceiling even at the stage of initial construction work. Before fixing the loop, it is recommended to check the load bearing capacity of the hook. For testing purposes, a load of the same weight or slightly heavier than the chandelier is hung on the installed hook for several hours. If the fixed weight does not move, you can start working on securing the chandelier.
In the event that the hook is moved from its original position or falls from the ceiling, you must do the following:
- drill a hole for a new fastener with an awl, if this was not done earlier;
- inserting a suitable metal pin or pin with a ring and a spring into the hole so that the element is in close contact with the interior surface of the hole;
- when working on a wooden ceiling, screw a self-tapping hook into the wood without making a hole first.
If the ceiling is lined with plasterboard or a tension structure is used, the work of attaching the loop to the hook becomes more difficult. Drywall is a durable material, and it is possible to attach the fastening element to the sheets only if the chandelier weighs no more than 6 kg. When installing a plasterboard ceiling, it is recommended to think over the nuances of lighting in advance and make a hole under the installed hook.
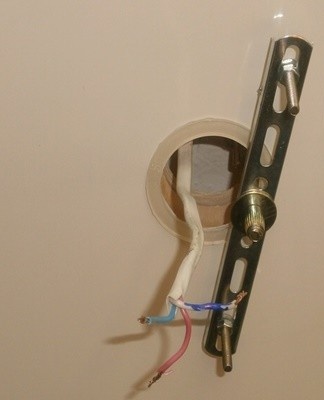
Fixing the ceiling chandelier to a bracket or a special mounting plate
Attaching to a specially designed mounting plate or bracket differs from using a hinge by distributing the load. In this case, the pressure of the weight of the luminaire is distributed in several different points. The bracket is attached to the ceiling using dowels with self-tapping screws screwed into them. It is important that the weight of the chandelier does not exceed 2 kg.
Crossbar or double perpendicular
The transverse or double perpendicular bar is intended to hang the light source adjacent to the ceiling. A common option is the ceiling chandelier, often referred to as a ceiling suspension. The design of the cross is similar to that of the bracket and differs only in the large number of points where the fasteners can be attached.
Reliable I-beam platform
The sturdy I-beam platform allows the installation of a large chandelier with a large mass. When using an I-beam platform, ties can be attached at multiple points. An I-beam is a standard cross section beam, which is a type of high quality laminated metal.
For production, high-quality steel profiles are used without alloy additions or with their minimum content.
I-beams have different weights and dimensions.To divide the beams into categories, numbering and marking are used, which simplifies the choice of material, taking into account the planned load on the structure. Due to the strength and reliability of the material, I-beams withstand external factors and increased loads.
Butterfly
The butterfly mount is rarely used to mount light fixtures because it can only support very light chandeliers. The butterfly is fixed directly to a surface made of plasterboard or plastic panels. Heavy-duty hanging chandeliers are attached to more durable, stress-resistant fasteners.

Features of installation in difficult cases
In a number of situations, it becomes difficult to install a light fixture on the ceiling. To avoid mistakes and avoid malfunctions of the light source, you should study the procedure for different cases of problems.
Low ceiling
The process of installing a chandelier on a low ceiling follows the standard scheme. The main challenge lies in choosing the right luminaires. The illumination of the space and the visual perception depend on the correct choice of lamps. The selection criteria are as follows:
- Suspended structure. It is recommended to give preference to the method of fixing to the overlap. If you hang the chandelier in a different way, it will take up a lot of space and be inconvenient.
- Direction of luminous flux. The horns should be directed upwards so that the lighting is diffused and even. These types of chandeliers are not suitable for all types of ceiling coverings, so as an alternative you can use LED lamps that do not heat up during operation.
- Lamp power. Rising heat can create dark spots on the concrete ceiling.Panel coatings are also sensitive to heat.
Plasterboard ceiling
Drywall is very durable, and the installation of the chandelier is carried out directly on the finishing material. It is not necessary to pre-embed the hook in the ceiling. When installing, it should be borne in mind that the plasterboard can withstand a mass of up to 6 kg per square, therefore it is worth choosing lighting fixtures with a relatively small mass.
Tension
When installing the tension material, you must first think about how to fix the chandelier. A stretch ceiling cannot be used as a base for a light fixture. Before installing the stretch ceiling, you need to make slots for fixing the fixture and glue the thermal insulation ring. The connecting wires are pulled through the hole, the chandelier is hung on a hook and covered with a protective cap.
no hook
Methods of fixing the chandelier without a hook depend on the materials from which the ceiling is made. For trim, a large hook screw can be used instead of a hook. The screw is screwed to the ceiling and the luminaire is hung on it.
On a plasterboard ceiling, you can use a butterfly bracket. This option is suitable only for a small luster weight. Large and heavy light sources can only be attached to the main ceiling, which is a concrete slab.
old wiring
To connect lighting devices, old wires can be laid without a specific scheme. Damage to the braid while drilling the hole may cause a short circuit.
How to properly connect to the network
In order for the chandelier to work properly, you must correctly connect it to the mains. During the connection process, you need to take into account a number of rules and nuances.
One button switches
The connection of the switch to a button is made through the junction box. The wires are fed into the box from the shield, the switch and the light source itself. A phase wire is connected through the switch. The phase wire in the socket is connected to the center contact to reduce the risk of touching the phase.
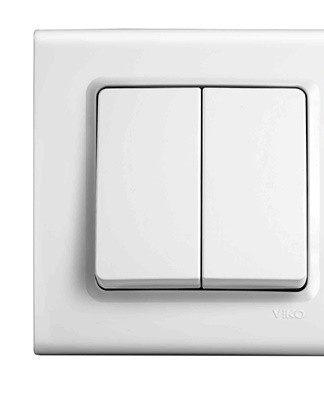
Two-button switches
The connection scheme of a two-button switch practically does not differ from working with one-button switches. According to the mechanism, a two-key switch represents 2 single-key switches, enclosed in a single box.
The double switch has 3 contacts - common input and 2 separate outputs. One phase of the junction box is connected to the input and the outputs are used to turn on the lamps.

Using the phase indicator
When installing the chandelier, you need to check the phasing of the wires. To check, use a special device - a phase indicator. When checking the phasing, they touch the metal terminal of the device with their thumb and touch the wires with the prick of the indicator. If the wire is in phase, the device will display the corresponding indicator.
How to find the wiring
Before you start drilling the holes for the fasteners, you need to find a place for the wiring. For this task, it is recommended to use an electronic device with an indicator. The instrument is guided across the ceiling in a perpendicular direction and marks are made when the phase icon appears on the screen. Then they continue and re-mark when the icon disappears. Dragging the indicator in the opposite direction, make similar marks. The wiring passes between the marked places with an error of 1-2 cm.
Alarm
If there is no marking on the wires, you will need to make a dial. For this, a universal tester is used. To make a dial, you need to screw in lamps of the same brand and feed them into all sockets.
Security engineering
Self-connection of any type of lighting devices involves high-voltage operation. For this reason, you should follow standard safety rules and precautions:
- Turn off the power to the room where the light source is to be installed. A stop must be made in the switchboard, because pushing the switch will not be enough to ensure safety.
- Test and disconnect the conductors to avoid accidental contact with each other. When testing the wires, they must also be de-energized.
- The connection of the wires must be carried out using terminal blocks. A simple insulating twist does not provide an adequate degree of security.
Fixture Removal
The process of dismantling a luminaire requires the sequential execution of a number of steps. In particular, you need:
- switch off the electricity on the distribution board;
- prepare terminal pliers, indicator screwdriver and other tools for work;
- remove individual fragile elements of the chandelier, including light bulbs, ceiling, decorative glass parts;
- unscrew the decorative cap, under which the junction of the wires under the ceiling is hidden;
- when placing the chandelier on the hook, disconnect the wires and remove the fixture, and when fixing on the bar, loosen the mounting bolts, insulate the bare cores and unscrew the chandelier.
Special chandeliers
Some designs of chandeliers create difficulties during installation and disassembly. For example, a plate-shaped chandelier is considered a special option. To remove the plate chandelier, you will first need to find the bolts with which it is attached to the ceiling.As a rule, the fixings are slightly recessed in the ceiling. To unscrew them, use a Phillips screwdriver and hold the device with the other hand.
Functional check
After installing the chandelier, you need to check its performance. You need to turn the electricity back on at the board first, then flip the switch.
Tips & Tricks
Without practical experience, it will be difficult to hang the chandelier yourself. Before you begin, here are some tips and tricks to consider:
- before installation, you need to check the reliability of the fastening and make sure that it can withstand the weight of the chandelier;
- familiarization with the instructions will help to avoid common mistakes;
- if you have old wiring, it is better to check its condition and, if necessary, lay a new set of wires;
- depending on the design features of the luminaire, the fixing methods change, so it is important to know the type of chandelier.