Diagram and step-by-step instructions on how to assemble a crib with your own hands
A crib is the most important thing in a child's room. As a rule, future parents acquire it in the first place, preparing for the birth of a child. The bed can be bought ready-made or rented from a master to assemble it, but you can also save money by assembling it yourself. Let's see how you can assemble a baby bed yourself.
Varieties
Different types of cribs differ from each other, first of all, in terms of reliability and service life. You should take a responsible approach to choosing a crib so that it lasts as long as possible and does not endanger babies.
Cradle
A crib is ideal for a newborn. Your baby will sleep more comfortably in a small crib than in a large bed.Such a bed takes up little space, it can be freely moved around the room. However, it should be remembered that the crib is suitable for a baby under six months, and he will need a more spacious bed when he starts to stand on his legs. Many parents use a stroller carrycot instead of a bassinet. In their form, the crib resembles a mother's belly, so a newborn baby will be calm and pleasant to sleep in such a crib.
Spacious structures are not so suitable for a baby - it is always unusual and uncomfortable for him to be there.
Among other things, the cradle can be easily placed right next to the parents' bed so that the mother can hear the child's call at any time. In addition, thanks to its lightness, the cradle can be transported anywhere and anytime without disturbing the child's sleep.
Classic
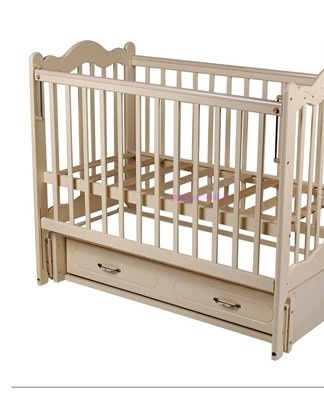
The classic crib design will fit into any room design. These cribs are usually quite simple and functional. The sleeping place is fenced on all sides with mesh walls, one of which can be dismantled. Most conventional cribs are designed for children under three years old.
Transformer
The advantages of transformers are the ability to adjust the size of the bed depending on the height of the child. Therefore, such a bed is characterized by an increased service life. Transformers also have shelves for diapers and bottles. Thanks to the sides, the baby will not fall out of bed during sleep. Most models have a built-in mattress and storage cabinets.

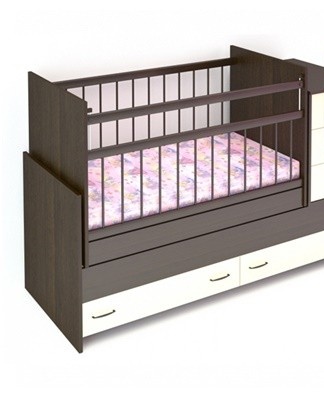
The disadvantage of such models is the tangible weight, which creates inconvenience when moving. Moreover, they cannot change the width - an increase in space is possible only along.The shelves of the transformers are small, so it will not be possible to put absolutely all the baby's things there.
Arena
The arena is a special folding structure. The parks are suitable for children from six months to three years old. As a rule, playpens are made from lightweight materials such as plastic, metal, fabric, due to which they are lightweight and easily moved from place to place. Playpen models are equipped with a protective net that will protect the baby from midges and mosquitoes.
A playpen is a lightweight type of bed, so it's quite easy to move it from place to place. It is usually equipped with wheels to move around the house. It will be easy for a young mother to move the cradle with the baby without help, without distracting the baby from sleep.
The playpen has a foldable structure, it can be easily folded so that it does not get in the way when cleaning. The bottom of the frame is stretched fabric, so there is no need to buy a separate mattress for it. The surface of the fabric is smooth and soft, which will have a beneficial effect on the child's posture. The maintenance of the bed is very simple, because the fabric elements can be easily removed and installed in place, they can be washed at any time.
How to assemble
The crib assembly process should be taken with full responsibility. The bed should be built strong and sturdy to support the weight of children and not harm children.
Tools
For assembly you will need the disassembled bed itself, bolts, dowels included in the kit, as well as screwdrivers of suitable sizes. In the process, you need to check the instructions for your model.
Preparation of parts
It is better to immediately assemble the cradle directly in the nursery, so that later there will be no problems with dragging the finished structure.Unpack the box and make sure that all the pieces of the future structure are present in place. Carefully study the instructions for your model, paying attention to the assembly recommendations.
Checking the condition of each part
Check, according to the instructions, that all the details of the future design are present in the kit. Check the condition of the structural parts. Make sure the parts are not damaged.
Support fasteners
Place the base with the inside facing up. Brackets should be attached so that they point inwards. On some models, the brackets are already attached to the top by default. For a small child, the base of the crib should be placed high. Babies six months and older need lower cradles.

Fixing wheels
Now you need to fix the casters. It is necessary to guide the axles of the wheels into the brackets on one side of the structure and attach the wheels to them. Sometimes the pins are not initially fixed on the wheels, so we fix them manually with screws. On some models, the rollers are already attached to the side panels.
Fixing the mattress
Then you need to attach the support panel. Install the two parts of the base with screws. Supports may be needed to connect the parts. The height of the support part for children of different ages is different: for babies under six months we fix it higher, for older children we lower the support part down.
Review
After installing the support board, attach the wheels to the front. Check the reliability of the resulting structure. The bottom must be secured so that it can be moved vertically. Place the mattress on a support board.There should be a small distance between the side panel and the mattress, no more than two fingers thick. Regularly check the structure for sharp edges or play.
Features of the pendulum assembly
The main difference between the pendulum cradle and the others is that you can rock your baby in it. The structure sways with a push and cradles the child. This will be useful at the very beginning of the baby's life and will save the parents from having to rock him in their arms every time.
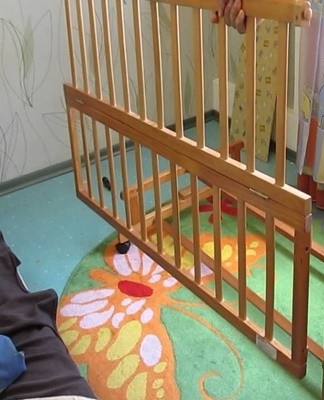
Installation of the fence
The assembly of the structure begins with the installation of the sides. Using screws, we fasten the side, bottom and headboard to each other.
Mounting the stock
The boards are inserted on the back and on the front wall. Screws are screwed into the support board.
Installing the bottom
When installing the support piece, properly adjust its height. For a baby, the mattress should be positioned higher to make it easier to put him to bed. As the child gets older, the mattress should be lowered.
Fixing the lower back of the pendulum
The backrest is installed from below and fixed with screws.
Pick up the box
Assemble the hinges, secure them with nuts to the base of the pendulum. If the model has boxes, they must be installed and fastened, as indicated in the instructions.
Put the box in the pendulum
The housing is mounted on the base of the mechanism. We fix it on the legs of the structure, insert the nuts. We fix the sidewall. We put bearings. We cover the screws with caps.
Scheme of assembly of a bed on hinges
The process of assembling a bed on hinges is divided into several stages.
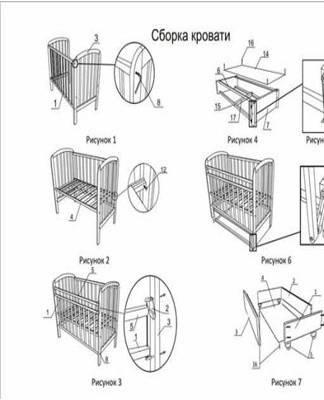
- Fundraising.
- Installation of front and rear walls.
- Installing the bottom.
- Side wall installation.
- Installation of clamps.
Instructions for assembling the transformer cradle
The transformer-type bed will allow you to manually increase the sleeping space at any time, thanks to the possibility of removing the bedside table. This design consists of a bunk, a table, a bedside table and a chest of drawers. The bedside table and the table can be detached, thus increasing the bed itself.
Frame assembly
First, we attach the guides to the side backs and connecting partitions of the future design. Assemble the frame. First we fix the rear part and the connecting partition, then we install the right and left backrests. At the end, it remains to screw the front of the cradle to the frame structure.
Pin down the middle
We adjust the bottom of the cradle, again, depending on the age of the baby. For newborns, a high sitting position is optimal; for older children, the bottom goes lower.
Assemble a chest of drawers or wardrobe
We collect boxes from the bed transformer. We connect the walls of the box, nail the bottom, fix the guides. Insert the finished box into the frame.We get the chest of drawers back. We connect the back and side of the chest of drawers together. Two plates with holes for self-tapping screws are installed under the cover. Two identical boards are screwed to the base. Install the guides for the drawers. As a rule, markings are provided under the guides on the walls of the dresser. Following the markings, we fix the guides to the walls.
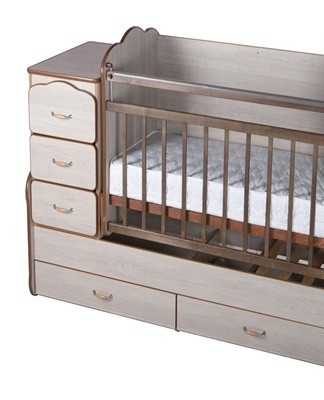
We connect the back and the walls of the structure together. Preparation of the base for the pendulums. We screw the bolts into the prepared holes and fasten them with nuts. We install the chest of drawers on the frame. We fasten the chest of drawers lid with self-tapping screws.
Installation of grids or restraints, headboard, top bottom
We make blanks for the pendulums on the back of the cradle. We put our backs. We collect the slats. Install the remaining construction details. We fasten the folding side of the cradle.
Lower assembly
We fix the bottom of the structure with screws.
Tips & Tricks
Make sure the crib parts are made from environmentally friendly materials. Also, they should not have sharp corners, so as not to injure the baby. Regularly check the structure for the stability and strength of the fasteners, do not let it loosen. Clean the bed periodically with mild cleansers and water.
If you are assembling a pendulum bed, make sure nothing is near the bed, as foreign objects will interfere with the rocking of the crib.
Among the pendulum varieties, there are beds with transverse or longitudinal tilting. Longitudinal tilting is considered more beneficial for the health of the baby, since his head does not swing from side to side, which negatively affects the vestibular apparatus. Pendulum mechanisms should be lubricated from time to time so that they do not creak and wear out. Care should be taken when choosing a crib with a folding side wall. Despite the fact that this design is easy to use, the belt may fall off and injure the baby. It is necessary to securely fasten the door leaf or purchase the classic version, without a descending wall.