Instructions for creating and laying garden paths using forms with your own hands
Garden paths can be made with your own hands using forms. Ready-to-use stencils are sold at hardware stores. They are poured with concrete. If you wish, you can make the casting mold yourself. In this case, you get an original element for the pavement in the garden. True, you will have to work hard and do several of these details so that it is enough for the entire length and width of the garden path.
Advantages and disadvantages of the method
Paths to your own summer cottage can be made from any purchased materials: paving slabs, timber cuts, clinker bricks, natural stone, paving stones. It is true that they are expensive. It is easier to buy cement, form and make paths yourself using the pouring method.
Pour the concrete solution into the finished stencil. The form can be made independently, from scrap materials. In this case, you will only have to spend on the purchase of M500 grade cement.
The advantages of homemade tracks:
- minimum financial costs;
- can be done by one person;
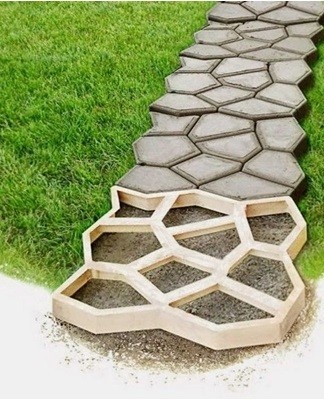
- paths made of shapes look like a cobbled road;
- forms can be used multiple times;
- you can create your own form based on your individual design;
- the concrete pavement has a long service life;
- the installation process only takes a few hours.
Disadvantages of the method:
- the concrete coating is inferior in appearance to natural stone or tiles;
- dyes will help improve the color of concrete, but they are expensive;
- to make a long track, you will need to purchase 2-3 forms or make several stencils;
- The concrete mix “sticks” in 3 to 6 hours, but it will be possible to cover the path on foot in 23 days;
- when laying the road surface, you cannot use the vibrating plate;
- to give strength, concrete can be reinforced with wire mesh.
How to do
You can create a garden path for your garden yourself. To do this, you need to prepare a cement-sand mortar and create a form in which the concrete mixture will be poured.
Proportions for the preparation of the concrete mortar:
- cement grade M500 - 1 part;
- river sand - 2 parts;
- aggregate for strength (crushed stone, gravel) - 2 parts;
- plasticizer;
- water (so that the solution resembles thick sour cream);
- coloring pigments;
- stone chips to imitate natural stone;
- resistance additives (propylene-based fiber).
Silicone
The mold for casting the paving slabs can be made of silicone. It is sold at any hardware store in an aerosol can. The silicone exactly repeats all the irregularities of the sample.
To make a small form (30x30 centimeters), you need to purchase at least 6 packs of silicone.
How to make a tile using a silicone mold:
- take a piece of embossed cardboard or tiles imitating natural stone;
- build a wooden crate according to the sample size "plus" 2 centimeters in stock;
- put the sample in the box, brush the surface and the walls of the box with soapy water with a brush;
- cover the sample with silicone, fill the entire space of the box, level the silicone on top and cover with a sheet of plywood;
- let the silicone dry (1-3 hours);
- remove the mold from the sample, grease it with oil and fill it with concrete.
Made of metal
A concrete casting mold can be made from metal drum hoops. The metal can be shaped or bent as desired. Concrete mortar is poured into a homemade stencil, oiled with machine oil and left to dry for 3-4 days.
The form itself is placed on a sheet of metal covered with a film. Then such a stencil is removed and used a number of times. The height of the mold should be at least 3 centimeters.
In wood
You do not have to spend money on buying a ready-made stencil for pouring a garden path, but make it yourself from wooden blocks. Also, the factory shape has standard dimensions that may not be suitable for trail making.
How to make a walkway with wooden blocks:
- make a formwork from interconnected bars in the form of a square or rectangle;
- the length of the bar can be from 25 to 50 centimeters;
- the thickness of the concrete slab depends on the height of the bar (at least 3 centimeters);
- the middle form should be greased with machine oil;
- put on a sheet of plywood or metal;
- put a film at the bottom of the form, lay out decorative elements (pebbles, crushed stone, broken tiles);
- pour the formwork with a cement-sand mixture;
- install, if necessary, fittings (drown in the solution);
- wait 3-4 days for the concrete to harden;
- the day after pouring, the concrete must be sprinkled with water and covered with a film;
- in the first week after pouring, the surface should not dry out.
Made of plastic
A plastic bowl is suitable for making a round element. It should be well washed, dried and lubricated with machine oil. A concrete mix is poured into a plastic mold and left to dry for 3-5 days. Every day, the concrete is sprinkled with water. Then the concrete element is removed from the basin and a new filling is carried out.
From scrap materials
A stencil for filling can be made from any material at hand. For example, you can take rectangular or round children's sand molds, lubricate them from the inside with machine oil and fill them with concrete. You can mold an element from a concrete solution using a baking dish, plastic wrapper from sweets, cookies. You can coat the burdock leaf with a cement-sand mortar and leave to dry. You will get a beautiful element for decorating a garden path.
Selection criteria for finished products
A wide assortment of road surface elements is sold in construction stores: slabs of all shapes, sizes and colors, clinker bricks, cobblestones, natural and artificial stone.
Materials for the construction of paths on the personal plot are chosen taking into account:
- terrain - a hilly area should be equipped with steps;
- garden style - timber cuts are suitable for the country, paving slabs, curbs will help to recreate the classics;
- soil condition - clay and loamy soils with excess moisture become mobile, for the device of the path you need to purchase a geogrid;
- future load - a hard surface is chosen for the entrance of vehicles, a sidewalk can be plastic or pebble;
- architectural features - the color and style of the road surface should be in harmony with the facade of the house.

The elements for road surfacing sold in stores are hard (natural stone, decking, clinker bricks, slabs) and soft (pebble fill, gravel, crushed stone, sand, tree bark). On sale are rubber plates, plastic modules.
Rubber and plastic elements are suitable for arranging a footpath.
How to fit properly
First you need to choose a place where the track will pass. On the site you need to make markings, drive pegs into the ground, tie them with a rope. Measure the width of the path using a tape measure and a rail.
How are the elements of the road laid:
- dig a trench 25-40 centimeters deep at the marks;
- make a base for the road surface with a slight slope for water drainage;
- the bottom is tamped and covered with a layer of crushed stone 10-15 centimeters;
- a layer of sand 5-10 centimeters high is laid on top of the gravel;
- crushed stone can be poured into the geogrid, then the base under the road surface will not move, will be washed away by water;
- the base must be carefully tamped;
- the sand should be moistened with water and the elements of the road surface should be laid on it;
- the gaps between the elements should be covered with sand and sprinkled with water.
How to fill up:
- in place of the marking, they dig a trench 35-45 centimeters deep;
- a layer of crushed stone, gravel (20 centimeters) and sand (10 centimeters) is poured on the bottom;
- the base is well tamped, leveled, make a slight slope for the flow of water;
- sand is poured abundantly with water;
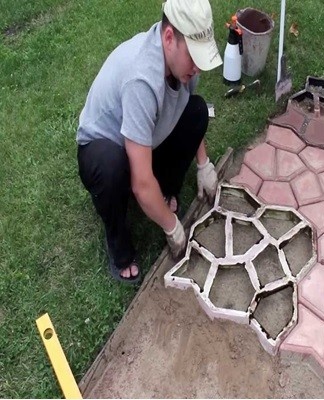
- a mold for pouring is installed on top;
- the form is poured with concrete;
- the surface is well leveled;
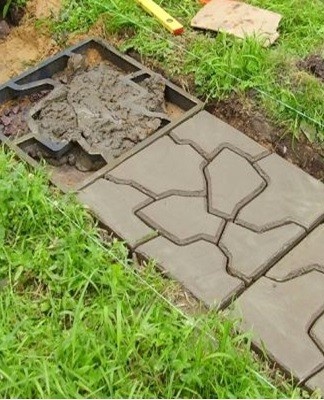
- when the concrete "sticks" (after 3 to 6 hours), the mold is removed and a new pour is launched;
- a wet surface can be rubbed with a mixture of cement and dye;
- the next day, the concrete is sprinkled with water and covered with foil;
- over the next 5-7 days, the concrete should be irrigated daily with water.
Original ideas to offer
With the help of garden paths, you can landscape the surroundings of the house, pave the paths to the outbuildings and all the functional areas. The road surface should be in harmony with the facade of the house and the design of the garden.
Interesting options for organizing the track:
- Made of large brown rectangular slabs. Wide concrete slabs (35x55 centimeters) can be laid along the entire length of the garden path within walking distance. Pebbles or gravel are poured into the sides.
- Made of irregularly shaped gray concrete slabs. The gray concrete slabs can be arranged next to each other in three rows and give the path a winding shape. Leave a small space between the elements. The seams are filled with sand or earth. Along the sides of such a path, you can plant plants, shrubs and trees.
- From a wooden saw cut. Tree cuttings can be laid in 1-2 rows within walking distance. Free space can be sprinkled with sawdust, pine needles or sand.
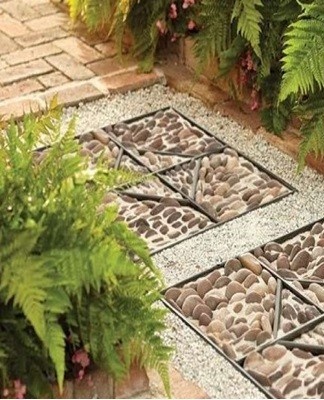
- From concrete blocks and obtained using a form of imitation stone.Wide slabs of gray concrete can be combined with a slab made by pouring concrete into a shape that mimics stone masonry. A 0.5 meter wide flat slab is placed at each simulation meter. Then, from such slabs, steps can be made to climb the hill. When the terrain becomes flat again, you can continue to lay out flat slabs in turn and the resulting imitation of concrete under a stone.
- From concrete slabs in the form of a trace. Huge concrete footprints can be spread along the way. Free space is sprinkled with sand or sawdust. Such a path can lead to a vegetable garden, a garden, a reservoir.

Working examples
On the garden plot you can make any path you want, taking into account the style of architecture and garden. For the arrangement of the road surface, ready-made materials are purchased. True, it is cheaper to make the tile yourself, from mortar and concrete formwork. You can buy a stencil at a hardware store or make your own from any material you have at hand.
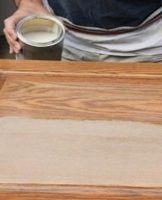
The main thing is to lubricate the mold with oil before filling.
examples of decorating garden paths:
- Incandescent stones. Pebbles can be painted with fluorescent paint and varnished on top for outdoor use. The colored stones will glow at night. You can sprinkle them on the sides of the path or scatter them across its width.
- Composed of concrete circles of different diameters. The concrete solution can be poured into round shapes of different diameters. Once dry, they can be used to decorate your garden path.Large circles are arranged in a zigzag, between them circles of smaller diameter are stacked. Free space is sprinkled with sand or earth and sown with undersized grass.
- Mosaic tiles. A 5 centimeter high layer of concrete is poured into a round plastic bowl, oiled with machine oil. When the concrete has a little "grip", a spiral is drawn on the wet surface, coming from the center. A mosaic is laid out in the direction of this line. Any ornament can be arranged. Previously, the mosaic elements should be laid out on a plywood sheet. After laying the pattern, the concrete is sprinkled with water, covered with foil and left to dry for 3-4 days. Then the circle decorated with mosaics is taken out of the basin. In total, you need to make 10-20 such circles. The concrete elements are laid on a cushion of rubble and sand against each other or in a zigzag pattern.
- Made of multicolored diamonds. A square mold for pouring concrete can be delimited by wooden slats so as to form diamond-shaped cells. When the concrete poured into these diamond cells dries, the surface can be rubbed with a coloring agent mixed with a cement mixture. True, the rhombuses should be painted in the same color, in a checkerboard pattern, that is, after one.