Instructions on how to install lamps in a stretch ceiling with your own hands
Stretch ceilings are used in a large number of apartments, offices and other spaces. The installation of luminaires in a stretch ceiling is an integral part of the installation work. The quality of lighting depends on correct installation, so it is important to observe a number of characteristics.
Content
- 1 False ceiling markings
- 2 Quantity calculation
- 3 Materials and accessories
- 3.1 Narrow claws or platypus
- 3.2 Roulette
- 3.3 3*1.5mm2 VVGng-Ls Cable
- 3.4 electrician's knife
- 3.5 stationery knife
- 3.6 Indicator screwdriver
- 3.7 Perforated tape 12*0.7 mm or adjustable rigid support
- 3.8 Wago clamps
- 3.9 Thermal ring
- 3.10 Screwdriver
- 3.11 puncher
- 3.12 Nails
- 3.13 make a mortgage
- 3.14 Connection cable
- 3.15 Wago Terminal Blocks and Drilling Clips
- 4 How to install thermal rings
- 5 DIY lamp installation
- 6 Recommended lamp power
- 7 Tips & Tricks
False ceiling markings
To maintain accuracy, you need to make a markup before installing the lighting fixtures. For this, it is recommended to use special tools.
roulette and pencil
Marking with a tape measure and a pencil or marker should be done before stretching the canvas. The material is stretched out on a flat surface or on the floor and the locations of the lamps are marked.
When applying the markings, it is important to consider the following recommendations:
- the distance between the start of the material and the first light source is at least 20 cm;
- the minimum distance between several lamps is 30 cm;
- if the ceiling is made of several materials connected by welding, leave a distance from the welding to the luminaire of at least 15 cm.
Laser level
Using a laser level greatly simplifies the task of marking. A level is a surveying instrument that determines the difference in height between several points. If it is necessary to place only one lamp in the central part, a diagonal line is drawn from each corner with a laser and a mark is made at the intersection of the lines.
When installing several lamps in a row, the corresponding markings are made by making marks at an equal distance from each other.
Quantity calculation
Before ordering a stretch ceiling, you need to calculate the required number of fixtures. The optimal level of illumination for 1 square of area in a room with a standard layout is considered to be 20 watts of power. As a rule, the power of incandescent lamps is taken as the basis for calculation. LED and fluorescent bulbs are calculated according to their equivalent power.
When choosing the number of luminaires on a stretch ceiling, you should take into account your own wishes regarding the brightness of the light. Also, the purpose of the room and third-party factors that affect the degree of illumination play an important role. For rooms with a wall height of more than 3 m, the number of light sources is multiplied by 1.5.
Materials and accessories
Before starting installation work, you need to prepare materials and accessories. Armed with complete equipment, it will be possible to effectively and correctly install the fixtures.
Narrow claws or platypus
It is necessary to use clamps or narrow platypus to securely fasten the fasteners. The platypus can also be used to easily lift the fixture in case of incorrect installation.
Roulette
It is more convenient to mark a large area on a canvas with a tape measure, since the use of a short ruler or other devices may lead to measurement errors. In addition to the tape measure, it is recommended to use a laser level, which simplifies the procedure for marking places for lighting fixtures.
3*1.5mm VVGng-Ls Cable2
The power cable is vinyl insulated and has a low flammability sheath with minimal gas and smoke emission. This type of cable is ideal for use in locations where there is a high probability of a short circuit or fire. The purpose of the VVGng-Ls cable is to transmit and distribute electrical voltage, when a nominal voltage of 0.66, 1 or 6 kV is applied at a frequency not exceeding 50 Hz.
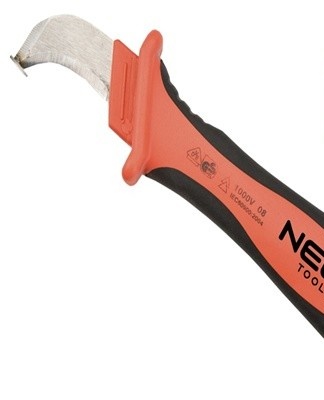
electrician's knife
Stripping the insulation and cutting the cable requires a special electrician's knife, which is more convenient to use than simple construction tools. Using a knife, you can cut the thread cleanly without damaging the inner core. The main features of the tool are:
- The blade of the knife is short and its length varies between 28 and 100 mm. As a rule, the blade is rounded with a pointed end or has the shape of a hook.
- The cutting edge is hardened carbon steel which does not corrode. On some types of knives, the blade tips are additionally protected with titanium nitride to increase the strength and durability of the product.
- In order not to damage the cable cores, the electrician's knife is equipped with a special screw that adjusts the cutting depth.
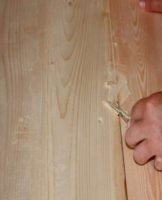
stationery knife
A utility knife is needed to pierce the fabric and make a slit to attach the lamp. You need to create slots according to the previously made markings.
Indicator screwdriver
An indicator screwdriver is used to check the voltage level at the end contacts. Using this tool will allow you not to disassemble the voltage structure in the future to find contacts in which the voltage has disappeared.
The best type of indicator screwdriver is the battery-powered model. The ease of use lies in the fact that to check the presence of tension, it is enough to touch the stitching on the wire. This way you can check for broken wiring by holding a metal contact and touching a dead wire with a screwdriver. In the event of a cut, the indicator will not respond, and if the wire is intact, the LED will light up.
Perforated tape 12*0.7 mm or adjustable rigid support
The perforated galvanized tape serves as a tie and is designed to secure all types of cables and wire harnesses. There are special holes for rivets and bolts on the surface of the perforated tape. A more advanced and durable alternative to perforated tape is the rigid, adjustable backing.
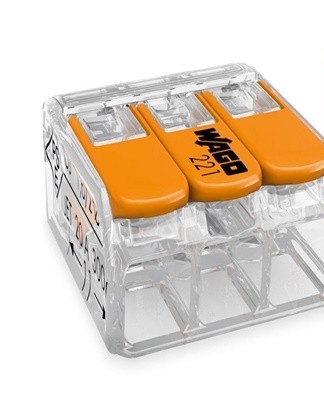
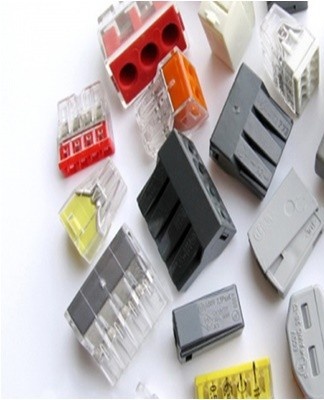
Wago clamps
To connect the wires of the luminaires, you must prepare the Wago terminals. The clamping technology does not use a screw connection and works on the basis of spring force. Since it is the connection that is the most vulnerable point in the wiring, it is important to use quality clamps. If the contact is bad, there is a risk of overheating and burning of the wiring.
Thermal ring
The thermal ring is intended to be used as mechanical protection for a cut in stretched tissue.The presence of the element reduces the risk of progressive failure due to tensile forces. An additional benefit of the thermal ring is protection against overheating by artificial light sources.
Screwdriver
The screwdriver is the basic tool used to fasten the fasteners. Using a screwdriver, you can not only tighten the screws, but also remove the fixture.

puncher
Using a puncher, holes are made in the previously marked places for the lamps. It is important to choose the right size for the tool.
Nails
To fix the mortgage to the ceiling, use nails-dowels. This type of fastener is designed specifically for fastening in dense materials.
make a mortgage
The presence of a mortgage allows you to build lighting fixtures in the stretch ceiling. The recesses are made from blocks of wood, sheets of plywood, metal or plastic. The main requirement for the selected material is high moisture tolerance. When using wooden elements, they are pre-coated with protective compounds.
Universal
For the installation of spotlights, recesses are made from universal plastic templates. They are made in the form of a pyramid, formed from squares or rings of different diameters.
In the case of installing a chandelier, larger recessed parts will be required, which can transfer a high load from the lighting device to the floor slab or other structure. To simplify the task, you can also use the ready-made ring-shaped mortgage.
For a specific diameter
If desired, you can independently make a mortgage that will correspond to the specified parameters.To do this, you need to purchase the right material and cut out the details according to the markup. Do-it-yourself mortgages should be made only in situations where the structure of the ceiling has a number of features. The parts manufacturing process is very labor intensive and it is much easier to buy off-the-shelf mortgages.
Connection cable
When installing spotlights, one of two connection schemes is used - parallel and star. The first option for connecting the cable involves the parallel docking of all light sources with the conductor connections in the luminaire itself. If you choose a star circuit, you must insert all conductors at one point and lay a separate cable for each spotlight. The choice of a suitable wiring diagram is based on the convenience of wiring.
Wago Terminal Blocks and Drilling Clips
The use of Wago terminal blocks contributes to the solid fixing of cable harnesses of different cross-sections. The terminals are chrome-nickel steel flat spring clamps with spring characteristics, which allows the creation of a programmable force. The required pressing force is formed depending on the cross section and the material of the core. The clamp creates even pressure across the entire area and reduces the likelihood of high contact resistance. The following requirements are imposed on the drill collets:
- vibration resistance;
- security;
- reliability;
- no need for additional maintenance.
How to install thermal rings
There are several options for installing a thermal ring on a tensile structure. The easiest way is to attach the heat rings with an adhesive method. For this you need:
- Prepare the base of the light fixtures using a block of a board or a wooden panel.The height of the base should match the dimensions of the tension band.
- Route the wiring from the base of the base to the locations of the light fixtures.
- Attach the tension fabric to the pre-equipped frame. Find a platform through the elastic material for the fixture.
- Glue the thermal ring to the canvas using a special mounting glue.
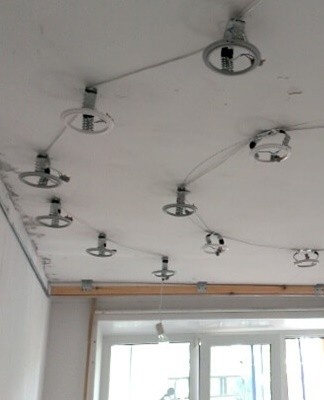
DIY lamp installation
The nuances of installing lamps depend on their variety.In order to avoid mistakes when performing installation work, you need to take into account the type of devices and follow the step-by-step instructions.
Point
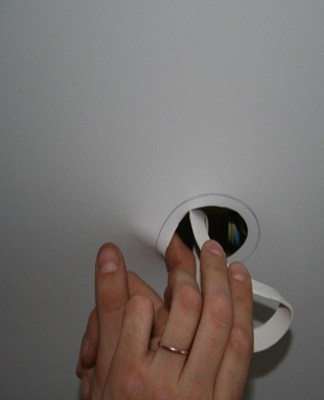
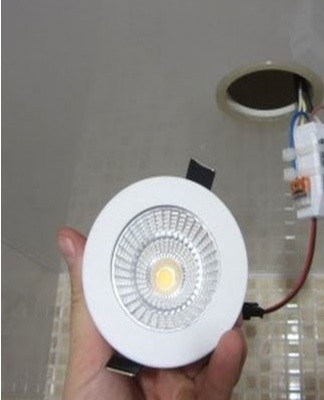
To install projectors, you must stick a rounded profile on the film at the locations of the fixing brackets. On the canvas, you need to make holes in advance for future lamps along the inner contour of the profile. When cutting the holes, it is important to be careful not to damage the tension fabric. Then the mounting posts are installed using set screws, the electrical conductors are removed and the lamps are connected. In conclusion, it remains to put the thermal ring on the body and install the lighting devices themselves.
Air
Types of hanging lamps can be provided in a scheme similar to the installation of a chandelier. The same principle is used due to the similar structure of the fixing part.
ceiling chandelier
There are several ways to attach the chandelier to the stretch ceiling. You need to choose the appropriate method based on the design features of the chandelier.
Hang
Most often, the chandelier is fixed on a special bracket in the form of a hook. The hook is mounted in the thickness of the concrete floor and pre-tested by hooking a special load.Further actions are performed according to the standard scheme - they lay a cable, cut a hole in the fabric, fix a thermal ring and hang a chandelier.
Plank
On the ceiling strip, to which the material is attached, mark the mounting point of the chandelier. A wire is tied into the profile, stretched along the center of the point of attachment of the lighting device. Taking into account the dimensions of the chandelier bowl, saw off the corresponding part of the bar. Then a hole is cut in the fabric, an insulating ring is installed and the chandelier is screwed.
LED light strip
Fixing the LED strip is much easier than other light sources. The tapes are attached to the surface of the base slab before the installation of the stretch ceiling. To keep the LED strip in place, it is recommended to use extra strong glue, as it will be laborious to redo the work.
With driver
When purchasing LED fixtures, LED drivers are often included with them. Voltage is supplied to them, and not directly to the LED. Luminaire drivers can be integrated or external to the body and connected via a connector.
It is recommended to purchase lighting fixtures where the drivers are connected through a separate connector.
If the fixture stops working, there is a high probability that the driver was the one that failed. If the driver is placed separately, it will be easier to repair or replace.
Recommended lamp power
For the film type of stretch ceilings, it is recommended to use fluorescent and halogen lamps with a power of not more than 20 watts. It is also allowed to use standard incandescent lamps with a power of up to 40 watts. This is because the material can be negatively affected by thermal effects.Similar types of lamps with a power of 35 and 60 W, respectively, are mounted on fabric ceilings. There are no restrictions on LED strips, as they heat up little.
Tips & Tricks
Simple recommendations and tips allow you to avoid common mistakes when installing lighting fixtures. Their list includes the following:
- It is necessary to adhere to the instructions for the installation of lamps, taking into account their variety and design features.
- In order not to damage the stretched material when installing the lamps, the marking and making of the holes is done beforehand by laying the canvas on a smooth surface.
- In the absence of self-confidence, it is worth entrusting the installation of recessed lamps to specialists.