How to make an imitation of a plastered brick wall with your own hands
Apartment owners are mistaken in assuming that a beautiful and interesting interior design can only be obtained for a lot of money. There are many ways to simulate building materials that save the family budget. These include the use of decorative plaster, which with simple manipulations turns into a beautiful brick wall. How to build a plastered brick wall, when repairing a room with your own hands, we will find out below.
Description and characteristics
Brick is considered one of the oldest materials used for housing construction. Brick walls are used in the following architectural styles:
- town planning;
- attic;
- shaggy chic;
- Provence.
They are very popular among young people due to their strict yet elegant design, which is pleasant to the eye. In their design, brick walls are actively used, thanks to which the room begins to play with new bright colors. Brick goes well with:
- wood, metal and glass products;
- harmoniously combined with antiques.
The only drawback of the material is its price, which not everyone can afford. In this regard, imitation brick is used, which is much cheaper than the original.
Tools and Materials Required
Imitation of brick plaster is not an easy task, and its implementation requires serious preparation. To carry out repair work, you will need:
- container for mixing the working solution;
- roulette;
- Master OK;
- masking tape;
- mixer with a special attachment for mixing plaster;
- brush;
- putty knife;
- level;
- film or a large number of newspapers to protect the floor from dirt;
- roll;
- old rags.
Don't forget personal protective equipment either. It is recommended to stock up on:
- a pair of gloves ;
- respirator.
To note! The number of tools required can be increased. It all depends on the chosen brick imitation method and other features of the planned interior.
How to prepare the surface
After the tools and materials are prepared in the required amount, they proceed to the next stage - the preparation of the working surface. It is worth treating it with the utmost seriousness, since the durability of the repair will depend on the result.

The algorithm of actions is as follows:
- remove the old coating if necessary;
- align the walls and eliminate defects on them;
- we treat the surface with a primer.
Remove the old coating
Removing the old coating from the walls, people act in two ways:
- remove all old coatings;
- only remove areas that do not adhere well to the wall.
The second option is quite common, as it allows you to cope with repairs faster, with less effort.The plaster on such a wall holds well, but there are also unfortunate cases when the repair will soon have to be redone.
If you don't want to take any risks, use the first option. Yes, it is more laborious, but in the end you will get a high-quality plastered wall that will not crumble in a few months.
Leveling and sealing of defects
It is not enough to simply remove the old wall covering and apply plaster to it. Walls should be carefully examined for defects that could affect the integrity of the plaster layer. These include:
- damage to masonry joints;
- fries;
- cracks.
A solution for their removal can be made independently, or you can buy a ready-made mixture, which you can find at any hardware store. A solution made with your own hands will cost less than a purchased one. Moreover, in terms of quality, it is in no way inferior to its store counterpart. Which option to choose is up to you.
Padding
Priming the work surface allows:
- strengthen the edges of microcracks in the wall, thereby preventing their further destruction;
- increase the strength of adhesion of the plaster to the wall, which will have a positive effect on the final result.
As a primer, use "cement milk" or store mixes. There is no difference between them in terms of quality, and cement milk will cost several times cheaper. It is prepared by mixing water and cement in a ratio of 1 to 1.
In stores, it is advisable to buy a primer that has the property of penetrating deep into the surface to be treated.
Preparation of the plaster composition
To prepare the plaster composition, you need to perform the following steps:
- combine chalk and plaster in a ratio of 3 to 1;
- add a little wood glue to the resulting mixture;
- add water and mix well with a construction mixer.

The resulting solution dries quickly and adheres perfectly to the work surface. Its only drawback is that it is not recommended to use it in rooms with high humidity. This is due to the fact that gypsum absorbs moisture well. If this variant of the mixture does not suit you, pay attention to the following recipe:
- mix cement and sand in a ratio of 3 to 1;
- add tile adhesive. For a bucket of solution - no more than 2 liters;
- to mix together.
If you are unsure of your own abilities, buy plaster at the store. It will cost a little more, but you will save time and hassle.
To note! When preparing the mixture yourself, under no circumstances use substances with different astringent coefficients as the main components. Otherwise, the strength of the topcoat will be several times lower than normal.
How to create a brick imitation
There are many different techniques that can be used to create a beautiful brick pattern on the wall. However, most of them require some skill.
Beginners are advised to use two basic techniques that give great results with minimal effort:
- draw the seams with a scraper;
- the formation of seams with adhesive tape.
Draw seams with a scraper
In order to make seams on the plaster with a scraper, you need to take:
- a spatula, the width of which will fluctuate in the region of 20-25 centimeters;
- scraper or chisel;
- spatula, with a blade 10 centimeters wide;
- a ruler with a width of at least 1.5 meters and not more than 2;
- join.
Algorithm of actions:
- priming the walls;
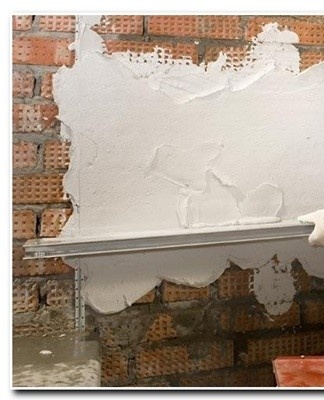
- apply a layer of the mixture with a spatula, then carefully level it;
- allow the mixture to dry;
- we apply the ruler to the place where the seam is applied;
- draw the seams.
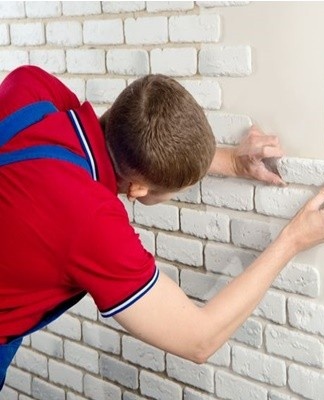
Keep in mind that the thickness of the seam varies from 0.5 to 1 centimeter, otherwise it will not look natural.When forming a pattern imitating a brick, take into account the standard dimensions of the original product. They measure 250x65x120 mm.
Once the seams are completely drawn, proceed to the final finish with a scraper. Horizontal lines are processed first, then vertical ones. If done correctly, the imitation will be difficult to distinguish from the original.

Form seams with masking tape
This method is considered more difficult, since the scotch tape is difficult to tear from the frozen mixture. If you have chosen it anyway, let yourself be guided by the following rules:
- the working surface is treated with a primer;
- the lines of the future seams are marked with a pencil;
- a narrow strip of adhesive tape is glued to them;
- then the solution is applied to the wall;
- leveling;
- let the plaster dry;
- we remove the end of the adhesive tape without plaster and gently pull it, pulling all the tape outward.

Do not wait for the plaster to dry completely, otherwise it will not work to remove the tape and the repair will have to be redone.
Advantages and disadvantages
The advantages of imitating bricks with plaster include:
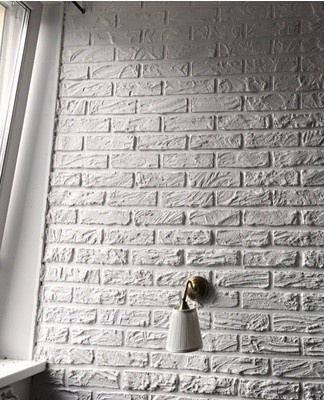
- the final plaster coating looks more attractive than real brick;
- this method of finishing does not take up the space of the room, since a layer of plaster of 1-3 centimeters is enough to imitate a brick;
- plaster weighs several times less than natural masonry;
- facilitates the process of repair work;
- the ability to adapt imitation to any interior;
- easy to use.
Defaults:
- the working surface must be carefully prepared before processing;
- in conditions of subzero temperatures, it is not possible to work with a plaster solution;
- a lot of dust accumulates in the folds of the plaster, which forces the owners to clean the room more often.
Common Mistakes
When creating an imitation for a brick, the following errors are made:
- the brick walls carry an element of brutality that doesn't go well with the delicate and sophisticated details of the interior. Usually, this factor is not taken into account in the repair process;
- the plaster is very dry, which makes it impossible to apply the necessary pattern on it;
- when you use tape to create a brick joint, its ends are embedded in the plaster.
Additional tips and tricks
Experienced builders recommend:
- do not try to create a mixture for plaster if there is not enough experience in this matter. It is easier to buy a ready-made mixture that will have the required strength and adhesion indicators;
- when choosing a plaster, take into account the features of the part used;
- to give texture to the plaster, use any available means, be it a sponge, a shoe brush or a washcloth.