Characteristics and choice of slab for garden paths, DIY installation instructions
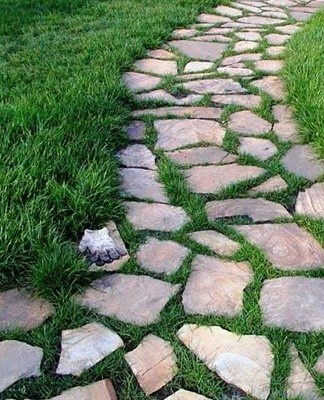
Paths in the garden are not only a necessary element for pleasant, quiet walks, but also a real work of landscape art. To make them beautiful and durable, it is important to select reliable materials and follow the basic rules for their installation. One of the best materials for garden paths in all respects is flagstone. It has many important advantages over other popular materials in landscaping.
Content
- 1 Special features of the material
- 2 How to properly design a stone walkway
- 3 Quantity selection and calculation
- 4 What tools and materials will be needed
- 5 How to make the markup with your own hands
- 6 Installation procedure
- 7 How to manage after styling
- 8 Finishing
- 9 Common Mistakes
- 10 Additional tips and tricks
Special features of the material
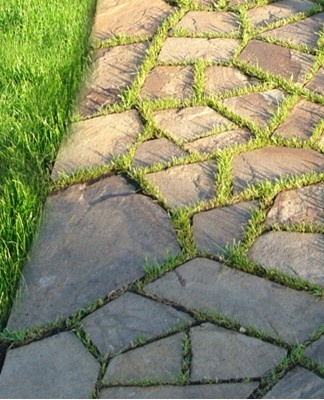
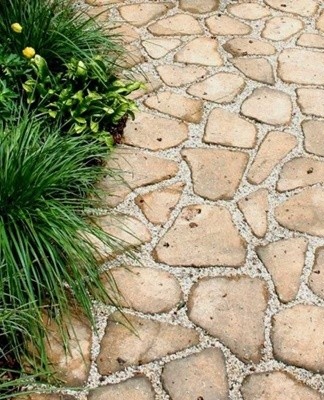
First, you need to understand what exactly is flagstone, which is often used to create attractive garden paths.These are flat slabs of natural stone, the thickness of which can vary from twelve to fifty-five millimeters. The shape of the stone slabs can be almost any - square, rectangular, oval, round.
There are several types of slabs depending on the source material. The most popular are granite slabs, slate-slabs and also limestone-sandstone.
The layout of garden paths is not the only purpose of the stone slab. It is actively used in areas such as stoves and facing chimneys, creating gazebos and alpine slides.
The widespread use of the stone slab in landscape design is due to its many positive characteristics, each of which will be considered separately.
Smooth and non-slip surface
The stone slabs have an absolutely flat surface that does not slip when moisture or snow penetrates. This guarantees safety and comfort of movement along the garden paths.
Respect the environment
This material is environmentally friendly and safe, as it does not contain harmful additives.
Frost resistance
Stone slabs for garden paths do not crack even in the coldest air temperatures.
Minimal moisture absorption
The degree of moisture absorption of limestone depends on the initial density of the stone and averages about 6%.
Strength
The material is resistant to high mechanical stress, weather conditions and temperature extremes.
Color fastness
The slab does not lose its original color for the duration of the service. It does not fade or rub off.
Ease of handling and styling
Limestone treatment is not difficult. Natural stone is easy to cut, grind, polish and engrave.Layout of tracks from this material is also very simple. This is done in the standard method, borderless.
How to properly design a stone walkway
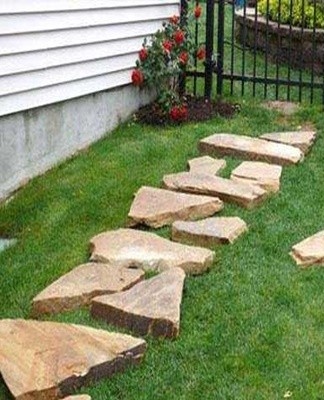
The quality and appearance of a garden path in the country depends on the quality of its design. The first step in this job is to create a sketch in a traditional paper or electronic format. When drawing up a plan, it is important to take into account the type of soil and structures, as well as the characteristics of the landscape. In places where the intersection of garden paths is planned, it is advisable to create areas with smooth curves and flower arrangements - sharp corners are extremely undesirable here. The shape of the path should be in harmony with the landscape: it is better to arrange a winding stone path in the garden, and straight and laconic on a well-trimmed lawn.
At the design stage of a limestone walkway, care should be taken that there are no large trees nearby, since over time their rhizomes can deform the stone facing.
Plants that tend to grow quickly should not be planted close to the path, as they create walking difficulties and a sloppy look.
When designing a stone garden path, there are several main points to consider:
- the widest should be the main path in the garden - from 1.5 to 3 meters;
- the minimum width of a stone walkway for domestic use is 70 cm, and the maximum width is 1.5 m;
- utility paths should be straight and as short as possible;
- garden walkways can be winding and long, with an average width of about 1 meter;
- the secondary tracks can be twice as narrow as the main one, they must be made of a different material;
- to avoid stagnant water, paths should be laid out with a slight slope - 2-3 degrees at the edges;
- the project must provide drainage grooves, which will play the role of additional drainage;
- stone garden paths, which are laid in areas with a pronounced relief, should have a slope of about 10-12 centimeters;
- if the slope exceeds 12 centimeters, it is advisable to design steps instead of a standard garden path - with a width of about 40 cm and a height of 10-15 cm.
It is necessary to familiarize yourself with the basic requirements that apply to the design of garden paths from stone slabs:
- The plan must clearly indicate the starting and ending points of the trails.
- It is recommended to avoid excessive twists and sharp turns.
- The total area of garden paths should not exceed 15% of the entire plot.
- The optimum width for footpaths is 50-75 cm, and for household paths more than 90 cm.
- The projected garden stone paths should be in harmony with the general stylistic direction of the house and the plot.
Quantity selection and calculation
After the garden path project is ready, it is necessary to correctly calculate the required volume of the slab slab. There are several important parameters to keep in mind.
Thickness
For the arrangement of a garden path, a stone slab with a thickness of 20 to 60 millimeters is used, depending on the type of soil and the expected loads.
size and brim
It is not recommended to use oversized stone slabs. The larger the surface, the lower its resistance. You should choose the size of the stone according to the desired width and length of the track. The optimal width of one side of the stone slab is ten to twenty centimeters.
Texture
The stone slab for making garden paths comes in different textures. The most common types are:
- tumbling - imitating a worn, faded stone, which seemed to have been in the water for a long time;
- sandblasting - with a uniform roughness;
- chipped - completely repeating the shine of natural stone;
- bush-hammered - obtained by the method of chipping a stone;
- sawn - a stone surface, sawn on a special machine without additional processing;
- sanded - smooth and moderately rough, with virtually no shine.
Place of extraction
The greatest number of limestone deposits is found in the southern Urals. However, it is also found in other regions of Russia.
This material is obtained in different ways. The most popular of them is the career one, which consists of several stages:
- find a stone deposit;
- career building;
- remove the top layer of soil;
- sequential cleavage of the stone plates.
It is necessary to chip the slab plates as carefully and carefully as possible so as not to damage the fragile material.
Possible faults
When choosing a limestone for arranging paths in the garden, you should pay attention to the flaws that may be inherent in it.
Delamination
One of the most common defects is chipping of the slab. The material may begin to peel around the second to third season after installation.
This happens for the following reasons:
- the questionable initial quality of the stone;
- violation of laying technologies;
- the wrong choice of the thickness of the stone slabs;
- mistakes when choosing a type of stone.

Rust
Traces of rust on the stone slab can be caused by the following reasons:
- the presence of copper particles, as well as other metals and impurities in the stone itself;
- rusty metal hitting the surface of the stone plate;
- exposure to hard water, which contains iron.
You can get rid of this inconvenience in several steps:
- Clean the stone slab of debris and dirt with a stiff wire brush, then rinse thoroughly with a hose.
- Once the surface is dry, treat the area with lemon juice and hold it in direct sunlight for five minutes.
- Sprinkle with baking soda and brush again.
- If the traces of rust are more extensive, they must be treated with a solution of oxalic acid. To do this, you need to moisten a piece of cloth in acid and hold it on a stone surface for five minutes.
- Apply baking soda to the brush and rub it over the rusty part of the stone.
- Finally, rinse the surface of the stone thoroughly with plenty of water using a hose.
Efflorescence
The unsightly white streaks that appear on the surface of the stone are called efflorescences and are deposits of soluble salts.
As a rule, they are formed where there are violations of waterproofing systems and storm sewers, as well as in the case of the use of masonry mortars containing a lot of salts.
You can remove this defect with a brush with hard synthetic bristles, then saturate the surface with a water repellent, which imparts water-repellent properties and increases resistance to cracking.
What tools and materials will be needed
To start with the stone slab, you need to prepare the necessary tools and materials. Let's take a closer look at each of them.
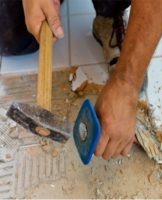
Mallet
A mallet is a small carpenter's hammer with a striking element made of durable rubber or wood.With this tool you can achieve the tightest fit of stone slabs to the base.
Master OK
A trowel or trowel is a necessary tool for uniform mixing and subsequent application of cement-based mortar. Made in the form of a small paddle with a handle.
Level
With the help of a building level, the stone slabs are laid with maximum accuracy relative to the floor surface without errors.
This indispensable tool can be made of metal, wood or plastic. Its important elements are barrel-shaped measuring cones filled with liquid - they are called "level eyes". A popular pattern is a level pattern with two "eyes" - a 180 degree horizontal and a 90 degree vertical.
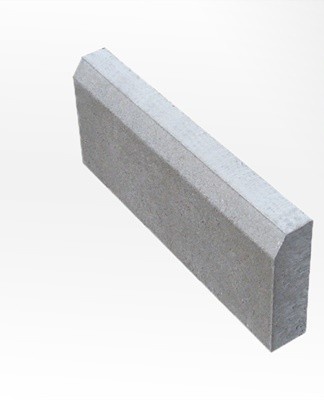
Border
Limestone garden paths are most often made without curbs. However, this is also possible with a low border made of small stone slabs arranged vertically.
Bulgarian
To cut stone slabs, you need a grinder (grinder or angle grinder) with improved dust protection and adjustable speed.
crushed stone
High-quality crushed stone combines well with the slab, making the garden path more efficient and durable. There are three main types of crushed stone: shale, granite and gravel.
The highest degree of resistance is typical of granite.
Roulette
To mark garden paths, a building tape is used, which combines the properties of a compass, calculator and marker.
Stakes and ropes for marking
The markup of the future garden path is made using pointed wooden stakes. They must be sunk to a depth of at least 300 millimeters. Next, stretch a scoring or cutting line, also called coated wire, over the entire inside surface of the stakes.
Shovel
With the help of a shovel, a trench is dug in the place where it is planned to equip the future garden path. The depth should be an average of 30 centimeters.
metal brush
A stiff bristle wire brush is needed to remove rust, salt deposits and other imperfections from the surface of the stone slab.
Vibratory plate for soil compaction
A vibrating plate or vibrating roller is an indispensable tool when laying tracks from any type of tile. Devices of different capacities are used for perfect compaction of stone slabs, paving slabs, gravel, crushed stone and sand.


Cement mixer
This device is not only used for stirring cement mortar, but also for rolling in natural stone.
Cement
For laying stone slabs, it is recommended to use strong cement of grades M300 and M400.
Sand
The composition of masonry mortar contains sand, which can be river, sea or quarry. In addition to its origin, attention should be paid to bulk density, specific gravity and composition.
How to make the markup with your own hands
The marking of the future garden path is carried out in several stages:
- The contour is applied in any convenient way. This can be done with chalk, lime, flour, or water from a garden hose.
- Sharp wooden dowels are driven into both sides of the walkway. The distance between them should be equal and be 1-2 meters.
- A trench is dug along the marked contours, the depth of which should correspond to the height of the bayonet of the shovel.
Installation procedure
After the preparatory markup work, you can begin to lay the stone path. The procedure differs depending on the base.
On a sand-cement base
The installation process includes the following steps:
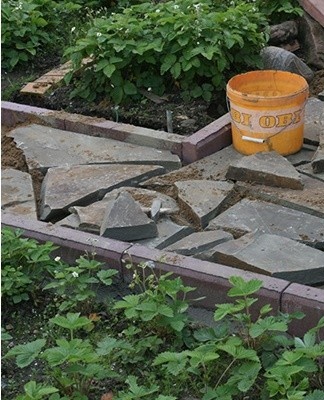
- Place stone slabs on the prepared surface. First, large specimens, then smaller ones. Leave minimal spaces between tiles.
- Align the entire top plane with a mallet, having previously checked with a level.
- Prepare a mortar with 1 part cement and 3 parts sand.
- Take out 2-3 stone tile elements and apply the prepared solution under it.
- Fill in the gaps between the stones. This must be done carefully so as not to stain the surface.
On a cushion of sand and gravel
This dry method is the most suitable for mobile, loose or lifting soils:
- Pour the sand and gravel mixture into the trench in a layer of about 20 cm.
- Install the curb and lay out the carrier layer up to 25 cm. The base is made of a mixture of gravel with a fraction of 2-3 cm and dry cement. The proportions are 6:1.
- Tamp the "cushion".
- Arrange the stone slabs as close to each other as possible, being careful not to leave any gaps.
- Align the horizontality of the coating with a mallet.
On a concrete base
A solid concrete base is used in areas where groundwater is too close to the surface.
In this case, you need:
- Dig a pit at least half a meter deep.
- Make drainage - put a 20 centimeter layer of sand on the bottom of the pit.
- Prepare a concrete solution consisting of 1 part cement, 3 parts sand and 4 parts crushed stone.
- Pour the first layer to 5 centimeters thick.
- Lay the wire mesh.
- Pour the next layer of mortar to ground level.
- Soak for two to three weeks to get enough strength.
- Apply porcelain stoneware glue and stone tiles to the concrete base.
- Tamp the coating with a mallet.
On crushed stone
This method involves the following actions:
- Fill a 20 cm layer of crushed stone.
- Align and compact.
- Place curbs on the sides of the walkway on the concrete base.
- Place stone slabs on top of the crushed stone layer.
- Align the cover with a mallet.
- Fill the joints with cement-sand mortar.
How to manage after styling
The laid stone slabs should be cleaned of dirt using a stiff metal brush. This will restore the color saturation and natural texture of the tile.
Finishing
At the end of the laying work, you need to carefully fill the gaps between the limestone particles with a slurry of sand and cement.
Common Mistakes
When choosing and laying limestone, the following errors are often encountered:
- insufficient thickness of the technological base layer;
- incorrectly selected thickness of stone plates;
- use of mortar without plasticizers;
- chaotic stacking of plates.
Additional tips and tricks
While choosing the slab, you need to consider the thickness, strength and size of the stone slabs. It is desirable that the composition contains a lot of quartzite impurities, which give the material rigidity and wear resistance. The texture of the stone slabs should be in harmony with the general style of the house and the land.