How to disassemble the lid of a Redmond multicooker with your own hands, types of defects and repairs
People often wonder how the lid of a Redmond multicooker can be disassembled. This procedure is required in case of device failure. To achieve good results during repair work, you need to clearly establish the causes of the malfunction. To do this, you need to understand the features of the device and the mechanism of operation of the device. It is also useful to understand error codes.
How the Redmond Multicooker Works
For self-repair of the multicooker, you need to familiarize yourself with its design features and analyze the principle of operation of the device. It looks like an ordinary saucepan with the monitor and power button on it.
The container is closed by a special lid with a latch. The appliance contains a bowl in which food is prepared. The power and control units are located under this part of the device. Schematics are also included. The multicooker is considered a multifunctional device. Its work is carried out by a microprocessor. It includes several elements.
Electrical diagram
Voltage is applied to the connector, which has multiple pins. One grounds the unit, the second connects to the body, the third to the cover.
Cable schematics
Current goes to the wires. Through them, the current is directed to the switch and the fuse, which are fixed sequentially. The switch is used to start or stop work. A fuse protects the device from overheating.
Power supply and switching unit
This item solves 2 problems at once. It supplies 220 volts AC and converts it to DC. 5 Volts are required for the control unit. The switching circuit requires 12 volts. The circuit includes a battery. It is necessary to record the actions of the hostess, which launches the device programs.
Control block
This circuit is responsible for generating all the functions and programs of the device.
Thermal resistance
The device has 2 thermistors. One of them is attached to the lid, the second to the bottom of the device. The key task of the elements is considered thermoregulation in the use of the device. Thanks to this, it is possible to maintain the temperature set by the hostess.

Thermal fusion
This element protects the kitchen appliance from overheating. This prevents damage to the control system.
Decoding Error Codes
To establish the causes of the malfunction, you need to understand the error codes. If a system message appears on the monitor, you need to understand what it means.This will help the instruction for a specific model or a visit to a professional master.
The most common codes are:
- E0 - indicates an open or closed circuit of the upper temperature sensor. Also, the reason may be hidden in its thread. Sometimes this error indicates incomplete closure of the lid. This is usually due to damage or the absence of a silicone seal.
- E1 - such an error indicates the ingress of liquid into the device. It also indicates a failure of the heating element or the lower temperature sensor. The multicooker displays the same code when the thermostat contacts are clogged.
- E2 - in this case, an open circuit or a short circuit of the upper temperature sensor circuit can be suspected. The same can apply to his thread.
- E3 - this code indicates the ingress of moisture into the structure of the device. It also talks about an open or short in the upper temperature sensor circuit or its wire. The reason for the error may be the absence of a bowl or the use of an unsuitable element.
- E4 - the problem may lie in the clogging of the pressure sensor. A failure of the control board is also considered to be the cause.
- E5 - this code indicates an automatic shutdown, necessary to protect against overheating.
Diagnosis and repair with your own hands
To repair such a device, it is worth carrying out a detailed diagnosis. This will help identify the causes of the failure.
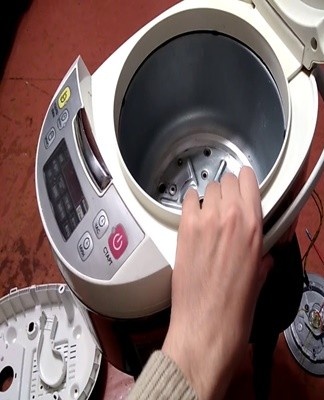
Checking the switch, thermal fuse and heating element
If the inspection does not reveal a fault, the operation of the switch should be checked. Assessing the operation of the thermal fuse is of significant importance.These elements are fastened with a thick thread. It is red in color. To identify the problem, it is worth taking a multimeter and measuring the resistance. The probes must touch points 1 and 2. The parameter must be zero. The procedure can be performed using an arrow tester.
The heating element is also controlled at the same time. To do this, the indicator should be measured between points 1 and 3. It should coincide with the resistance of the spiral of the heating element. Considering the power, this parameter can be from 30 to 80 ohms. If, after measuring the resistance at points 1 and 2, it was possible to identify that it tends towards infinity, the breakdown lies in the switch or the fuse. To check the switch, put the key in the on state and touch the bare terminals with the probes of the device. Normal resistance is 0.
If the switch is working properly, you can proceed to check the fuse.

To do this, it is recommended to release the support from its attachment to the body of the device and to move the insulating tube. Then touch the terminals with a multimeter. Normally the resistance should be 0. Otherwise the fuse is broken. It must be replaced. The element has no polarity, so it is allowed to place it in any way.
Doesn't work and the screen is on
If the monitor displays an E error code, this indicates normal operation of the cord, fuse, and switch. The break may lie in the thermal resistance, heating element. In addition, the power supply can damage the device.
How to Check Power and Switching
If at the preliminary stages it was not possible to identify the breakdown of the device, it is worth checking this block. It is exposed to high temperatures, so it often breaks down.Often this failure is accompanied by the appearance of an E1 error code. If you look closely at the elements of the block, you can see the resistance of the fuse. When measuring resistance with a multimeter, it tends to infinity. However, according to the color code, it should be 100 ohms.
In order to repair the block panel, it is recommended to dismantle it. This element is fixed to the base of the multicooker with 2 screws and nuts. While loosening the screws, hold them in place.
To access the nuts, it is recommended to hold the element by the side of the bowl. In this case, you need to remove the heating element, which is fixed on three screws. The wires do not need to be detached from the terminals. If you remove the resistor from the circuit board, you can see that it has blown. In the circuit, this element is not only used to limit the current, but also as a fuse. Its damage is due to the large current that circulates.
To more easily identify a multicooker breakdown, you can draw a fragment of the power supply circuit diagram. A detailed examination of the case of the microcircuit makes it possible to highlight a slight local darkening of the fragment with the marking.
How to replace a standard power supply
To replace the power supply, it is worth choosing the right device. You can get it on order. It is also permitted to use an IT technology adapter. To do this, it is worth using a device for a voltage of +12 Volts and replacing the failed part of the circuit on it.
An adapter can be used for the Redmond multicooker. On its case there should be information about a constant voltage of +12 volts and the ability to withstand a charging current of up to 200 milliamperes. This is absolutely identical to the parameters of the device microcircuit.
It is recommended to turn off the stabilizer before connecting the adapter to the power supply. First, it is recommended to remove the resistor and the diode. To avoid having to open the adapter case and cut its cord during the test, you can connect the element via a conventional connector. The plus is located at the pin, in the center. The wires must be soldered according to the rules of polarity. This is done in parallel with the capacitor leads from the power board. The lid must be put on and the multicooker must be connected to the network. Then the adapter is plugged into the socket.
At this point, the multicooker should work. To assess the reliability of its operation, it is worth pouring water into the food bowl. The device is filled to the brim with liquid and the cooking mode is set. It is recommended to bring the water to a boil and cook for 45 minutes until the timer rings. Such tests will confirm that the repair procedures are carried out correctly.
Finally, insert the adapter into the device. Then it must be connected to the power supply. For this, the contact fragments of the adapter board are connected to the terminals of the block board. The supply voltage is supplied by a pair of wires. They differ in black and red.
To ensure proper thermal operation of the adapter, a fragment of the case with an AC outlet should not be installed. Before fixing the element in the cover, it is worth choosing a section that excludes the emphasis on the parts of the device after closing. A hole can be drilled in the cover for the thread of the self-tapping screw to run normally. Holes for screwing are made in the body of the adapter.
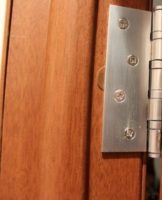
Lid hinge repair
If the hinge that holds the lid on breaks, it's worth taking action. Such a malfunction does not interfere with the preparation of food, but violates the tightness of the device. If the unit is used carelessly, there is a risk of damaging the wires that connect the RTD in the cover to the control board.
The cover of the device consists of 2 fragments. To repair the buckle, it is recommended to separate them. The cover elements are fixed to each other by latches. They are small in size, so you can easily disconnect the cover with a flat screwdriver. This tool should be pressed between the halves of the product.
To access the other part of the hinge, it is necessary to remove the steam condensate collector and unscrew the screw. In this case, it will be possible to identify a malfunction of the hinge pin supports. This defect is quite common, since the retaining pin is made of plastic and is no more than 2 millimeters thick.
A steel paper clip can be used to restore the hinge eyelet. One end of the fixture should be straightened, then bent at an angle and cut with wire cutters. Then it is recommended to swoop the corners of the paper clip into the base of the cover. It is quite a laborious process that requires patience.

During the procedure, you need to hold the prepared element from a paper clip with tweezers and heat it up by attaching a soldering iron tip. As a result, the fragment should literally sink into the lid plastic to the required depth. It should be borne in mind that the end result may not be very appealing. However, the hinge can be covered with the second part of the lid. Thanks to this, it will be invisible from the outside.In this case, the restored loop will turn out to be much stronger than the previous one.
Valve cleaning
This element is located at the top of the luminaire. It requires careful maintenance. To clean the steam valve, proceed as follows:
- Gently pull the cell cover and open it. This can be done using a small protrusion. There is a latch on the back of the device. It is also recommended to remove it by turning it counterclockwise.
- Gently remove the elastic from the support and rinse thoroughly. The elastic should not be stretched or twisted. Such actions will lead to its deformation.
- It is recommended to assemble all parts in reverse order. Then close the valve cover.
- Replace the lid and gently press down.
It should be remembered that manufacturers advise all owners of multicookers to regularly clean the steam valve and the inner lid of the device. This should be done after each use.
Timer Troubleshooting
Multicooker Redmond has an electronic control system equipped with timers. Their job is to track how long it takes to prepare the dish. In some situations, the mode starts and the timer does not register the time. It can also freeze after the countdown starts. Experts say that this is an error of the automatic control device. Also, the reason may lie in the settings of this part. Before using the device for the first time, you should carefully study the instructions.
Very often the timer does not start counting time due to the loose closure of the lid of the device. Operation of the device element begins after reaching a specific temperature defined by the user. When the lid is not properly closed, heat is consumed by the slot.Therefore, the timer is not activated.
If the lid is sufficiently closed, but the timer remains inactive, this indicates a malfunction in the electronic system. Also, the reason is a fault in the temperature sensor. After troubleshooting, the multicooker will work normally again. The timer starts on the hour and beeps when the cooking time is over. If the timer does not work immediately after purchase or after a short use of the device, it is recommended to call the wizard. This product is under warranty. Therefore, you do not have to disassemble it yourself.


Contact cleaning
To clean the device yourself, you need to follow these steps:
- Remove the metal or plastic cover. It is also advisable to remove the other visible parts that are fixed with screws.
- Clean the microcircuits. To do this, it is recommended to turn the device upside down and shake it gently.
- Attach the lid and other top parts.
When placing obstructed contacts on the bottom of the device, it is recommended to do the following:
- unscrew the screws that secure the bottom cover;
- detach the cables holding the heater and software boards together;
- remove the heating element and screws;
- carefully remove the internal thermometer so as not to damage the device;
- clean boards and microcircuits from bulk products.
Due to strict compliance with the rules of dismantling, cleaning the devices will not cause special difficulties.
Repair master class on board
For troubleshooting, microcircuits should be carefully inspected. To identify malfunctions, you should pay attention to the following signs:
- the appearance of carbon deposits;
- swelling of capacitors;
- delamination and breakage of tracks;
- damage to solder joints;
- obscuring resistors.
If any components are faulty, they must be replaced immediately. Welding is easier to restore. Board tracks can be repaired by zero sanding. It is also possible to tin the damaged areas.
In some cases, jumpers are used, which are easily made from resistance lugs. After the work is completed, the surface must be covered with varnish. Otherwise, leaks can have negative consequences. The varnish helps to protect the metal from moisture and oxygen. These are the factors that pose the greatest danger to drivers.

In which cases it is worth contacting specialists
If it is not possible to troubleshoot the multicooker yourself, it is recommended to seek professional help. Most often, the need for professional help is required in such cases:
- the product is under warranty;
- you cannot disassemble the multicooker yourself;
- the software element is down.
Additional tips and tricks
To avoid problems with the operation of the multicooker, it is recommended to follow the basic rules for its operation. To do this, you should pay attention to the following points:
- When using the delayed start function to cook food with food, it is worth putting a few ice cubes. It will slowly evaporate to help prevent food spoilage.
- If the milk porridge constantly boils or foams too much, it is recommended to grease the walls of the bowl with butter after filling the product. It is also not recommended to use too fatty milk for cooking. The optimal indicator is considered to be 2.5%.
- For even cooking of food, it is worth placing those that take longer to cook on the bottom. It can be root vegetables or meat.
- It is important to ensure that the outside of the bowl remains dry at all times. The same goes for the heating disc.
- The multicooker should only be filled halfway.
- Do not rinse the porridge in the bowl. This will damage the non-stick coating.
- To avoid steam leakage, it is not recommended to cover the appliance lid during cooking.
- You do not have to make your own cooking mode settings.
- When using the device, it is not recommended to open the lid, unless provided for by the program.
It is recommended to remove it before placing the food in the bowl. Thanks to this, it will be possible to protect the internal fragments of the device from the effects of liquids or bulk products. Many housewives ignore this rule and pour broth into the bowl of the multicooker. As a result, the device constantly breaks down. When using the device, it is worth monitoring the stability of its operation. Periodic errors on the monitor and wear of the seal indicate a failure of the device.
Disassembling and repairing a Redmond multicooker is not so difficult. To do this, it is necessary to clearly establish the causes of malfunctions and follow the rules for their elimination. In some situations, it is impossible to do without the help of specialists. This is especially true if the product is under warranty.