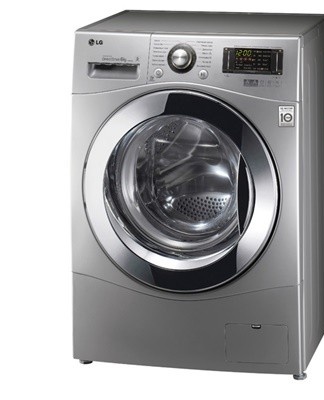
Instructions on how to change the bearing of an LG washing machine with your own hands
People often wonder how to change the bearing in an LG washing machine. To get good results, you must first understand how to properly disassemble this device. To do this, it is worth following a certain sequence of actions. The choice of bearing is also important. In this case, it is recommended to take into account the model of the washing machine.
Content
- 1 Features of the design of LG washing machines
- 2 Tools required
- 3 Table of correspondence of models and bearings
- 4 Analyze the car
- 4.1 Removing the top cover
- 4.2 Detergent drawer
- 4.3 Disconnect the wires
- 4.4 How to remove the clamp
- 4.5 Service panel cover
- 4.6 Cuff
- 4.7 Disconnect the hoses from the tank
- 4.8 Heating element
- 4.9 Fourth cover
- 4.10 Disconnection of all elements associated with the tank
- 4.11 Rotor
- 4.12 Stator
- 4.13 Shock absorbers
- 4.14 Reservoir
- 5 How to replace a bearing with your own hands
- 6 Reassembly
- 7 Solve common problems
Features of the design of LG washing machines
This manufacturer produces quality direct-drive washing machines. The use of technology allows to increase the resource of the engine. The same goes for moving parts. But sometimes the parts of the unit break.
The company's automatic machines include a large number of electromechanical components. During washing, all parts experience increased loads for a long time. They wear out under the influence of sudden temperature changes.In addition, water with aggressive components leads to negative consequences. Masters claim that cars of this brand begin to fail after about 5 years of active use. Almost all breakdowns can be eliminated at home using the tools available.
To properly carry out the repair, you need to familiarize yourself with the features of the operation of the device with direct drive.
LG appliances can be standard or direct drive. In the first situation, the drum rotates under the influence of the drive belt, in the second this happens after starting the electric motor. The motor of such a unit does not contain small brushes that wear out quickly. To identify a fault, the device must be carefully examined.
As a rule, the following parts of washing machines fail:
- tubular electric heater;
- bearings and oil seals;
- terminals and contacts;
- pressure switch;
- electric lock;
- drain pump;
- inlet valve;
- speed sensor;
- water pump;
- filling valve;
- contact clothing;
- sealed;
- flexible pipes;
- drying system;
- steam treatment system.
Tools required
It is recommended to disassemble the equipment to replace the bearing. This will require the following:
- pliers;
- screwdriver with different attachments;
- wrenches - use tools of different sizes;
- round nose pliers;
- screwdrivers - crossed and slotted;
- hammer - it must be rubber;
- chisel - it must be blunt;
- mastic - a waterproof agent is used;
- an ordinary hammer of large sizes.
Prepare the bearings in advance. An oil seal is also required. These parts are sold at service centers. They can also be purchased in specialty stores.
Table of correspondence of models and bearings
Devices from this manufacturer have 2 bearings - small and large. You will need to purchase this set. Often these items are sold with oil seals. At the same time, experts do not advise buying universal elements.
In order for the device to work as long as possible, an original bearing should be chosen, taking into account the brand of the washing machine.
To choose the right parts, it is worth considering the model of the unit:

| LG model washing machine | stuffing box | Bearing |
| F 1068 LD | 37x66x9.5 / 12 | 205-206 |
| WD 6007C | 25x50x10 | 203-204 |
| WD-1020C | 25x50x10 | 203-204 |
| WD-1030R | 37x66x9.5 / 12 | 205-206 |
| WD 1090 FD | 37x66x9.5 / 12 | 205-206 |
| WD-1050F | 35.75×66.9.5 | 205-206 |
| WD 1074 FB | 35.75×66.9.5 | 205-206 |
| OF 1040W | 20x50x10 | 203-204 |
| WD 6002C | 25x50x10 | 203-204 |
| WD 1256 FB | 37x66x9.5 / 12 | 205-206 |
| WD 1274 FB | 37x66x9.5 / 12 | 205-206 |
| WD 6212 | 25x50x10 | 203-204 |
| WD 8014 | 20x50x10 | 204-205 |
| WD 8022 CG | 37x66x9.5 / 12 | 205-206 |
| WD 8023 CB | 37x66x9.5 / 12 | 205-206 |
| WD 8050FB | 37x66x9.5 / 12 | 205-206 |
| WD 8074 FB | 37x66x9.5 / 12 | 205-206 |
| WD 10130 | 37x66x9.5 / 12 | 205-206 |
| WD 10150S | 37x66x9.5 / 12 | 205-206 |
| OF 1020W | 37x66x9.5 / 12 | 205-206 |
| WD 1080 FD | 37x66x9.5 / 12 | 205-206 |

Analyze the car
To disassemble the device, it should first be disconnected from the power source and blocked pipes. It is recommended that the unit be installed in such a way that each of its parts is accessible. All disassembly procedures are worth photographing. This will help to properly assemble the device after the repair is complete.
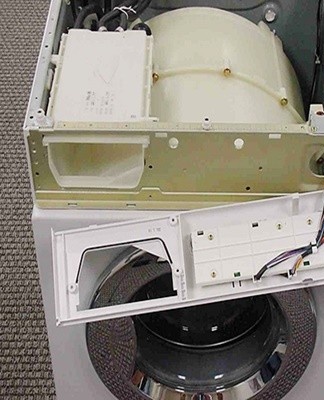
Removing the top cover
First you need to unscrew the lower fixing screws located on the rear wall. They should be pulled back slightly - 3-4 centimeters. Then remove from the stops, fold down and set the lid aside.
Detergent drawer
To remove this part of the device, you need to press it with your finger on the latch located in the center. Then the tray can be removed. The side bolts are then visible.They must be unscrewed with a Phillips screwdriver.
Disconnect the wires
To disconnect the wires, you need to unscrew the plastic holders. Then it will be possible to remove and disconnect the wires. To do this, you need to find and tighten the latches. Then disconnect the connectors one by one.
How to remove the clamp
The next step is to open the door. The clamping spring must be hooked. This is done with a screwdriver. It is located under the rubber band of the drum. The clip should be removed and the cuff should be inserted under the drum.
Service panel cover
To remove the service panel, it is worth squeezing the clips that go on top. Then lift and tilt the panel slightly towards you. It is recommended to untie the wires and pull them through a special hole. Then remove the control panel from the device.
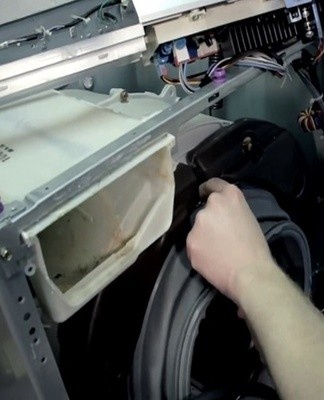
Cuff
The hoses connected to the cuff can be disconnected with a flat screwdriver. The collar is attached to the tank with the same clamp as on the hatch. Therefore, the spring must be hooked. This is done with a flat screwdriver. This will remove the retaining clip. The cuff can then be removed from the drum and set aside.
Disconnect the hoses from the tank
To lighten the tank, it is worth detaching the heavy counterweights. Then you need to unscrew the fastening screws of the counterweight located on top and remove it. Similar measures can be taken for the lower counterweight.
Heating element
To remove the heating element, it is recommended to detach the batteries and cut the link with pliers. Then you can unscrew the grounding pins.
Fourth cover
It is recommended to unscrew the screws to detach the back cover.
Disconnection of all elements associated with the tank
It is imperative to remove all parts attached to the tank. Nipple clamps can be loosened with a Phillips screwdriver. Also remove the screws securing the pressure tapping chamber.
After that, it is recommended to unscrew the Phillips screws and remove the wires from the tank.
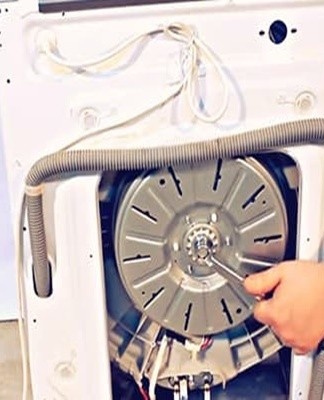
Rotor
It is recommended to remove the motor after unscrewing the mounting bolt.
Stator
This part must also be removed after unscrewing the screws. It is recommended to tilt the element downwards. This will help pull the threads out of it.
Shock absorbers
These fragments are fixed on pins. To remove them, you need to put in a key and tighten the locking tendrils. Then pull the piece towards you with pliers. It is recommended to disconnect and lower it. Then remove the front shock absorber. This is done using a wrench. Use pliers to remove the pin.
Reservoir
To remove the tank, it is recommended to remove the side springs that secure this structural element. Use a flathead screwdriver to flip the plug over, lift and pull the spring out of the hole in the frame. Carefully lower the drum and remove the spring. Do the same for the second side.
How to replace a bearing with your own hands
Replacing the bearing yourself is not so difficult:
- First, place the drum on an elevated surface. Place the bolts to be removed around its perimeter.
- Remove the front part and remove the broken element. If difficulties arise after applying the lubricant, the part should be knocked out. To do this, it is recommended to put a block on the tree and hit it with a hammer.
- It is also recommended to remove the second fragment from the tank. Dirt and scale inside should be thoroughly cleaned with a brush. It is better to use thread for this purpose.
- Remove the oil seal, take some grease and fill the bearing seating areas with it. Remove the piece with a hammer and punch. This is done from above. In order to remove the outer bearing, the tank must be turned upside down.
- The seat should be thoroughly cleaned. Any broken object should be discarded.
- Take spare parts and treat them with soap.
- Install the bearing in a special place and hammer with a hammer.
- Insert the outer bearing in the same way.
- Lubricate the seal with oil and apply soap to the edges. Press the item with your fingers to press it down.
To avoid repair problems and maintain the functions of the device, it is worth avoiding common mistakes made by beginners:
- When removing the front fragment from the unit, the wires of the hatch blocking sensor are often torn out.
- When trying to remove the cuff, the part breaks, because inexperienced craftsmen forget to remove the pliers.
- Excessive impact on screws fastened without heating or lubrication will cause them to break.
- There is a risk of breaking the wires of the temperature sensor.
- The filler pipe is removed with a hose.
- There is a risk of damaging the drum, which makes it necessary to change it.

Reassembly
After installing new parts, you can assemble the washing machine. It is important to replace the seals and lubricate the shaft. Assembly of the device is carried out in the reverse order.In the process, it is recommended to compare the photos of the steps that have been taken. This will ensure excellent performance after repairs.
After assembling the device, it is not recommended to start washing clothes immediately. It is best to do a full cycle with water.This will help clean the drum from grease and test the operation of the device. It must not emit parasitic sounds.
Solve common problems
In order for the repair of the device to be successful, it is necessary to correctly identify the causes of the breakdown. To do this, it is worth analyzing the signs of malfunctions:
- If the heating element fails, an error code appears on the monitor. If there is no such signal, the operation of the heating element can be evaluated by other criteria - the quality of washing, the dissolution of detergent powder. To accurately determine the operation of an element, it is necessary to measure the voltage. This is done on contacts.
- If the pressure switch fails, water often flows out on its own. He is recruited and released immediately. The indicator does not signal that the tank is full. Therefore, water is continuously poured and drained from the device. Dealing with a breach is easy. For this, the pressure switch is replaced.
- If the bearings are broken, the unit generates unusual noises during operation. Sometimes the unit rumbles so loudly that the sounds of a breakdown can be heard even in neighboring apartments. To identify a violation, it is worth spinning the drum in different directions. If a squeal and rattling sound appears, you may suspect bearing failure.
- A sudden stoppage of the device indicates the location of the fault in the terminals. It may also indicate damage to the wires. The control module itself rarely breaks. Much more often the wires leading to the sensors burn out and close.
- Equipment from this manufacturer often breaks drain pumps. This is due to poor design. The drain is often clogged. As a result, the blockage prevents water from draining completely.In this situation, the “OE” code appears on the monitor.
- Sometimes the collar of the fill valve breaks. If it is broken, water enters the tank even when the device is turned off. If a murmur of water appears after turning off the device, you can suspect a failure of the fill valve.
Bearings fail quite often in LG technology. To deal with such a defect, it is necessary to properly disassemble the device. This should be done carefully, strictly following the instructions. It is advisable to photograph this process. Thanks to this, it will be possible to correctly assemble the unit.