How to glue wallpaper yourself, step-by-step instructions and preparation rules
Deciding to make repairs on their own, many do not know how to glue wallpaper on the wall. Usually the roll is cut into sheets of the same length, taking into account the height of the room, and greased with glue. The glue solution is also applied to the wall. It is easier to glue non-woven wallpaper: only the wall surface is lubricated with glue. You can completely forget about the glue mixture if you buy self-adhesive photo murals.
How to prepare well
Before you start renovating, you need to buy wallpaper, construction tools and glue.Before gluing, the wall surface is cleaned of old materials, leveled and reinforced with a primer.
How to calculate the quantity yourself
The wallpaper is sold in rolls with the indication of the meter. In order to determine the amount of roll fabric needed for the repair, you need to measure the length (a) and width (b) of the patch. Then calculate the perimeter: P = (a + b) * 2. Then you need to measure the height of the room (h) and find out its area: S = h * P. From this value you need to subtract the area (S1 ) windows and doors, because the wallpaper is not glued to them. The resulting value is S2 = S - S1, equal to the area of the walls that will be covered with wallpaper.
Then you need to take a roll and see what is its length (a3) and width (b3). These two values must be multiplied to find the area (S3 = a3 * b3) of the fabric roll. Now the area of the walls for pasting the wallpaper (S2) should be divided by the area of the roll fabric (S3): S2:S3=N. You will get the value N, you need to round it to a whole number to know the number of rolls to fix the part.
Tool required
Before starting the repair in a hardware store, you need to purchase all the necessary tools. Admittedly, the repair work is divided into several stages: preparation of the walls, application of the markings, cutting of the strips, gluing, smoothing of the sheets. In the store you need to buy tools for removing old coatings, putty and leveling the walls, applying glue.
What tools are needed for gluing the walls:
- woolly paint roller for applying glue;
- roller, rubber spatula, brush for smoothing the glued fabric;
- a tray that allows the glue to be distributed over the surface of the roll;
- plastic bucket (10 liters) for diluting the adhesive solution;
- a drill or construction mixer to mix the glue;
- a wide and narrow brush for applying glue to seams, corners;
- a clerical knife or scissors to cut the sheets;
- screwdrivers and insulating tape for dismantling sockets and switches;
- plumb line and level to apply even vertical marks;
- construction tape for measuring length and width;
- wide metal spatula for cutting sheets at joints;
- a stepladder that allows you to reach the required height.
De-energizing the premises
Before the renovation, the room must be disconnected from the electricity. Indeed, when gluing the walls, you will have to remove the switches and sockets. To turn off the power, you need to unscrew the plugs on the dashboard or move the lever of the machine to the "off" position.
After a power outage, you must check the voltage in the socket using an indicator screwdriver: the indicator should not light up.
Remove the old coating
Before pasting the walls with new wallpaper, you need to remove the old coating. Wall cleaning is considered the longest and most messy process. However, you cannot do without it. Whatever the finish, the surface must be cleaned down to the floor.
The water
The easiest way is to get rid of old paper-backed vinyl wallpaper. All you need is a bucket of warm water, detergent and a wide spatula. To peel off the wallpaper, it must first be soaked in soapy water using a sponge, and after 20 minutes, peel it off with a spatula, remove it from the wall.
Chemistry
Special chemical agents will help remove wallpaper that is tightly stuck to the wall.Any of the drugs is diluted with water in the correct proportion and the solution is applied to the surface of the wall.
Cleo
It is a liquid for removing old wallpaper. The agent diluted with water is applied to the surface, and after 15 minutes the wall is cleaned of the old coating. True, if you used wood glue, you will need to take a drill with a brush and remove the paper with the plaster.
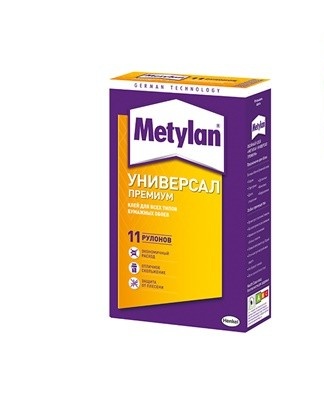
Metylan
This chemical will "peel" any type of light or heavy wallpaper. The product does not contain solvents and is odorless.
The product is diluted with water beforehand, then applied by roller to the torn coating with a wire brush.
Prospector
This is a primer that is diluted with water and the surface is impregnated with the solution. Helps to remove any type of wallpaper (even liquid) from the wall.
Quelud
Removes light, paper or vinyl wallpaper. The liquid is mixed with water in the required proportion, the surface is moistened with a sponge. The paper is soaked with humidity and chemical agents, then easily removed with a spatula.
DIY wall alignment
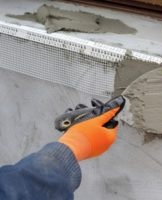
The wall under the wallpaper should be flat and smooth. Putty will help eliminate small holes, cracks and pitting. It is applied to a cleaned and primed surface. An uneven wall is leveled with plaster. The mixture is applied to the cleaned surface of the old coating. The wall is pre-primed. You can level the surface with drywall. First, a crate is installed on the wall, and plasterboard is mounted on it.
Padding
The walls are primed before applying putty or plaster. Primer is also used before wallpapering. This product strengthens the crumbly surface, increases adhesion, protects against mold and mildew.The primer dries quickly, strengthens the base well, does not allow the plaster to dry out and peel off. The liquid is applied with a roller to the cleaned surface.
How to measure and cut
Before gluing the wallpaper to the wall, you need to cut it into pieces of the required length. The rolls are unrolled on the floor; first, the floor must be freed from furniture and covered with foil. The length of the panel must be equal to the height of the wall. If the height is 2.5 meters, and the length of the roll is 10 meters, then 4 strips will be obtained from one roll.
True, the wallpaper is cut taking into account the pattern, so you will have to slightly shift the cutting line so that each canvas begins with the same pattern. The patterned panels are marked on the front side. From a roll of 10 meters, only 3 stripes can be obtained, starting from the top with the same pattern.
Basic Bonding Techniques
Pasting walls is a laborious process. True, knowing some of the intricacies of this issue, you can do the repair yourself.
How to get off to a good start
Before gluing the walls, you need to ventilate the room, tightly close the windows. Wallpaper does not like drafts. If you plan to glue not only the walls, but also the ceiling, then you need to start with this. On the top, the panels are usually glued without a pattern. The ceiling is glued from the wall. Wallpaper with a pattern is glued from the center of the ceiling in opposite directions. In this case, the first strip should be in the middle. The second and third panels are glued to the sides of the central strip.
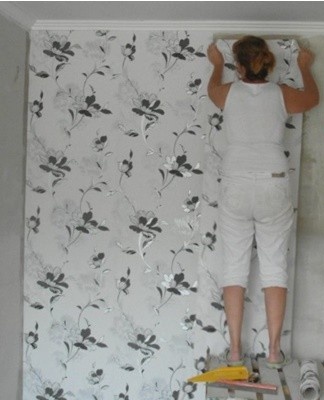
The wallpaper on the wall is pasted from the corner, window, door or from the middle of the wall. On the surface of the wall, marks are made - a vertical line, along which a strip cut from the roll is glued.The first panel is glued according to the mark, the following ones are joined side by side. The gluing of the walls is carried out counterclockwise. Before gluing the surface, cut the required number of strips and number them. On the wall, the numbering is repeated.
Varieties of prints
The wallpaper has a different pattern. The process of gluing the walls depends on the print applied to the panel. Plain panels can be glued with an overlap, strips with a pattern are glued end to end.

Monochromatic
Plain wallpaper can be cut into strips of the desired length and glued to the wall. There will be no waste in the roll, the whole panel will be used to stick the wall surface. A room with such wallpaper begins to be glued from anywhere.
Abstraction
An abstract drawing with a non-standard pattern affects the emotional and psychological state of a person. Such wallpaper can be glued on one of the walls in the room. The roll is cut into strips of the desired length, which should begin with the same pattern.
Sheets with abstraction are glued, starting from the middle of the wall.
Geometry
A geometric print can be composed of different shapes. When cutting the fabric into strips, you need to remember that each of them should start with the same pattern. Such wallpaper is glued, starting from the middle of the wall, in order to maintain a clear symmetry in the design.
Grooves
Usually the room is wallpapered not with horizontal stripes, but with vertical stripes. Along the entire length of the panel, the pattern is the same - long lines. The roll is cut into pieces, taking into account only the height of the part. Start pasting from anywhere.
Vegetable
When pasting a room with floral wallpaper, it can be difficult to match the pattern. First, you need to cut into strips, which will start in the same way. When pasting the area above the door or window, an adjustment is made. Start gluing from the middle of the wall.
Ornament
Wallpaper with small repeating patterns can be glued from the corner or doorways. A large design should be symmetrical. The gluing starts in the middle of the wall.
How to stick on flat surfaces
All types of wallpaper are glued in the same way: the rolls are cut into pieces of the required length and glued to the wall. Certainly, each type of material needs its own glue. Manufacturers produce adhesive mixtures, naming them according to the names of wallpaper (paper, vinyl, non-woven glue).
Step-by-step instructions for self-adhesive flat areas:
- dilute the glue with water to the desired consistency;
- the glue solution is applied to the wrong side of the sheet or only to the wall to be glued;
- the fabric coated with glue is folded in half, avoiding bending;
- wait 5 or 10 minutes for the sheet to be saturated with glue;
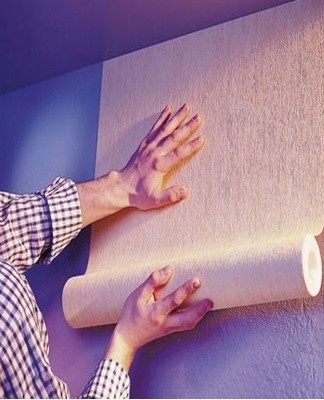
- bring the fabric to the upper edge of the wall, firmly press and smooth it, displacing the remnants of glue;
- the tape is glued, focusing on the markings on the wall;
- the lower part of the sheet remains retracted, it unfolds gradually;
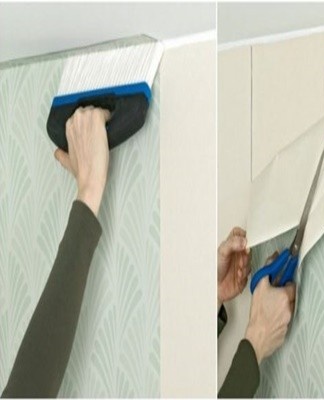
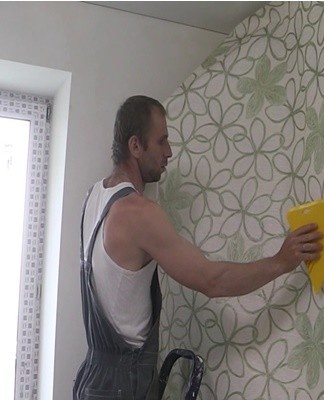
- the glued panel is smoothed with a roller from top to bottom, from the middle to the edges;
- glue protruding from the edge of the sheet is removed with a dry cloth.
How to stick in the corners
Usually the wallpaper starts from the corner. True, even the corners are rare, therefore, the butt panels are not glued there.It is better to first draw a vertical line and glue the sheets from it. The corner itself is glued like this: from one side the edge of the canvas should go to the adjacent wall by 4 centimeters, and from the other side, the edge of the panel should be glued with an overlap of these 4 centimeters. In the very corner, the sheet is not placed in the middle, since folds may appear there after drying.
Sticking near windows, doors and behind the radiator
There should be a symmetrical pattern on both sides of the doors. Wallpaper with large ornaments should be started from the doorway, and not from the corner of the wall. The top of the design above the window should match the top of the adjacent sheet. On both sides of the window, the pattern should be symmetrical. Behind the battery, you can glue the remaining sheet after cutting the strips.
How to stay in outlets
Before gluing, you need to remove the casing from the socket, wrap the wires with electrical tape. The electricity must be cut off.
The wallpaper is glued to the socket. The holes are cut to size when the glue is completely dry.
Invisible joints
Usually the sheets are glued end to end next to each other and do not overlap. True, after drying, the panels shrink and gaps appear between them. These areas can be masked with remnants of glue and wallpaper. The top layer is cleaned from the sheet with sandpaper and a grout is prepared for the gaps.
Correction of defects
Scratches or bare joints can be masked. To do this, you need to take a pencil of matching color and crumble the mine. Gaps or scratches on the panel are smeared with it.
Technology for gluing different types of wallpaper
The room is covered with different wallpapers: heavy (vinyl, non-woven) and light (paper). Each type needs its own glue, a certain soaking time and its own bonding technology.
The roll is cut into strips of the desired length, turned over with its front side facing the floor and smeared with glue. The glue mixture is applied to the sheet from the middle to the edges and left to soak for 5-10 minutes. The walls are also coated with glue. True, the adhesive solution for the wall surface is made more liquid and left to soak for 10-15 minutes. You can buy glue with a color indicator to help you apply it evenly to the sheet.
If vinyl wallpaper on a non-woven base is glued, the panel itself is not coated with glue. The glue mixture is applied only to the wall and left for 10-15 minutes. The self-adhesive wallpaper is glued to the surface without using glue.
Subtleties and nuances
For each room, the wallpaper is selected according to its characteristics and pattern. Canvases are glued to the wall with glue.
Paper
The wallpaper lets the room breathe. They adapt perfectly to any surface. True, the paper cannot be glued in a room with high humidity. In addition, its lifespan is short. Paper sheets are produced in 1 or 2 layers.
Two-ply materials hardly deform when wet. For wallpaper, paper glue is suitable, it is applied to the wall and not very thickly on the cut strips, only for 5 minutes, otherwise the panels will get wet.
Vinyl, non woven
Beautiful, durable wallpaper with a smooth or embossed surface. Perfectly hide all the irregularities on the wall. Can be used for rooms with high humidity.They do not stretch, shrink after drying, or deform when wet. Before gluing with non-woven glue, only the walls are plastered, then dry sheets are applied to the wall surface.
Wallpaper
They are glued in the same way as ordinary paper wallpapers. Paper glue is applied to the wall for 10 minutes and to the sheet for 5 minutes. Then the wallpaper is placed against the wall and pressed tightly. Using a rubber trowel, the surface is smoothed, displacing the remaining glue.
Ceiling wallpaper
It is better to glue the wallpaper on top together, you cannot cope with the repair alone. They make marks on the ceiling and coat it with glue. The sheets are glued, depending on the pattern, from the wall (from the window) or from the center. The fabric is pressed tightly to the surface and smoothed with a rubber spatula.
Wallpaper on wallpaper
New wallpapers can be pasted over old ones. After all, the sheets of paper are not so easy to remove from the wall, they literally grow there. Non-woven fabrics peel off easily, it is better to remove them before gluing the new material. Paper ones can be left and well greased with glue. New wallpaper should also be impregnated with an adhesive mixture.
Self-adhesive, self-adhesive
Such wallpapers are glued on a perfectly smooth surface, all the irregularities of the wall below are clearly visible. They have an adhesive base and a protective layer on the seam side. The protective film is removed gradually, firmly pressing the adhesive against the wall.
Common labeling errors
Before gluing, the wall must be cleaned of the old coating, leveled with plaster or putty holes and cracks with putty.The base will not fall off if the surface is properly primed before using the leveling mortar. The primer is applied to a layer of finishing plaster, after which they proceed to wallpaper the wall.
Tips and tricks from experienced craftsmen
It is better to glue the wallpaper in the summer. After all, the glue should dry at room temperature, and in winter a heater can be turned on in the room, which is undesirable, otherwise the wallpaper will warp. There should be no drafts in the room where the renovation is taking place: all windows and doors should be tightly closed. Before gluing the walls, be sure to walk on the surface with a primer, otherwise the wallpaper will begin to fall off together with the putty.