How to properly plaster window slopes with your own hands
After installing the windows, it is necessary to install the slopes, under which a layer of plaster is applied. The latter is necessary for leveling openings and closing finishing materials (including heat and sound insulation). When applying the plaster of the window slopes with your own hands, it is necessary to take into account the type of solution used and a number of other nuances that will help to avoid mistakes and spoilage.
Tools needed for the job
Before plastering work, you need to prepare the following tools:
- to reign;
- mixer for mixing the solution and the container;
- spatulas, the size of which is selected taking into account the volume of work performed;
- roll;
- grated;
- edge;
- perforated corners;
- chisel;
- hammer;
- stationery knife;
- level.
When choosing additional tools and materials, you should take into account the recommendations of the manufacturer of the purchased plaster mixture.
Due to the fact that the alignment of the slopes is carried out after the installation of the windows, it is recommended to prepare masking tape before starting work. You will also need a large piece of plastic wrap.Both materials are needed to close the plaster window.
Choice of solution
Before buying a solution for plaster, you need to decide on the area of \u200b\u200bfuture work. When choosing a material, it is recommended to give preference to durable and economical products. For plastering slopes, gypsum and cement-sand mortars are used.
You can also make your own wall leveling mix. However, it is recommended to do this in cases where similar work has already been carried out previously. When mixing the solution, it is important to observe certain proportions. Otherwise, the resulting composition will not stick to the wall.
Regardless of the type of material used to plaster the walls, each mortar should adhere to the trowel, but it should be easy to remove. If the material holds firmly to the base, then such a composition should be mixed.
Cement-sand
Cement-sand mixtures are often used for plastering exterior walls. This material is less susceptible to negative environmental influences. Before buying a cement-sand mixture, you should take into account that coarse-grained is consumed in a ratio of 0.2-0.5 kilograms for every 1-2 square meters, fine-grained - more than 0, 5 kilogram.
Gypsum
Plaster-based plaster is used to level interior walls. This mixture is more expensive than a cement-sand mixture and hardens in three days. The demand for this type of plaster is due to the fact that the material after application forms a flat surface. That is, after leveling, the slopes remain suitable for painting.
Preparatory work
Before starting work, it is recommended to determine the places where the wall deviates from the vertical (the permissible difference is not more than two millimeters for each meter). Thanks to this, it is possible to calculate in advance the approximate volume of the mixture required to level the slopes.
It is recommended to clean the working surface from traces of dirt and dust. The latter reduce the degree of adhesion between the plaster and the wall. Before applying the mixture to the brick or concrete, the slopes are pre-cleaned with a 3% solution of hydrochloric acid, then washed with water. If there are traces of grease on the surface to be treated, clay should be applied to these places for some time and allowed to dry completely.
It is recommended to apply the plaster on “bare” walls. That is, it is necessary to remove traces of paint, cement, wallpaper and other materials from the working surface. To increase adhesion (the strength of adhesion of the mortar to the wall), it is necessary to treat the slope with a primer. The latter also prevents the appearance of mold and mildew.
How to plaster with your own hands
The slopes are aligned with a square. The latter should be applied to the edge of the window at an angle of 90 degrees, and appropriate marks should be applied in the opening along which the plaster will be laid. After that, you can start preparing the solution.

The plaster is mixed according to the instructions on the package. To do this, it is recommended to take a drill with a suitable attachment, which will speed up the work.
Heating and soundproofing
You can make sound and heat insulation of a window opening using 2 types of materials. The first, with a denser structure, is placed closer to the interior walls, and the porous - to the street.This arrangement allows not only to improve the quality of sound and heat insulation, but also to prevent the formation of condensation, due to which mold appears. The type of insulation is chosen based on financial capabilities.
If there are large cracks in the opening, then the latter should be filled with oakum, having previously treated the material in an antiseptic or with foam. This speeds up the work. However, towing gives the best and lasting result.
Corner reinforcement
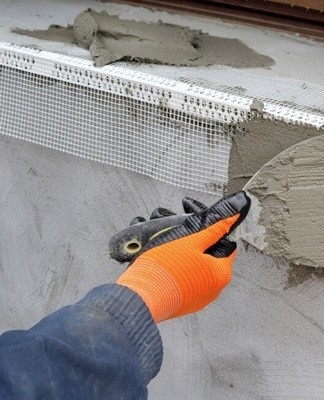
Plastering work begins with the reinforcement of the corners. To do this, you will need to mix a small amount of a liquid solution and apply the material to the entire surface to be treated. The first coat after complete drying will ensure better adhesion of the coating to the slopes.
Also, along the previously applied marks, holes are drilled that will be needed to secure the beacons.
Securing tags
It is recommended to level the slopes using metal beacons fixed to the prepared surface. You can plaster the walls without such devices. However, in this case, you will have to constantly monitor the level of the slopes, which significantly slows down the progress of work.
On the outer walls, the headlights, as already noted, are fixed with screws or nails. On the interior slopes, the fixtures are attached to the plaster mixture. After installation, the beacons must be aligned vertically and horizontally. In the first case, a plumb line is used, in the second - a building level.
Plastering on beacons
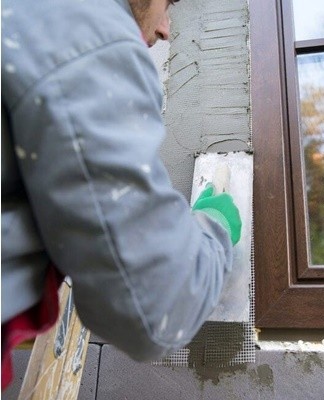
Plastering slopes is reduced to the following two operations: throwing and leveling the material.The solution should be applied so that the mixture protrudes slightly above the beacons. The excess is then removed with a spatula during the leveling process.
It is recommended to plaster the side slopes first, then the upper part. After the mixture has dried, it is necessary to remove the beacons. For this, the plaster is cut with a clerical knife. After removing the beacons, you need to close the remaining hole with the prepared solution and level the material.
Due to the fact that PVC window frames expand under the influence of heat, the plaster on the slopes cracks over time. Silicone sealant will help prevent this. In order to avoid cracks, it is recommended to make a furrow 3-5 centimeters wide near the frame until the solution completely solidifies. The resulting hole must be filled with putty.
Finishing
After drying, the plaster is moistened with water and treated with a trowel, making circular movements. If cracks have formed on the surface, the defects must be repaired with a solution. After completing the described steps, you need to wait 6-11 days (during this time the composition is completely dry), apply a primer and putty. After that, you can start finishing the tracks.

Troubleshoot potential issues
When plastering, finishers face a variety of problems. The most common are:
- During the work (most often observed in novice finishers), the plaster begins to crumble from the upper slope. To prevent this, the surface is additionally reinforced with a fine mesh, which is attached directly to the wall.
- The coating must be applied in accordance with the manufacturer's requirements.In particular, gypsum mortars cannot be used when the ambient temperature drops below 10 degrees, cement-sand mortars - 5. Under these conditions, the mortar does not reach the desired consistency and loses its properties.
- Before proceeding with the plastering of the walls, the slopes should be inspected. In older homes, electrical wires often ran under the windows, which could be damaged during the cleaning process.
- Before starting work, it is recommended to check the correct installation of the window. If the profile is mounted with violations, then in order to eliminate the latter in the future, it will be necessary to remove the layer of plaster and relevel the slopes.
- Without sufficient drying, the plaster will crack over time. Because of this, the finishing materials will come off and the paint will peel off.
- It is recommended to keep the windows closed when plastering the interior. The temperature difference, as well as the dirt that enters the room from the street, prevents the solution from setting.
Finishing work should be carried out in rubber gloves, which will protect the hands from scratches and cement mortar (plaster). For insulation of slopes, it is recommended to use polyurethane foam or expanded polystyrene. When working with the first material, it should be borne in mind that after application it expands.
Examples of finished work
Plastering the walls shouldn't be difficult. However, in order to avoid possible problems in the future, you should familiarize yourself with the examples of finished work. Due to the great popularity of plastic windows, the slopes are plastered only to level the surface. The walls are then covered with matching panels. But you can also plaster the slopes to paint them in the same shade as the walls.This option allows you to visually enlarge the wall. Also, thanks to gypsum plaster, you can create the effect of a concrete wall, which is successfully combined with certain types of interiors.