6 ways to paint Easter eggs and a step-by-step master class on how to do it
Traditional Easter treats are Easter cake and painted chicken eggs. There are several traditional and modern methods of painting Easter eggs. The patterns and images are so beautiful and interesting that it's a shame to break the shell. To paint an egg, you do not need to be a talented artist, no special tools are required for work, an adult and a child will cope with the task.
A little history
There are two versions of why eggs began to be painted at Easter: one utilitarian, the other biblical. According to the first version, in the past, when it was not possible to store eggs for a long time, they were boiled on the days of the 40-day fast before the holidays to prevent spoilage. And so that boiled specimens were not confused with fresh, they were dyed.
The second version is related to biblical events.After the resurrection of Christ, Mary Magdalene went to the Roman emperor Tiberius to convey to him the marvelous news of the resurrected master. Since he was not supposed to come to the imperial audience without an offering, Madeleine took an ordinary egg with her. Tiberius refused to believe in the resurrection of the preacher, said that no man can be resurrected, just like a white egg cannot turn red. As soon as he said that, the white egg in Madeleine's hand turned red.
Whichever version is true, the tradition of dyeing eggs for Easter has existed for many centuries. Initially, exclusively red dye was used - a symbol of Christ's blood and royal origin. And the egg itself symbolized rebirth, new life. But today Easter eggs are painted in a variety of colors, decorated with pictures and patterns.
Existing painting methods
There are several traditional methods for painting Easter eggs.
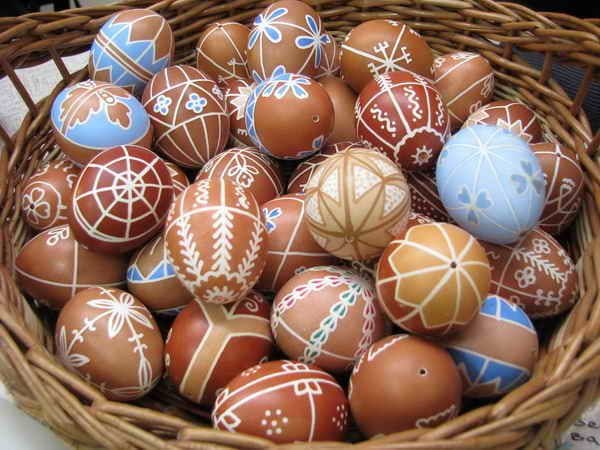
Easter eggs
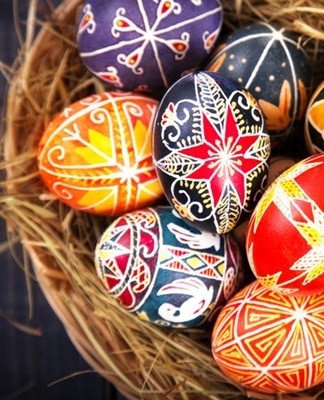
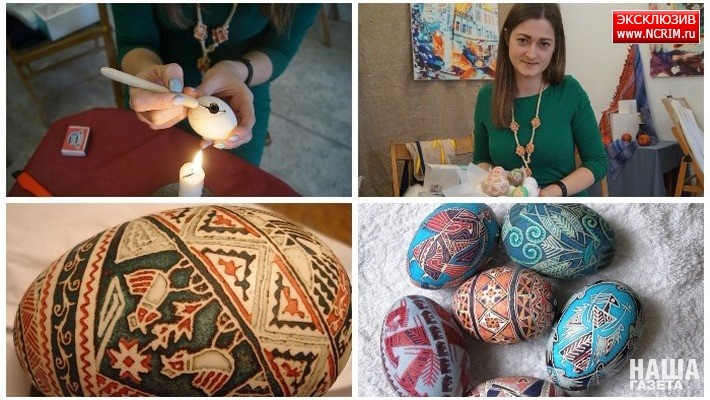
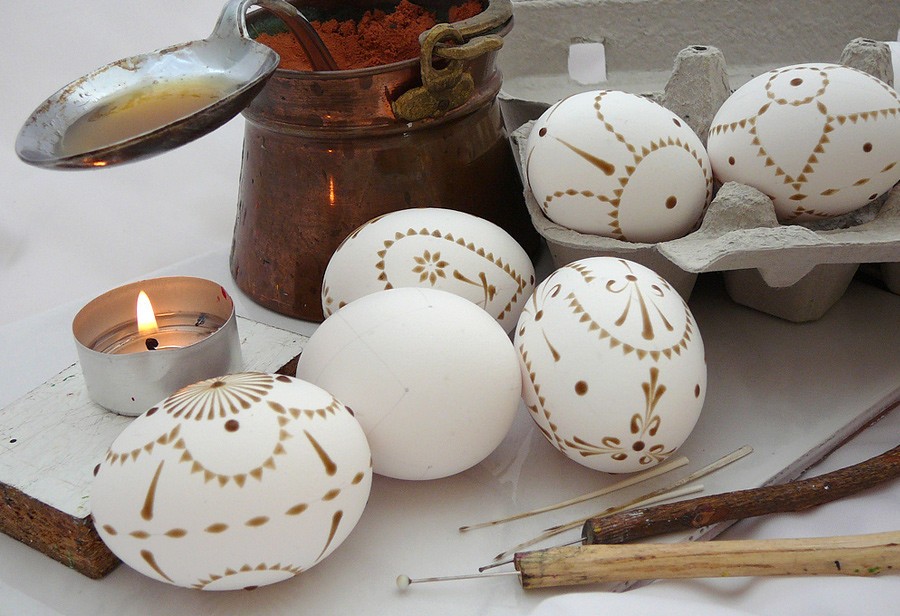
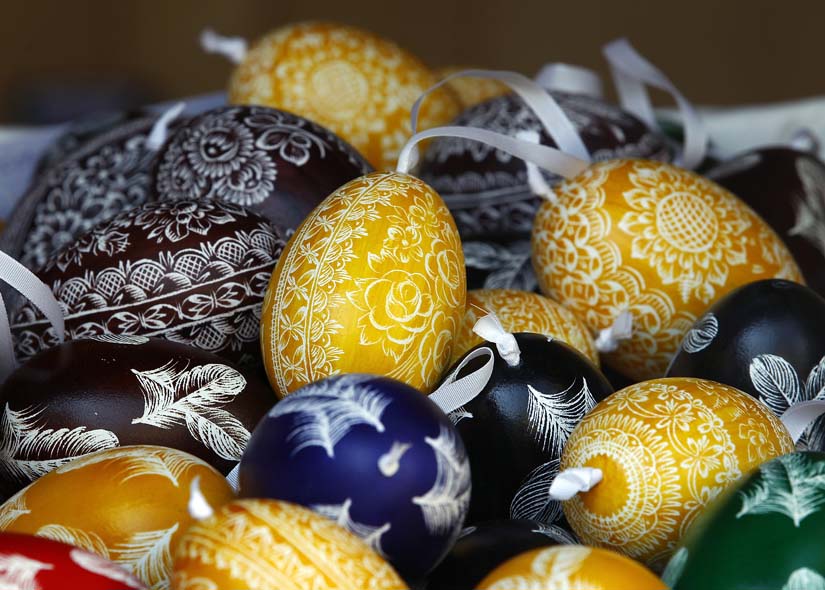
Wax and dyes are used to embody the traditional Easter technique. Making Easter eggs is difficult, it's one of the most time-consuming painting techniques.
On a raw egg, the patterns are written in wax using a metal pen. The egg is dipped in cold liquid dye, first in the lightest. Take out, wipe off the excess. The next wax pattern is applied, again submerged in darker paint. After completing all the models, the wax coating is carefully melted over a candle or gas flame. Melting wax is gently wiped off with a paper towel or soft cloth.
Krachenka
The easiest coloring option. The boiled egg is painted in one color, there are no patterns.It is the tinctures that are most often served at the Easter table, it is they that children beat against each other when playing at Easter.
There are several ways to easily paint Easter eggs:
- Boil it hard, then immerse it in commercial food coloring dissolved in lukewarm water for 15 minutes.
- In its raw form, lower it into a container of water, cover with onion peels. Bake 20 minutes.
- Wrap in dry oak or birch leaves, wrap with threads, boil. After such cooking, the shell acquires an interesting "marble" color.

Krapanka
On the hull, painted in one color, spots, stains, scratches are applied with melted wax. It turns out spots - eggs covered with drops of wax. Traditionally, no more than 3 colors were used to create Easter spots.
At the first stage, the hull is painted in one color. After drying, the surface is decorated with drops of melted wax. Once the wax layer has cooled, the egg is immersed in another dye. When the painted hull is dry, immerse it in hot water to melt the wax. Also, the wax coating can be carefully removed with a sharp tool.
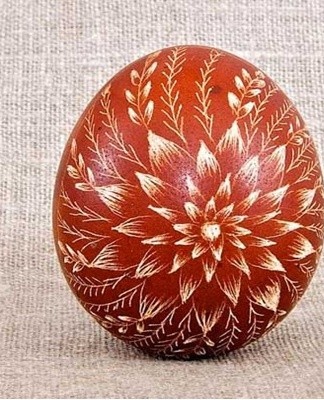
Dryapanka
Also called shkrabanka - an Easter egg painted in one color, on which the paint is scratched with a sharp metal object (office knife, needle, awl). For work, it is advisable to take a colored boiled egg (its shell is stronger than a white one) and a natural dye (store food can be smeared). It is desirable that the dye be dark, saturated, the striped paint will look better.
Scrape over the dried shell, holding the egg in the left hand, the tool in the right. Previously, a sketch is drawn on the shell with a pencil. To make color transitions, do not scrape with the tip of the tool, but with the side edge of the blade, holding it obliquely.
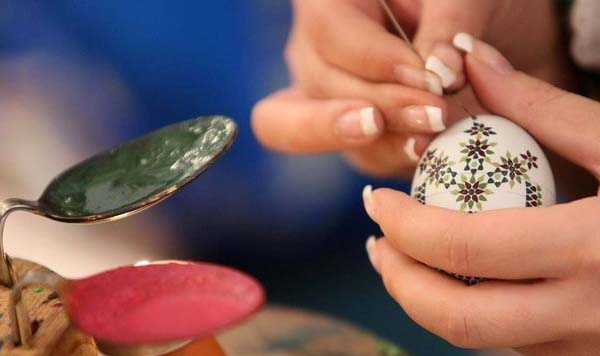
Malevanka
This is the name of an Easter egg, decorated not with a symbolic pattern, but with any image: bouquets, landscapes, inscriptions, etc. For his work, the artist uses not only wax and food dyes, but any paints that allow him to embody a creative idea.
Eggs
Easter eggs are not just a treat, but an attribute of the holiday. Copies with luxurious painting can be presented as gifts, but it's a pity to break. In this case, you can buy not real eggs, but eggs - products imitating them from different materials. They were engaged in the production of clay and wooden products as early as the 13th century, later glass and porcelain products appeared, they were decorated with beads, beads, lace.
World famous eggs in the amount of 50 copies for the imperial family and the aristocracy in the period from 1885 to 1916 were created by the Russian court jeweler Karl Fabergé.
Table of natural pigments for coloring
It is not necessary to look for dye in stores to dye Easter eggs. A safe dye can be obtained from plants and natural products.
The color given by certain products is indicated in the table:
| Received color | Product |
| Purple | boiled red onion pod, black grape juice |
| pink | beets, cranberries, grapefruit juice |
| red | pomegranate, cherry juice |
| brown | rich instant coffee, strong black tea, boiled regular onion skins |
| Orange | decoction of ground red pepper, decoction of paprika, carrot, tangerine, orange juice |
| YELLOW | a decoction of lemon peel, a decoction of turmeric |
| Green | decoction of nettle, spinach, parsley |
| blue | red cabbage decoction, blueberry decoction, blueberries |
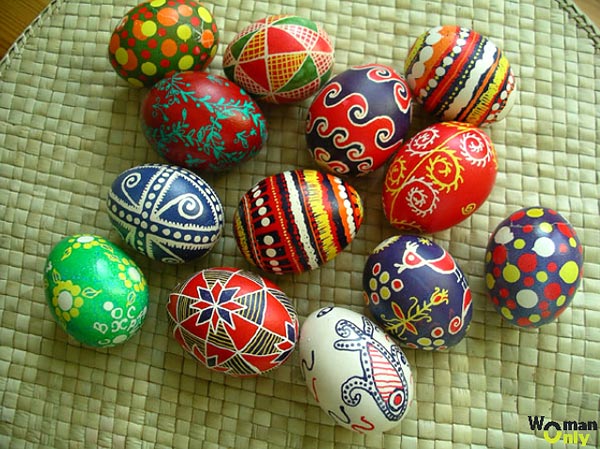
Symbols used for painting
Today, everyone paints Easter eggs as they please, but before painting was symbolic, designs with specific meaning were applied to the shell.
| Symbol of traditional painting | Meaning of the symbol |
| to cross | universe, created world |
| Star | the course of time and the cyclical nature of life - a person's path from birth to death, the changing of the seasons of the year and agricultural work (in the old days it was believed that the stars were holes in the firmament through which the gods observe earthly life) |
| report | white - the spell given to a person from birth by higher powers, yellow - the spell created by the person himself |
| diamond or square | wealth, well-being, image of mother nature, fertile land, sown field |
| woman with outstretched arms | the image of the Slavic goddess Bereginya - the guardian of the family hearth |
| bird | the human soul |
| hop cones | fertility |
| berries | motherhood, fertility |
| flowers | youth, girlish innocence |
| rake | rain |
| tasks | harvest, fertility |
| black background pattern | sadness |
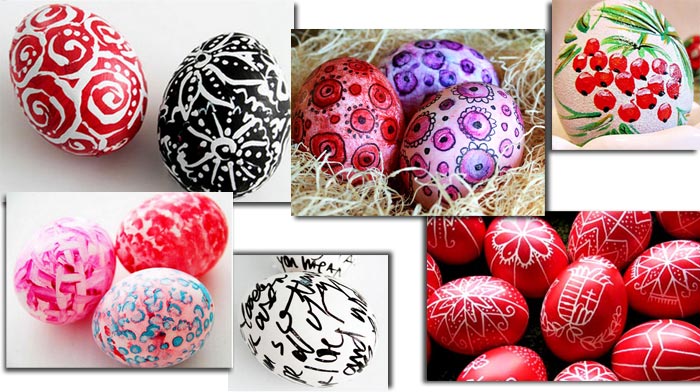
Unconventional painting methods
Traditional Easter painting methods are quite complicated, you have to fiddle with the dyes. Modern masters offer many simple and original methods of staining that do not require special tools and a lot of time.
Concealer shot
Solidly color the egg with any food or natural color.The main thing is that the color should be saturated so that the white pattern looks good on it. Take a stationery concealer with a brush or in the form of a pen, draw whatever your heart desires.
Q-tips
By dipping cotton swabs in different dyes, apply patterns. By varying the density of the applied layer, create saturated or translucent patterns. Prick a stick on the shell, make multi-colored spots.
Bubble wrap
Coat the packaging material with whole bubbles of paint, roll the egg on it. You will get an original speckled pattern.
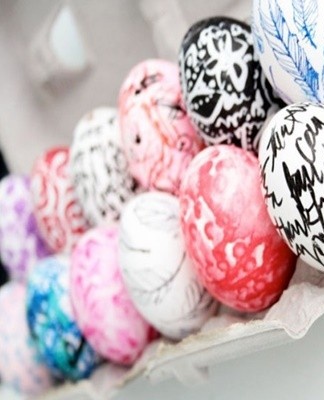
Markers or markers
The easiest and most stylish way to paint Easter eggs is to create inscriptions and drawings with markers. Write what you like: sayings of famous personalities, phrases in English, prayers, advice and wishes, even doodles.
gel pen
Gel ink adheres well to smooth case surfaces. Using multi-colored pens, you can create a beautiful Easter painting in a graphic style.
wax technique
To make an Easter wax painting, take:
- raw chicken egg, empty inside (remove the contents through the small holes at the top and bottom);
- paraffin wax candle;
- food or natural coloring;
- the vinegar;
- scribbler - a tool for covering the shell with wax.
Wipe the hull with a cotton swab soaked in vinegar. Melt the candle wax. Dip the pen in wax, heat the tip of the pen over the flame. Draw on the shell, turning the egg in different directions, but holding the squiggle still. Set aside until the wax layer is dry. Dip the egg in the dye and let it dry. Heat the paint over a fire, remove the softened wax with a soft cloth.
watercolor technique
For the watercolor Easter painting, take:
- Hard egg;
- watercolor paints;
- watercolor pencils;
- brushes.
Watercolor paint is not waterproof. Painted eggs should not be exposed to moisture, otherwise the pattern will fade.
Cover the shell with watercolor paint. When the surface is slightly dry, apply stains on top of the same color as the bottom, but more saturated. After the shell dries, create an interesting design using watercolor pencils. If desired, brush the drawing with a wet brush, the watercolor strokes will be smeared, creating a beautiful effect of blurring the contours. You can also draw with pencils directly on a wet surface, the effect will be the same.
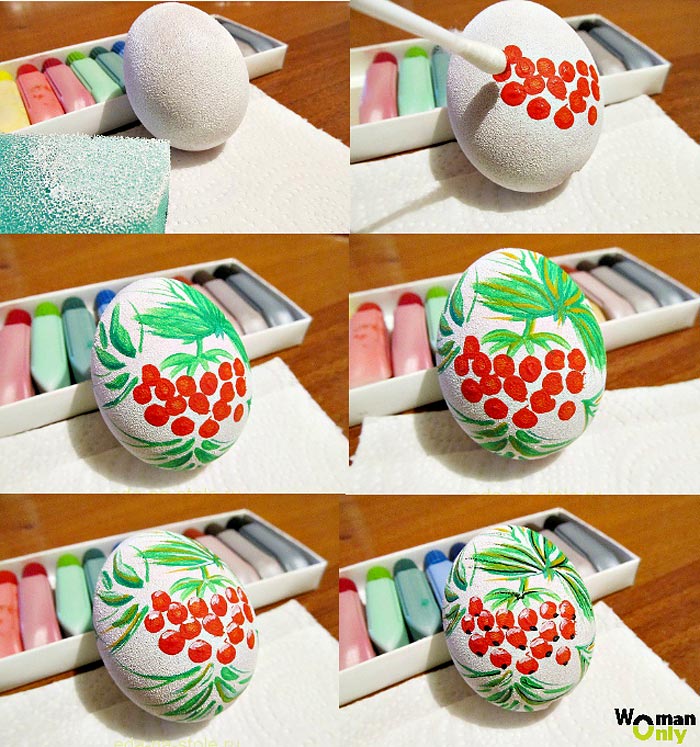
stucco painting
To create a pasted Easter board, take:
- a boiled egg with a completely dried surface (or raw with the contents removed through the upper and lower holes, if the product is not intended to be eaten, but used as a souvenir);
- acrylic paints;
- brushes;
- cotton swabs (for pricking them on the shell);
- foam sponge;
- furniture varnish.
Using a sponge, paint the shell with suitable acrylic paint to make the background of the future drawing (in this example, it will be a bouquet of mountain ash). Let the piece dry. Apply a second coat of paint if necessary.
Dip the tip of a cotton swab into red acrylic. Make red berries by pushing the stick perpendicular to the shell. Make spots close to each other to form a beautiful bouquet.
Next, draw rowan leaves by taking green paint with another cotton swab, making thick oval stripes.
To make the Easter painting quaint, naturalistic, take a medium-width brush, run dark green paint along the center along each leaf, then make a petiole of leaves with a thin brush, apply streaks with yellow paint. On the fruits, paint highlights with white paint. Place black dots at the bottom of each berry. Let the paint dry. Apply furniture polish to secure.
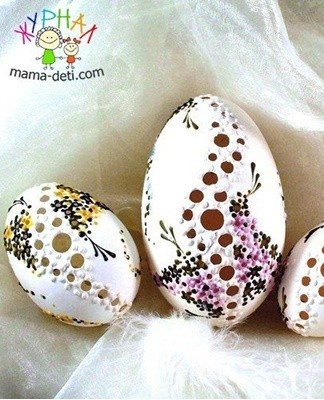
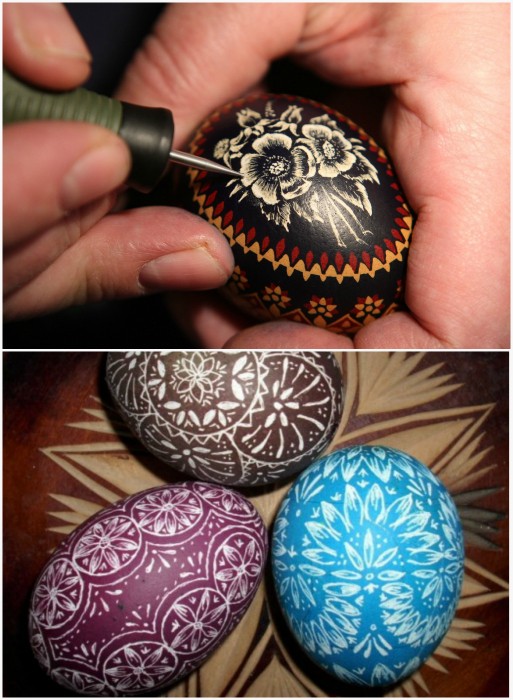
Engraving
To make an Easter bun, take:
- an empty egg inside;
- food or natural coloring;
- sharp scraping tools.
Paint the surface. Use a strong dye to make the paint more contrasty. Let the egg dry. The dye should dry well. Using a pointed tool, etch a pattern on the shell. Use stencils for intricate designs.
DIY painting master class
Those who want to practice painting Easter eggs can purchase wooden eggs from a craft store. Good work can be presented to friends for Easter. The main thing when buying is to make sure that the surface is smooth, that there are no cracks and chips.
The following tools and accessories are also required:
- acrylic or gouache;
- artistic brushes of different diameters and shapes (also, if necessary, cotton swabs);
- transparent varnish for wooden surfaces;
- simple pencil;
- a clean eraser for erasing a pencil outline on a wooden surface;
- fine sandpaper;
- beads, beads, decorative thread and other decorative elements of a painted egg.
Step-by-step implementation of Easter painting:
- Sand the wooden surface carefully with an abrasive cloth, removing the slightest flaws and flaking wood fibers.
- Draw a sketch on paper. You can do this with colored pencils to see how harmonious the color combinations look.
- Take a beige or pale yellow paint, carefully paint the room with a wide brush. Let dry.
- Draw the outline of the future drawing on the egg. Use a hard pencil and draw thin lines to prevent the graphite from smearing onto the surface.
- Paint the outlines with the desired color. First, fill in the larger elements of the pattern. After drying, apply fines on top.
- Set the egg aside until completely dry.
- Apply a thin layer of varnish to protect the souvenir from mechanical damage and ultraviolet rays.
- Place the finished Easter keepsake on a rack until it dries.
For painting a large area, use wide brushes, for small details of the pattern - thin, with stiff bristles. Apply the second coat only after the first has dried. Start coloring with large, light details and finish with small, dark details. This will prevent unsightly blending and smudging of shades.