Master classes on drawings on stones for beginners step by step painting ideas
Stone painting is a fun and interesting activity. The process of creating a picture on a selected stone can become a serious hobby for both children and adults. The conditions for creating a unique work are the choice of a suitable stone, special tools and a sketch that can be easily transferred to the material. Painted and painted stones can be used to decorate a garden, yard or terrace.
How to choose the right stones for painting
The realization of the idea of painting depends on the quality of the chosen materials. To achieve a good result, stones of suitable size and properties are selected, capable of preserving the applied pattern.
Checklist for choosing a material for painting:
- a suitable size that allows you to completely fit the intended design;
- flat surface;
- correct shape (semicircle, semi-oval, oval);
- absence of cracks, scratches, porous structure;
- light background without spots or dark spots.
You can find good things on the beaches. Wave-washed pebbles have a smooth, dense surface that will withstand any paint application.To decorate the garden, materials of approximately the same size are selected to create a single image. In gardens and plots, the use of large painted rocks is appropriate.
Some painting techniques favor the presence of a porous structure. Several layers of paint are applied to it to create a denser background for the future drawing. But the most convenient surface for work is still a dense flat surface of a light shade.
Paint recommended for working with stones
The purpose of painting is to create a good layer with clear lines, details and necessary contours.

Different types of paints are suitable for work.
| Kind of paint | Features |
| Gouache | Has a liquid consistency when diluted with water. Applied neat, it creates too dense a layer that can crack in the sun. |
| Acrylic | When applied over a layer of primer, it creates a dense layer, gives a clear outline. The drawing does not crack, does not fade. |
| Watercolor | Has a liquid consistency, does not give a clear pattern, fades in the sun. |
Auxiliary tools are felt-tip pens, liquid eyeliners, gel pens. The last layer of anchor capable of keeping the drawing is a layer of varnish. Varnishing prevents the image from cracking or fading.
Stages of painting pebbles with your own hands
It seems to many that painting does not take time, but it does not. Before starting the process of working on the image, you need to properly prepare the surface.
The first step is to rinse and dry the work surface. Soap solutions are used to wash off sand particles, some areas are cleaned with a long-haired brush.After washing, the surface is wiped with a clean, dry cloth and dried in the sun.
Padding
The primer has several functions:
- prepares surface for paint application;
- levels the material;
- creates a dense layer that adheres to the paint;
- reduces the amount of paint consumed.
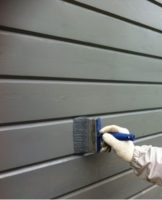
Priming is carried out using PVA glue or a special professional primer. The primer coat should be even, wait until it is completely dry before painting.
Coloring
They start painting once the primer is completely dry. The main background shadow is applied to the ground. After drying, they begin to draw the contours of the drawing. The coloring of the image begins along the parched contours.
Details
The last stage is to draw small details, use special highlighters, add shades and finishes. Fine-tipped brushes, markers and outlines are used to decorate the details of the design. This step allows you to correct the defects that were made during the creation of the background or the main image.
Final opening
The last step necessary to fix the pattern is varnishing. It is carried out after complete drying of the last layer applied. The work uses construction varnishes, artistic transparent type. The manufacturer indicates the working rules of the formulations and the duration of the fixing period.
Reference! On small pebbles, transparent nail polish is used to fix the image.
Master classes for beginners step by step
The idea of the drawing can be related to the shape of the selected stone. Some designs are particularly in demand because they can be created on stones of any shape and size.
Strawberries
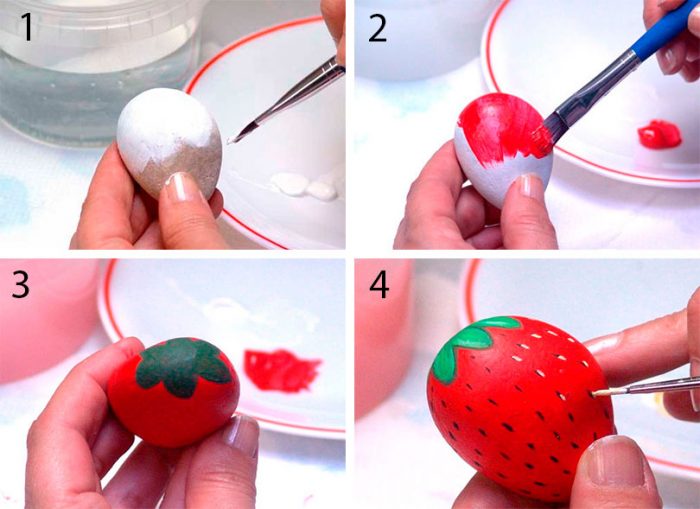
One of the most popular options for painting is the creation of a full basket of "stone strawberries". For this, even stones of the same size are chosen.
Step by step instructions:
- The prepared surface is primed with a layer of PVA glue diluted with water according to the formula 1: 1.
- After the layer has solidified, the upper and lower parts of the stone are alternately covered with a layer of red paint.
- In the upper part, the contours of the leaves are drawn.
- The leaves are covered with green paint along the contours.
- After drying, black dots are made on a red background.
- White micro-stripes are applied next to the blackheads.
- After the parts are dry, the surface is varnished.
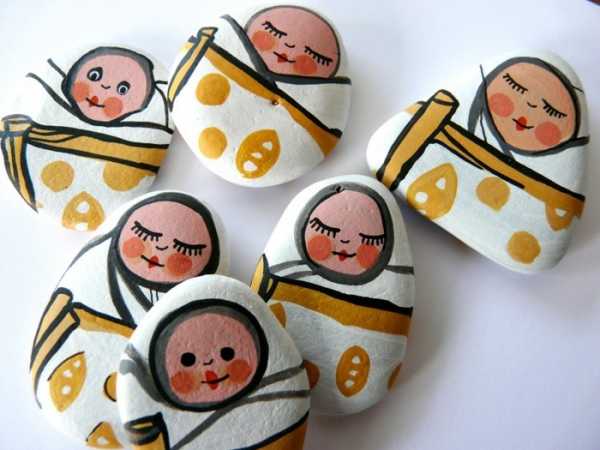
Family
To create a family, stones of different sizes are taken. Once colored, you can arrange them by size, starting with the largest and ending with the smallest. The embodiment of the idea depends on the imagination of the artist. To designate a family, simply draw eyes on each stone and fix the stones vertically by seniority. To make the picture more detailed, the accessories are shown:
- for mum: skirt, bow, pearls, earrings, hairstyle;
- for dad: mustache, pipe, hat;
- for children: pacifier, bangs, ponytail, pigtail, toupee.

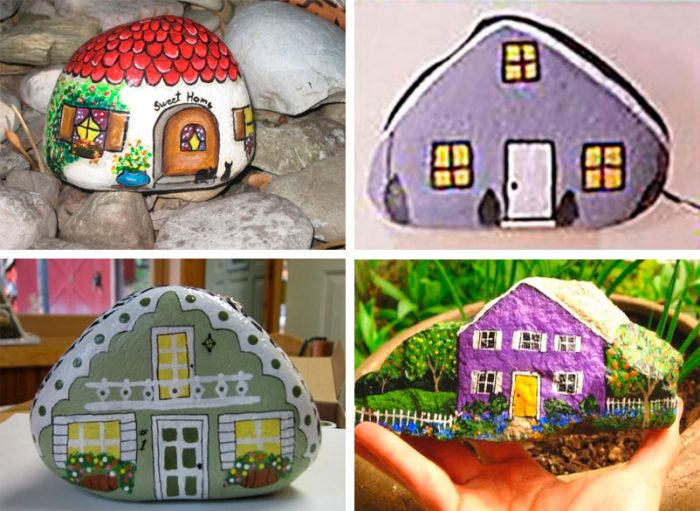
Little house
The design of the house is created on stones of any shape and size. The result depends on skill and skill. The most attractive are small detailed images that convey a sense of comfort and harmony.
Step by step instructions:
- On the prepared surface, markings are made with a pencil (it is necessary to indicate the position of the door, windows, roof).
- The bottom is painted with the chosen paint, leaving the doors and windows intact.
- After the background has dried, the doors and windows are painted.
- They add outlines, draw details (curtains, door handles, chimney smoke, flower pots).
- White accentuates.
- Draw small details.
- The surface is varnished.
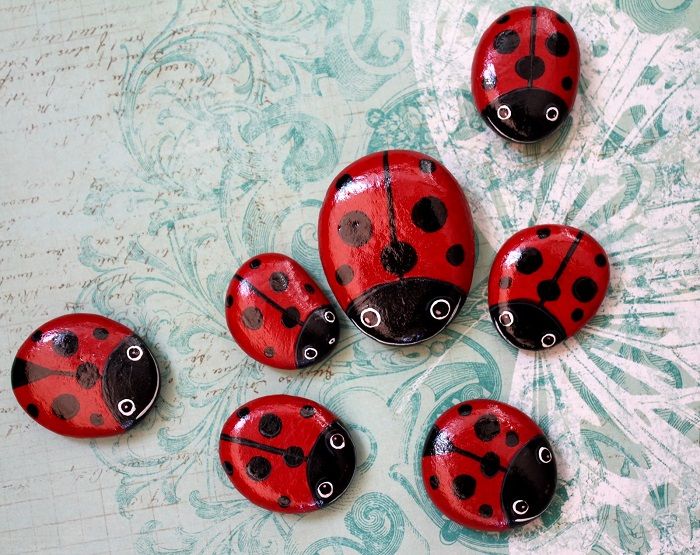
ladybug
To create the body of a ladybug, a semicircular stone is chosen. Instructions:
- First, marks are made: they indicate the wings, the body of a ladybug, the antennae.
- Depending on the markings, the stone is painted red or yellow.
- After drying, black dots are applied to the red field.
- Draw the wings.
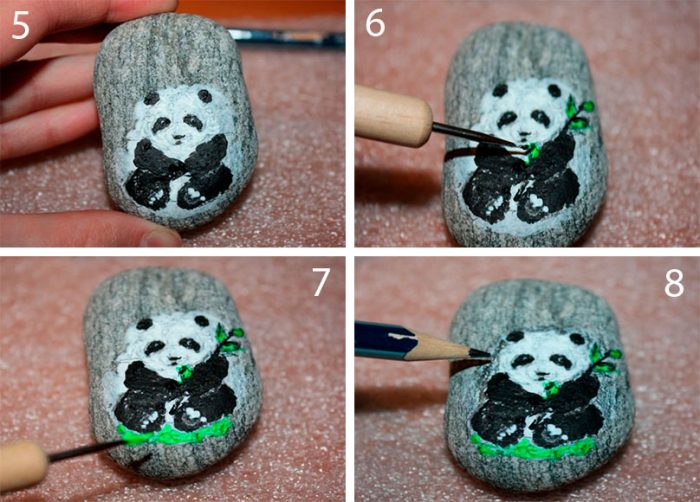
Pandochka
It is based on a white background. The black ears, eyes, nose and mouth are marked all over the surface of the white background. Every detail is painted along the contour.
Reference! The panda family is often depicted on stones of different sizes. This is an easy to image design that a beginning crafter can handle.
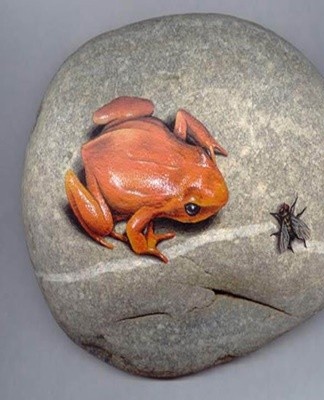
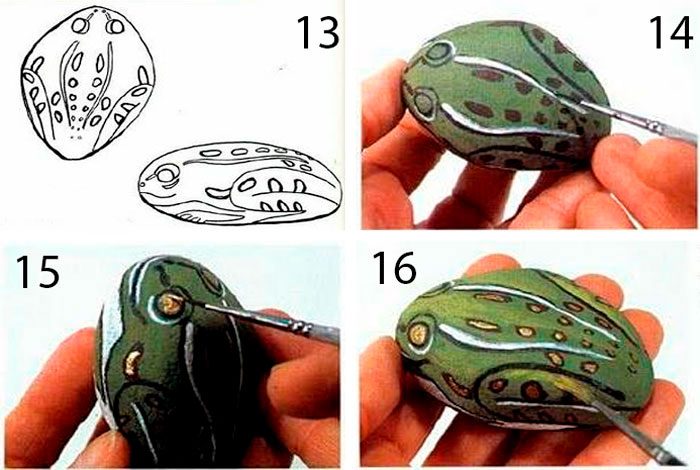
Frog
To create the body of the frog, take a semicircular uniform stone. Instructions:
- Yellow and green dyes are mixed until a uniform olive hue is obtained.
- The surface is covered with paint and dried. The abdomen is treated with white paint.
- The legs are drawn from above.
- A simple pencil designates a muzzle, eyes.
- The details are underlined with black marker. Draw the tongue with a red marker.
- Dark green stripes are shown along the top of the stone.
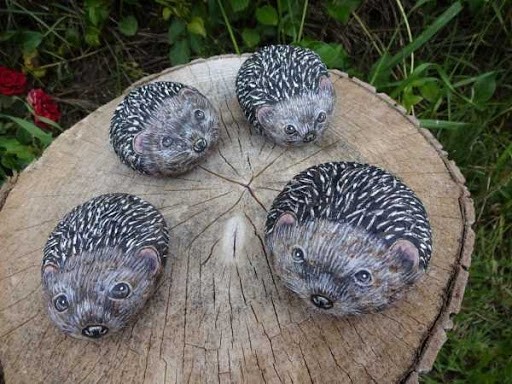
Hedgehog
To draw the needles of the hedgehog, you will need a thin brush and contour markers. After drying, the gray background is painted with strokes that imitate needles. When creating needles, they adhere to a specific direction. After the fields have dried, thin white strokes are made inside the needles to add extra volume to the body of the hedgehog. The tone of the muzzle is light gray. The nose and eyes are drawn in black.
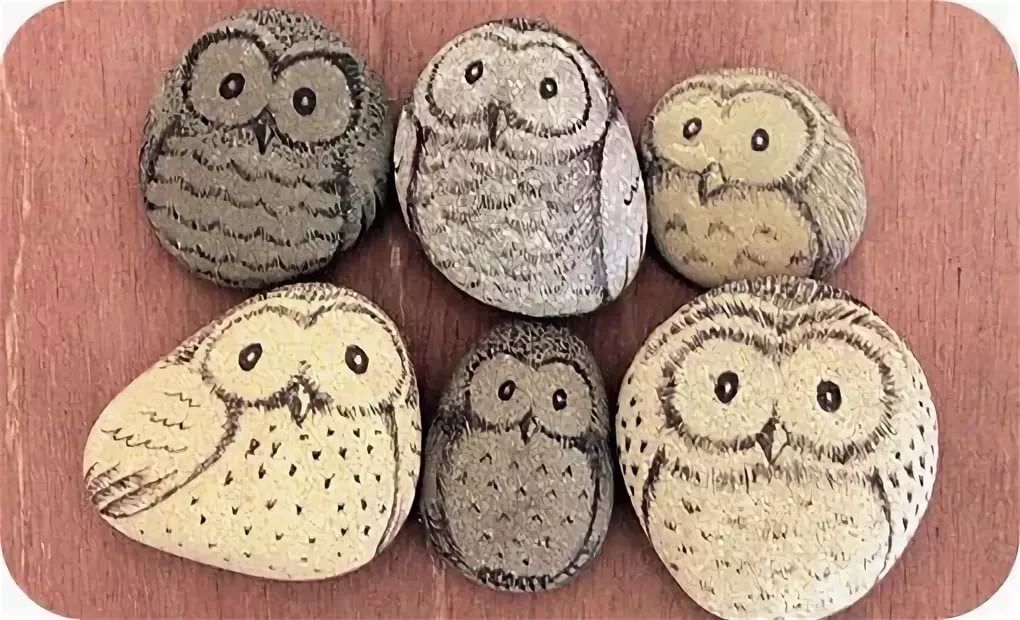
Owl
An owl is recommended for painting on large semi-oval stones. These murals are used as decorative elements when decorating a terrace or a flower bed.
Step by step instructions:
- A large, even stone is covered with a layer of primer (diluted PVA glue).
- A white gouache paint is applied over the base coat.
- The pencil marks the eyes, nose, wings on the sides.
- White and black gouache are mixed. Using a thin brush, draw feathers starting from the second third of the entire surface.
- After drying, the eyes are underlined in black and white.
- The pupils are painted with orange gouache with red reflections.
- White feathers are drawn between the eyes.
- White and gray strokes are done to add volume to the plumage.
- After all the layers are dry, paint the nose with black gouache.
- Between the joints of the muzzle and the body, the lines indicate the plumage.
- After drying, the machine is entirely covered with transparent varnish.

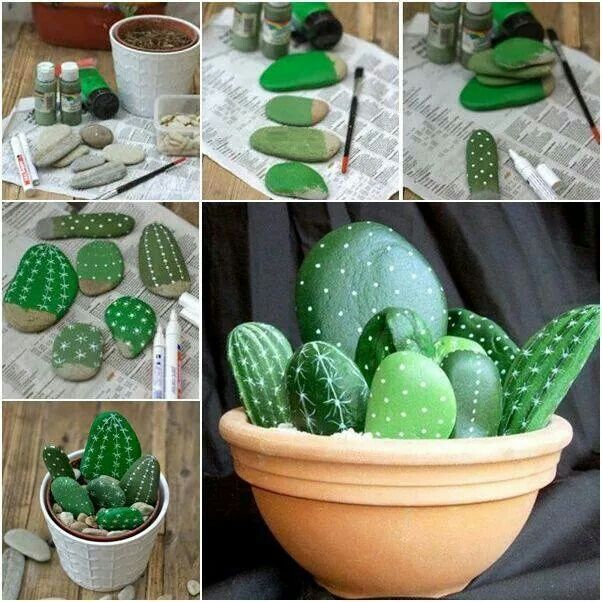
Cactus
Stone cacti look realistic when finished. Several pebbles, stylized as cacti, are placed vertically in a pot. This technique makes it possible to create a unique decorative element.
Instructions:
- 4-5 stones are washed and dried.
- Green or red acrylic paint is applied to the primer.
- With the help of a concealer, a felt-tip pen or a thin brush, characteristic longitudinal lines imitating needles are drawn in the cactus.
- Cacti are placed vertically in a pot covered with small stones or sand.
Advice! A rare flower can be depicted on top of the cactus. As a rule, bright red or orange flowers are particularly attractive against a green cactus background.
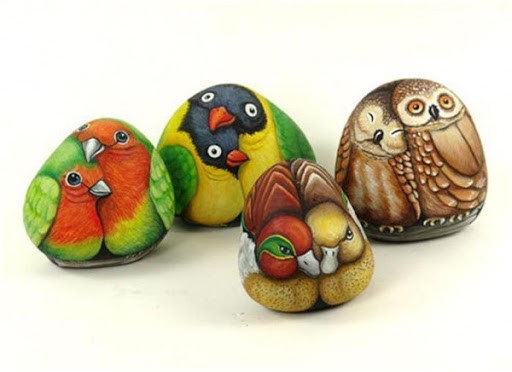
Bird
In addition to owls, they create different birds: from traced details of sparrows to a schematic representation of a bird using the designation of beak and wings.
Small flat stones with a bird's beak are placed on a branch and glued to the panel.
Instructions:
- 4 stones are painted under the birds: for this, images of eyes, beaks are made on a gray background, wings are sketched.
- A thick branch is glued to a semi-circular wooden panel.
- "Birds" are placed along the entire length of the perches, glued with construction glue.
- The surface is varnished and dried.
Information! Panels with birds are used for wall decoration or placed in the form of a stand.
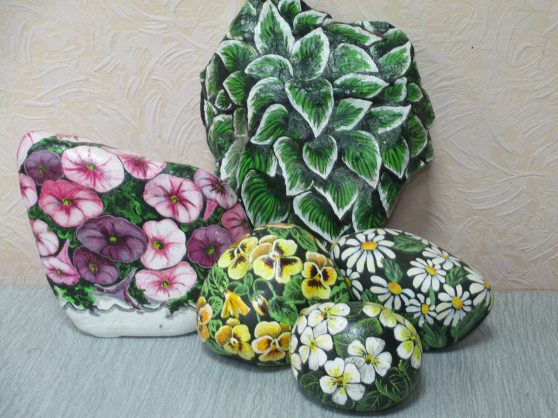
flowers
Flowers are one of the most popular subjects in craft production. When using ideas with flowers to paint stones, you should limit your imagination to creating floral designs. It is difficult to make a realistic stone bouquet.
The drawing can be transferred using stencils. Floral compositions are used to create garden signs, terraces, paths, space delimiters within the site.
More pattern ideas
To paint a stone, it is not necessary to have the talent of an artist. Images can be transferred using simple stencils, transparent cripples or parchment. For creativity with children, it is recommended to use images of cartoon characters or fairy-tale heroes. You can create a whole fictitious city with imaginary characters, elements of scenery, designations of places.
Those who are preparing a child for school are interested in ideas for creating a count or an alphabet from stones.To do this, an image of a number or letter is applied to the primed surface, using a shade contrasting with the main background.
Flat, even stones are often painted with blue paint to create the illusion of a body of water. Such decorative elements look great among flower beds. Lawns, terraces, verandas decorated with stones with images of rabbits, cats and puppies look especially attractive. The condition for creating such decorative elements is the mandatory varnishing of the surface. The varnish will protect the surface from fading.