Step-by-step instructions on how to properly disassemble a shower head
How nice to come home after a hard day's work and take a relaxing shower. However, sometimes situations arise when the shower head stops working, thereby depriving us of the well-deserved pleasure. Do not despair, because you can solve the problem with your own hands and for this you do not have to spend a lot of time. Let's figure out how to independently disassemble the shower head in the bathroom and what features should be considered in this case.
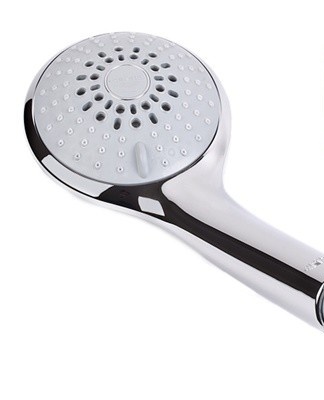
How to properly disassemble and clean a shower head
Before starting the repair of a faulty device, it is necessary to prepare some tools:
- gas key;
- a pin wrench, which should have been included with the watering can;
- Phillips screwdriver.
There is such a set in almost every apartment, therefore, there should be no problems in finding the necessary things.
To note! Be extremely careful during assembly and disassembly. The watering can consists of a large number of small parts that can be easily broken or lost through carelessness.
Once all the tools have been collected, you can begin the shower head analysis process. Action Algorithm:
- we turn off the water in the shower;
- deactivate the shower mode on the faucet;
- unscrew the nut that connects the watering can to the hose;
- We take a close look at the water diffuser panel, noting the attachment points. Usually there are no more than 5 of them, and they are located in special recesses in the body;
- unscrew the connecting elements using a special key supplied with the watering can. Otherwise, get a pin wrench from your toolbox. In the absence of a hook wrench, ordinary scissors or a knife will do;
- the unscrewing process can be started from any screw, the main thing is to do it sequentially, clockwise;
- Once the top cover of the showerhead is removed, you will have access to the whirlpool box, which is attached to the back of the showerhead with a screw;
- take a Phillips screwdriver and unscrew the screw;
- it is then necessary to carefully dismantle the dividers and mobile partitions intended to diffuse the flow of water. This must be done carefully so as not to lose or break fragile parts;
- take out the whirlwind;
- we remove the spring, which is responsible for switching the mode of dissipation of water pressure, if it is provided for in the design. Do this carefully so as not to stretch or tear the piece.

If the tourbillon case is fixed with latches, it is not recommended to open it yourself. Clamps are extremely fragile, with any careless movement they will become unusable. It is not possible to restore them after a failure.
In order to clean the inside of the watering can from the plate, it is allowed to use:
- A vinegar solution. We take a container for soaking clogged parts and pour 200-300 milliliters of 9% vinegar into it. We dilute with water and reduce the details of the watering can in the resulting solution.It is necessary to soak for at least 10 hours, otherwise the result will not meet your expectations.
- Lemon acid. We dilute citric acid in warm water and lower the disassembled watering can into it. We wait 30 minutes and remove the parts. We wash them with water and wipe them with a rag.
pipe repair
An equally common cause of failure is the failure of the watering can's water supply pipe. It fails for two reasons:
- at the junction of the watering can with the hose, water begins to flow;
- the corrugated casing is damaged, which leads to the formation of leaks on the body of the product.
It is not difficult to solve the problem, the main thing is not to be afraid and to act according to the instructions.
Eliminate the leak
Leaks occur at pipe connections. This is due to the wear of the rubber pad, which loses its elasticity over time. It all starts with small leaks, which are hardly detected by the human eye.
In the future, the flow becomes more and more, making exploitation of the soul impossible.
If a similar problem occurs, you should do the following:
- we try to tighten the fixing nut harder to ensure a tighter fit of the joint;
- if the problem persists, the gasket will probably need to be changed;
- However, replacing the seal does not always solve the problem. In this case, pay attention to the nipple inserted into a larger diameter plastic pipe;
- we remove it and inspect the part for cracks. If they are found, we cut the nipple to a usable size or replace it with a new one.

To note! If a crack is found in the plastic tube itself, it is permissible to heat or cut it. Be careful when heating.As soon as the crack is sealed, turn off the heat.
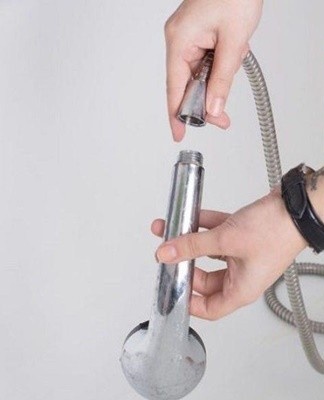
Brass Corrugated Hull Repair
If the hose is strongly twisted during showering procedures, the turns of the brass corrugated sheath may not withstand and scatter. In this case, the tightness of the pipe is broken, which will damage the plastic part.
Solving the problem is simple:
- grab the pipe with both hands near the break;
- we begin to turn the upper hand clockwise, trying at the same time to pick up the upper turn of the shell with the lower turn.
During repair work, it is important to observe two conditions:
- it is necessary to scroll the pipe carefully, without applying excessive force;
- remember to watch for changes in braid diameter. Try to rotate the braid so that the entire segments aren't strained unnecessarily.
If the pipe cannot be repaired once assembled, you can remove the union nut and then twist the sheath. Otherwise, there should be no problem with the repair.
Features of the repair of multimode models
Repair of a multimode model is practically no different from the usual one. It has a bit more detail, but, in general, you can let the algorithm shown above guide you. The main thing is not to scatter the disassembled parts anywhere, as they are fragile and easily lost. Replacing them will be problematic.There is no specific analysis algorithm, as different manufacturers implement mode switching design differently.
Reassembly
Reassembly is simple. Simply repeat the steps in reverse order and the shower is ready to go again. If you forget the correct sequence, use the following cheat sheet:
- install the mode switch spring, if applicable;
- we put a whirlwind;
- we fasten the top cover of the watering can;
- we connect the hose to the tap and turn on the water;
- we check performance.