Rules and instructions on how to disassemble a shower cabin with your own hands
The need to disassemble the shower enclosure arises when you want to install other plumbing equipment, transfer to a new place or carry out repair work. Faced with the question of how to properly disassemble the shower enclosure, it is recommended to study the detailed instructions.
How to prepare for dismantling with your own hands
Before proceeding to the direct dismantling of the cabin, you need to carry out the preparatory stages. This will help to carry out further work more easily and avoid the appearance of difficulties.
Tool
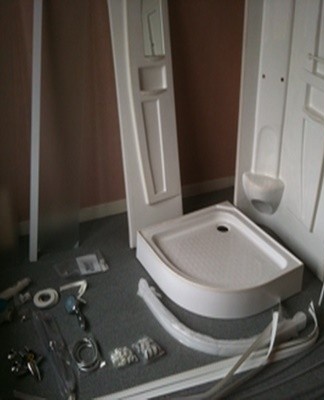
It is possible to dismantle a hydrobox or a shower cabin without the help of a professional, using a minimum of basic tools. A standard list of accessories required for disassembly includes a sharp utility knife, a screwdriver set or a screwdriver and a silicone sealant treatment agent.
Armed with a tool, you need to treat the open surfaces of the shower cabin with detergents, rinse with water and wipe the body with a dry cloth.
Communications Disconnect
After cleaning the shower stall and preparing the tool, you can proceed to the stage of disconnecting the utilities.To disconnect the plumbing from the general water supply system, you must adhere to a certain sequence. Instructions for disconnecting communications are as follows:
- If the shower is connected to the mains for hydromassage and other functions, first disconnect the cabin from the mains.
- Shut off the water supply by turning the appropriate valves.
- Disconnect the hydrobox or cabin from the sewage system.
- Remove additional parts of the structure, including towel racks and shelves.
Procedure
Careful adherence to the order of actions helps to avoid common mistakes. Having started to disassemble the structure, you need to perform each stage competently, adhering to the standard instructions.
Dismantling the door
Most types of shower cabins have the same design, and the doors move on special roller mechanisms placed in the guides. Dismantling the doors first requires loosening the screws that hold the rollers on top. After unscrewing the screws, the lower rollers are removed from the guides by lifting and slightly pulling the door. For convenience, it is better to perform this manipulation with an assistant, since a large door can be difficult to lift and hold on its own.
Tempered glass doors are particularly heavy.
Removal of panels
Glass or plastic panels are attached to the frame on both sides with fasteners. If the panel is close to the wall, then it is fixed on the side with racks or bands. Starting to remove the panels, remove the clamps on both sides, then hold the panel and unscrew the screws that hold the rack. After moving the part, remove the panel and press lightly on the glass or plastic to remove the material from the side groove and completely remove the panel.Follow these instructions to remove all side panels.

It is important to consider that in some situations the removal of the panels can be problematic due to the presence of silicone seals. Due to the long-term operation of the shower enclosure, the seals adhere firmly to the glass and plastic components of the sanitary equipment. Faced with this problem, you need to carefully cut the seams with a wallpaper knife.
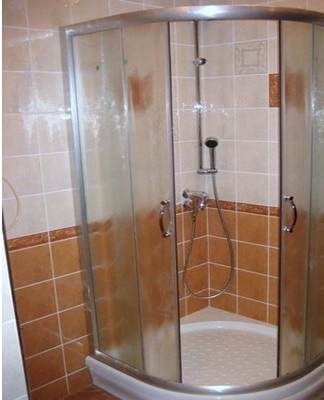
Frame disassembly
To disassemble the frame, the strips are separated from the walls by unscrewing the screws, then the traces of silicone are cleaned by treatment with a solvent and scraping with a knife. Then you need to remove the upper part of the frame, which will make it easier to do the rest of the work. The frame is removed from the pallet and all screws are unscrewed for complex dismantling.
Disassembly of the pallet
When disassembling a pallet, there are two options depending on the specifics of the initial assembly. If during installation the pallet was placed on a brick base, then dismantling it will not be particularly difficult. When the pallet is mounted directly in the ground, it will take some effort to disassemble it. It is easier to disassemble a pallet with high edges. The sequence of actions for dismantling is as follows:
- Remove protective and mastic residues by applying a solvent.
- Gently try to pull the paddle out. It is important to be careful because the plastic element can be easily damaged.
- If the pallet cannot be removed by hand, use a lever to lift it.
- Removing the pallet from the screed, clean the traces of glue, silicone and other building compounds from its body.
How to disassemble a watering can
The need to disassemble the watering can may arise when the structure is clogged. First, the watering can is disconnected from the hose, and if the components are new, this does not require any effort. If the structure is rusty, it is better to use a key to unwind. Then the cork is removed from the central part of the watering can, prying it off with a sharp knife. After removing the cap, you will have access to the screw, which must be unscrewed with a screwdriver. If a large amount of deposits accumulate on the surface of the screw, first clean the groove with a blade. After unscrewing the screw, detach the grille from the housing.
Additional tips and tricks
It will be necessary to deviate from the standard instructions when dismantling a shower enclosure with higher pans. The main difference is the presence of a protective part that covers the body and gives the structure a complete look. This structure is fixed with standard brackets and must be unscrewed before dismantling. During the first intervention, it is recommended to write down the procedure or take pictures to avoid errors during reassembly.