Instructions on how to repair a leather jacket with your own hands
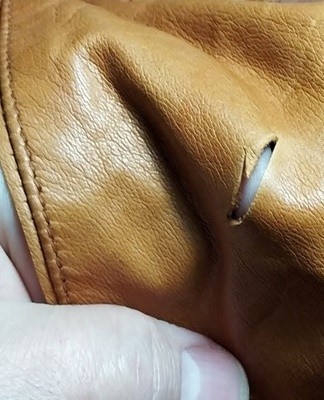
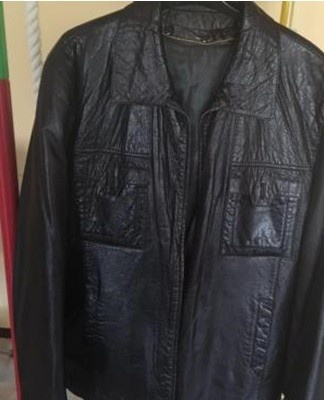
After prolonged wear, scratches and scuffs appear on the leather jacket. The thin skin breaks if caught by a sleeve during transport. Your favorite leather jacket can be repaired at home if the damage is minor. The main difficulty is choosing a patch that matches the color. To beautifully repair a leather jacket, you need to know how to use glue, tape and liquid leather. You can also use appliqués, fabric or embellish the item with a decorative stitch.
Preparing the product for repair
Before repairing, you must:
- dry the jacket;
- clean and degrease the skin of the damaged area.
Do not start working when the surface of the item is wet, after rain.
Degrease the surface with a nail polish remover without acetone, alcohol. A cotton ball is moistened in a small amount of liquid and the damage is wiped away.
What is necessary
Various equipment is needed to repair a jacket:
- glue for leather;
- toothpick;
- needle;
- thread;
- blade, stationery knife;
- Scotch;
- liquid skin.
The leather patches choose a color close to the material of the jacket.
Basic Home Repair Methods
The skin is sewn, glued and a patch is applied. Additionally, the damage is masked with a coloring spray.
How and how to plug the hole
Minor damage can be sealed with special glue. It is applied to the front and back for durability. It's the easiest and fastest way to repair your jacket.
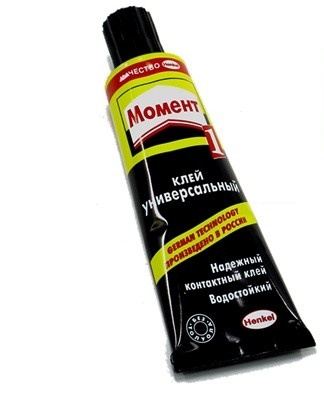
Moment
Superglue is not suitable for repairing leather goods because it contains cyanoacrylate. The substance hardens as it dries and the canvas loses its elasticity. Better to use ordinary Moment 1 Classic. Moisture and heat resistant agent does not affect the plasticity of the product. The glue is produced in 30 milliliter tubes. A small volume is enough to repair a jacket.
To glue the piece with the Moment, you have to press it firmly, then put a press on it. Unlike Super Glue, when using Moment, it doesn't matter how many minutes you hold the part to be glued. The oppression will help keep it flat, without wrinkles.
Double-sided tape
Method for repairing fine scratches or tears:
- prepare a patch;
- fix the edges of the gap from the outside with transparent tape;
- lay the product face down on the table;
- cut a piece of double-sided tape with a diameter of 1-1.5 centimeters larger than the patch;
- glue a patch on one side of the tape so that there are free centimeters at the edges;
- with the other side, attach the tape to the sewn side of the gap.
Double-sided tape can be used to seal the cut with any piece of fabric. The renovated site will remain flexible. If the gap is visible from the outside, it must be tinted.
We remove the hole with a decorative seam
In order not to bother with glue and the selection of patches, a torn jacket can be sewn. There are two ways to store the product:
- sheath a straight and even cut with threads on the front side;
- on the torn edges, place a thin strip of leather and also sew over it.
The usual "cross" is suitable for decoration. A more complex, but tight goat stitch looks bright if embroidered with threads of two colors.A decorative trim strip can be used to beautifully close the ripped leather next to the pockets.
How to close the gap
A large hole with a completely torn piece of leather is closed with a patch from the outside and inside, under the lining. Repair method:
- tear the lining along the factory seam;
- glue the support from the inside and wait for it to dry;
- cut out a piece of leather or substitute that follows the contours of the hole;
- insert into the hole on the front face so that the edges of the patch coincide with the edges of the hole;
- Fill the gaps between the insert and the edges of the gap with glue;
- when the outer patch is dry, sew the lining.
If the exterior white is a different color, it can be painted with cream or spray paint.
The gap, closed with a piece of leather of the same color as the jacket, should be lubricated with an emollient cream so that the product does not swell due to hardened glue.
How to seal a cut
When cutting, one stitch is sufficient. Repair method:
- open the cut from the inside;
- bring the edges together and glue the outside with adhesive tape;
- stick the patch from the inside out;
- keep it under load;
- once the substrate is dry, remove the adhesive tape;
- Apply glue between the cut edges with a toothpick.
After drying, the damage will be almost imperceptible. You can completely mask the cut with a paint spray.
What to do if part of the material is torn off
How to fix an irregular angle burst:
- insert the torn piece in place and seal it with tape;
- turn the jacket inside out;
- tear off the liner on the torn part of the product;
- degrease the gap of the face and the wrong side;
- stick the patch on the back of the gap;
- peel off the ribbon and sew the lining.
After careful repairs, the place of the break is almost invisible.
Collar and cuff repair step by step
Methods to restore various damage to the collar:
- scratches, scuffs - paint with a spray or cream;
- torn holes - apply patches;
- torn collar - sew the gap from above with decorative seams or sew from the inside out.
You can change frayed cuffs yourself:
- turn the sleeve over, tear off the liner and the damaged part;
- cut the same from a suitable material;
- sew by hand.
The edges of cuffs worn in white shall be concealed by piping sewn onto fine leather or its substitute.
Liquid skin application
Cuts and scrapes can be easily removed with a special solution. In stores selling sewing supplies and accessories, you can find the desired shade. Liquid leathers of different colors are also mixed to obtain a color close to the original. Before applying the product, the surface must be degreased.With the help of liquid skin, wounds of varying complexity are removed:
- small scratches are covered with a thin layer, without exceeding the limits of damage. Excess funds are blotted with a sponge;
- under the through bursts, a patch is glued, on the front side, 2-3 layers of liquid skin are applied to it. If the edges of the gap are uneven, trim them with a razor blade.
The solution is prepared according to the instructions on the package. How to handle the product:
- apply a slightly larger piece of bandage to the damaged area;
- apply the first layer of liquid peel with a plastic spoon or spatula;
- after drying, spread on the second layer.
Liquid skin dries in 3-4 hours. A large surface covered with several coats will dry up to 8 hours. You need to cook as much of the solution as needed for one layer.
How to reduce the size with your own hands
Leather items stretch over time. A basic knowledge of the course of cutting and sewing will help in sewing a jacket to the shoulders or to the waist. Workplan:
- take a measurement;
- tear off the liner;
- tear the seams;
- set new parameters;
- hand sweep and try;
- sew along the marks.
When removing extra inches from the waist, it is important to ensure that the jacket does not sit too loosely on the chest. If the top looks baggy, you'll need to cut out the darts yourself.
Features of working with leatherette
Artificial leather, like natural leather, is repaired with patches. But it is important to choose the glue that is suitable for the material. Chemicals can damage the leatherette fibers and ruin the item. The skin substitute adhesive is available in aerosol form. A universal product suitable for eco-leather containing natural fibres.It is applied in a thin layer, so that the product retains its elasticity.

When to bring it to the workshop
Professional help will be needed if a large part is torn to shreds or torn off - foreleg, back, sleeve. The damaged part will be fully replaced. It is better to go to the workshop to change the collar and cuffs with a complex cut of the leather jacket, as well as when the skin around the rivets is frayed.
Common Mistakes
How to spoil the look of your jacket:
- glue the gap with PVA glue - a patch held on a water-soluble composition will fall off after rain;
- sew on a typewriter with a thin needle - a special machine and needles are used for working leather in the workshop;
- abuse glue - traces will remain on the front side;
- paint the patch without checking - you need to try on a small whole area of the skin, how the paint or cream will look.
Leather sewn on an ordinary sewing machine will stretch and wrinkle.Excess dried glue can be wiped off with a dry cloth. It is impossible to wash off the traces with water, because the patch will move away from moisture.
Additional tips and tricks
The following rules will help you fix your favorite jacket:
- use non-streaking tape;
- to check the quality of the tape, you need to stick the piece on the leather sample. If a sticky mark remains, you can weaken the adhesion of the tape - stick and peel several times;
- instead of Moment, you can use any moisture-resistant elastic adhesive - polyurethane Desmokol, Kenda Farben chloroprene SAR30E;
- work quickly, remember the instructions before repairing or check the points with the inscription on the piece of paper;
- cut the patch 1 centimeter larger than the size of the gap;
- do not hold the patch coated with glue on the weight for a long time, otherwise it will dry out and it will not be possible to correct its position after gluing;
- the surface to be treated must be dry;
- instead of a leather patch, you can use a fabric patch, but the fabric adheres less well to the skin;
- the leather insert can be painted with leather cream, but it is less resistant than paint;
- apply the patch evenly, otherwise wrinkles will form;
- in order for the patch to fit better, after gluing it, you need to knock it lightly with a hammer;
- the lining does not need to be torn, you can cut the fabric under the tear and then sew it.
If it was not possible to choose one patch by color, you can glue a contrasting patch, and a few more of the same for decoration.