How to clean your laptop from dust yourself at home
Regular cleaning of the laptop is necessary not only to keep the equipment clean, but also to extend the service life. Removing accumulated dust and dirt helps reduce the possibility of overheating and ensures proper cooling element operation.
When to clean and prevent the laptop
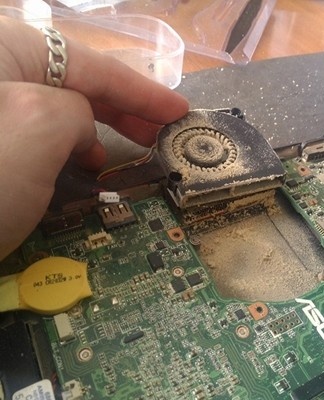
The need for prophylaxis and thorough cleaning of the laptop arises when signs of malfunctioning of the cooler and other elements appear. Users often find the following symptoms:
- increased noise from a running fan;
- strong heating of the case;
- constantly crashes and restarts when launching productive programs.
Cleaning the cooler and internal boards is the main preventative measure.This procedure reduces the risk of breaking the heating elements.
What is necessary
The laptop can be avoided on your own, without the intervention of service center personnel. To clean at home, you will need to prepare a set of tools and materials, then follow the step-by-step instructions.
Screwdrivers in different sizes for small parts
The laptop case and internal parts are screwed with screws of different sizes. To unscrew the device, you will need to use several screwdrivers, the easiest way is to prepare a set of tools.
Brushes
The laptop should be cleaned with different brushes. It is best to handle parts with a scraping surface with soft brushes. For thorough cleaning of the rest of the elements, you can use brushes with hard bristles.
Napkins
Use special wipes to clean the monitor, case, and internal components. Treating parts with simple wet wipes can cause breakage due to alcohol impregnation.
Maybe a plastic card
Often as part of preventive maintenance, it becomes necessary to remove the old layer of thermal paste on the internal chips. For an even distribution of the new layer on the surface, it is more convenient to use a plastic card. It is important to take an unnecessary board, as it can be damaged when in contact with thermal grease.
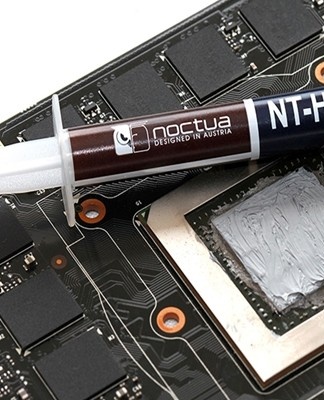
Thermal paste
Thermal paste is a creamy substance with a conductive property. The paste is used as an intermediate layer in the element cooling system and removes heat from powerful transistors.
It is recommended to replace the thermal paste 2-3 times a year, because it dries out quickly with frequent use of the laptop, which reduces the heat dissipation efficiency.
Budgetary
Inexpensive types of thermal paste are made on the basis of powdered zinc oxide and liquid polydimethylsiloxane. It is advisable to use economical thermal paste in the case of prophylaxis of inexpensive devices or in cases where a small amount of a substance should be applied to the fleas.
Expensive
The composition of expensive types of thermal paste contains metals with high thermal conductivity characteristics. These include particles of silver, gold, copper or tungsten. Expensive thermal grease is required for high performance laptops.
How to choose
Depending on the composition, the thermal paste acquires a different consistency, density and color. There are a number of factors to consider when choosing the right strain, including the following:
- Thermal conductivity is the main parameter of any thermal paste. The higher the indicator, the more effective the use of the substance will be.
- Thermal resistance, which is the reciprocal of thermal conductivity. Low resistance paste is better at dissipating heat from internal parts.
- Plasticity, on which the uniformity of application on the surface depends. The thermal paste should smooth out well and create a thin layer without porosity.
- Resistance to extreme temperatures to prevent premature drying out. When using a laptop, the paste is constantly affected by different temperatures, and a sufficient wear period is 1 year or more.
Excellent lighting
To prevent damage to parts, bright lighting is required to provide good visibility. Work should be performed in a prepared work area where a desk lamp can be attached.
Attention and precision
The cleaning process requires care, since there are a large number of fragile elements on the boards and microcircuits. Careless movements can cause malfunctions.
Time
Full maintenance takes several hours and it is recommended to clean without long interruptions. Small internal components can be lost if your laptop is disassembled. In addition, the likelihood of dirt getting on the surface of the microcircuits increases.
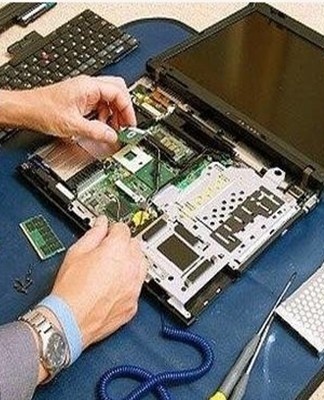
The procedure for complete disassembly of laptops from different manufacturers
Laptops from different manufacturers differ in design features. To avoid errors when scanning portable devices, you should follow the instructions for a specific laptop model.
Acer
To clean Acer laptops, you will need to completely disassemble the case. First you need to disconnect the battery by putting the latches in the appropriate position. Further analysis is performed by the following analysis:
- unscrew all screws from the bottom cover;
- disconnect wires from wi-fi module and RAM slots;
- remove the hard disk and disk drive;
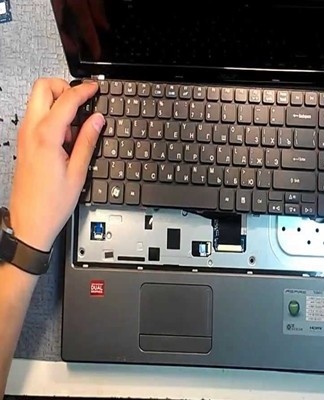
- lift the keyboard by disconnecting several latches in the upper part and sliding the latch, after which the panel is removed from the outside;
- disable all visible loops;
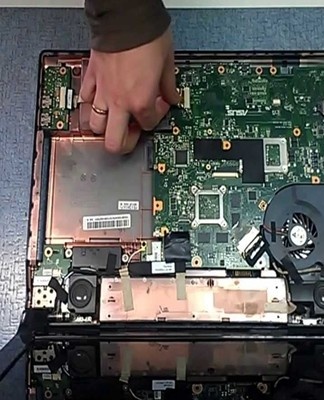
- disassemble the motherboard to access the cooling system.
HP
The disassembly process for HP laptops begins by default by removing the battery and unscrewing the screws from the chassis. Then the hard drive, RAM sticks, Wi-Fi module and keyboard are disconnected sequentially. To perform the cleaning, it remains to turn off the motherboard and the fan.

Lenovo
Modern Lenovo models are easier to disassemble than equipment from other manufacturers. It is enough to remove the battery, unscrew the bottom cover and remove the hard drive, after which the cooling system will be visible. To get the cooler, you need to unscrew the fixing bolts and disconnect the buckle.
Toshiba
Dismantling Toshiba laptops begins with removing the cover located above the keyboard. Then use a screwdriver to lift the keyboard and disconnect the cable from the motherboard. The battery and hard drive are removed from the reverse side, the cover is unscrewed, after which the cooler can be cleaned.
Dell
Dell laptops are sequentially disassembled from both sides. The battery and base cover are removed first, followed by the keyboard and top cover. Having gained access to the motherboard, they unscrew the fixing bolts and clean the cooler.
MSI
MSI brand devices are easier to disassemble due to their special design. It is enough to remove the battery and unscrew the back cover, after which access to the cooling elements will be opened. After removing the cooler and pipes, you can start cleaning.
Asus
To spin the Asus laptop, you just need to remove the bottom of the case, remove the hard drive and the motherboard. To perform basic cleaning, the actions listed are sufficient.
Cleaning components
Cleaning various parts of a laptop should be approached individually. Taking into account all the nuances, it will be possible to avoid breakage of the elements.
RAM
It is necessary to clean the RAM slots with a brush and a can of compressed air. First, most of the dust is blown off with a spray can, then the residue is carefully removed with a brush.All hard-to-reach areas should be cleaned, including bumps with accumulated dirt.
Fans
The laptop cooler is gently cleaned with cotton swabs. The fan blades can be cleaned with cotton balls. Excess dust is blown off using a jet of compressed air.
Keyboard
The surface and the inside of the keyboard are cleaned of dust with special impregnated napkins. The contacts can be cleaned with an electronic grade cleaner.
Radiator
The heatsink cooled by the cooler can be cleaned with a vacuum cleaner, sucking up dust. The surface of the radiator can be cleaned with a cleaning agent.
Connectors
All connectors on the laptop can be cleaned with fine cotton swabs.
After cleaning the interior, it is recommended to run a damp cloth along the body to remove excess dirt from the connectors.
Loops
It is important to clean fragile plumes with extreme care. For plumes, dip a cotton swab in cleaning solution and run it over the surface to remove dirt.
The order of assembly of laptops from different manufacturers
The assembly of devices of various models, by analogy with disassembly, is carried out with certain peculiarities. To return all parts to their original position and not damage internal components, you need to follow a number of step-by-step steps.

Acer
After starting to assemble the Acer laptop, first return the motherboard with the cooling system to its original place and secure the elements with screws. Then they put the upper part of the case, connect the cables and insert the keyboard.The laptop is turned over and the hard drive, disk drive, RAM, and wireless module are installed. After fixing all the elements, screw the bottom cover.
HP
When assembling HP laptops, a fan, motherboard, keyboard, Wi-Fi module, memory slots and hard drive are connected sequentially. After fixing all the parts in their original locations, all that remains is to screw the case and connect the battery.
Lenovo
Assembling Lenovo laptops starts with connecting all cables and a cooler. The hard drive is then flipped over, the bottom case secured, and the battery installed.
Toshiba
After completing the internal cleaning of the Toshiba laptop, screw the bottom cover first and install the battery and hard drive into the connector. From the front, connect the motherboard and cables, insert the keyboard until it clicks into place. Put the upper part of the case from above and fix all the screws.
Dell
The first step in assembling the device from the manufacturer Dell is to install the motherboard - the element is put in its original position and bolted. Next, the keyboard, front of the case, bottom cover and battery are installed.
MSI
Collecting laptops from the MSI brand takes a minimum of time. Since the main components of the cooling system are located directly under the lower cover, all you need to do is put the case back in place, secure it with screws and install the battery.
Asus
In Asus laptops, during assembly, the motherboard is replaced first, then the hard drive and the base cover. If it was necessary to disconnect the loops for cleaning, they are connected before fixing the case.

How not to
Often laptop owners make mistakes when cleaning. The main mistake is to try to clean the device without disassembling it. Vacuuming the keyboard and connectors will collect minimal dirt, and it will not have a positive effect on fan operation. In most cases, a complete disassembly of the device is necessary to remove all dust.
Common myths
Among inexperienced users, there are many myths associated with cleaning laptops. The most common misconception is that dust accumulation does not affect device performance.
The myth that it is impossible to carry out high-quality cleaning without the intervention of specialists is also popular. In fact, you can do the prevention yourself by following the step-by-step instructions. Failure to clean regularly will cause the device to malfunction and wear out internal parts.