How to quickly and beautifully glue ceiling tiles with your own hands
The ceiling is one of the design elements of the room. The use of a large assortment of decorative panels expands the possibilities of creating a unique interior. The building material does not require special professional skills during installation. But you need to know the basic requirements for gluing ceiling tiles to get a beautiful and even surface.
Varieties of tiles
Ceiling tiles can be divided into 3 categories:
- by type of material;
- surface type;
- manufacturing method.
For the ceiling, products made from:
- fiberglass;
- drink;
- metal alloys;
- expanded polystyrene.
This last type is the most requested due to the variety:
- forms;
- colors;
- texture.
The tiles of this one are affordable and easy to install.
We distinguish the type of surface:
- laminated;
- transparent;
- mirror tiles.
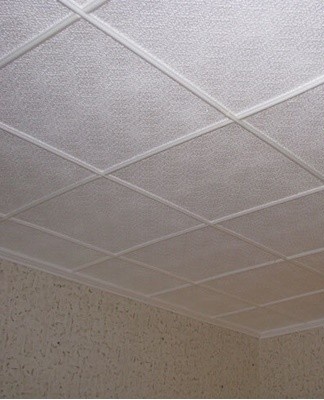
The laminated tiles are covered with a waterproof colored film. Coatings with a relief decor are used for a seamless ceiling. The mirror panel is the result of a combination with polished plastic.The properties of ceiling panels depend on the method of production.
Extruded
The tile is made from a strip of extruded polystyrene. The essence of the technological process is the saturation of polystyrene with pressurized and high-temperature air and additional pressure through an extruder. The thickness of the product does not exceed 3 millimeters. The panel has a smooth and durable surface. The color palette is given to the coating by painting or gluing (laminating) a film.
The tile is not afraid of water, which makes it easy to care for the ceiling covering, but it turns yellow when exposed to sunlight. The dense structure makes it possible to cut the panel without deformation of the edges and to hide the irregularities of the ceiling. The variety of shades, patterns makes it possible to create any compositions when decorating rooms. Repainting is not recommended.
foam or stamped
Manufacturing technology involves pressing blocks of expanded polystyrene. The thickness of polystyrene tiles is 6-8 millimeters. Inexpensive water-based foam boards break easily, absorb dust and cannot be washed.
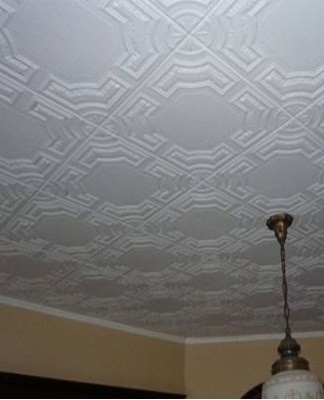
Injection
The decorative coating is obtained by the method of high temperature action on the foam. The thickness of the products is 9-14 millimeters.
Properties of injection panels:
- strength;
- sound and thermal insulation;
- moisture resistance;
- fire safety.
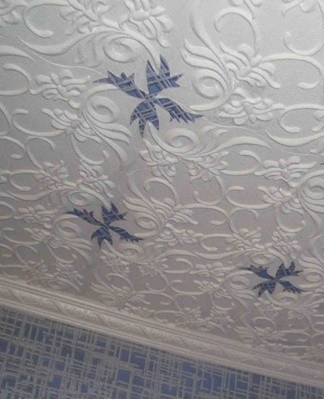
Products have a light corrugated surface, with the help of which a seamless ceiling covering is obtained. Available in one color (white), but dyes well. The price is 3-4 times higher than stamped tiles.
Quantity selection and calculation
The tile is chosen by evaluating its external characteristics. All products should have smooth edges, a regular square or rectangular shape. Patterns or embossments on all panels must be identical. Fragility is checked by shaking the tile at one end.
The type of ceiling covering depends on the design, purpose of the room and financial capabilities. Stamped panels are not suitable for kitchens, bathrooms, summer cottages. Due to high humidity, burns and temperature changes, they will soon become unusable. For a jointless ceiling, injection products are used.
The physical volume of a tile is determined mathematically. To begin, calculate the ceiling area by measuring the length and width of the room. The dimensions of the non-standard configuration are transferred to paper, and a total calculation of the areas of geometric shapes is made.
The result of the calculation is divided by the area of 1 tile whose dimensions may vary (in centimeters):
- 50x50;
- 40x40;
- 60x60;
- 30x60;
- 30x70;
- 40x70.
The resulting amount is multiplied by a factor of 1.1. This is the number of panels needed to fill the ceiling space, taking into account any gaps.
What to stick on
The tiles are attached to the ceiling with glue. The appearance of the ceiling covering, the complexity of the installation and the sanitary safety will depend on its characteristics.
Optimum adhesive properties:
- sufficient viscosity to fix the panels;
- surface setting time - 20-30 seconds;
- absence of toxic fumes;
- white or transparent color.

The liquid consistency of the glue produces a thin film unable to support the weight of the coating.Thick adhesive will form an uneven, thick film that will warp the panel.
Long-term retention of the tile to the ceiling while quickly sticking tires, reduces performance.
Installation of ceiling decor, such as wallpaper, should be done without drafts. Therefore, in residential premises it is necessary to use adhesives without components harmful to health. The dark stuff will show through the seams and ruin the look of the ceiling.
Titanium
Titan Professional Gallop Fix brand adhesive is used for bonding in rooms with high humidity. A layer thickness of 0.5 millimeters supports a weight of 240 kilograms per square meter. The final curing of the film occurs after 3 hours. Titan Professional 60 Second Modification gives no-primer adhesion within 24 hours, allowing you to adjust panel installation.
On the tray
The adhesive is similar in composition and method of application to titanium. Forms a good adhesion on all types of ceilings. Feature of application: keeping the tile in a pressed state for 2-3 minutes.
Moment
The glue is available in 3 versions:
- Installation of the moment. One for all. To improve the quality and slow down the adhesion, it is recommended to treat the ceiling with a primer based on wood glue and 1x1 water. You can work in rooms with high humidity.
- Moment Installation Express decor MV-45. The glued tile retains its adhesion at temperatures down to 0 degrees, with increased evaporation of moisture. Curing time is 2 days. The viscosity of the adhesive allows it to be used as a sealant to fill joints between panels and gaps in the ceiling up to 1 centimeter.
- Wagon of the moment. Has optimum viscosity and adhesion characteristics. The ceiling surface should have good hygroscopicity.
All varieties do not contain a solvent that affects the properties of the products.
Liquid Nails
Foam adhesive is water-based, with the addition of organic solvents.
App feature:
- high degree of adhesion (up to 80 kilograms per square centimeter);
- setting time - 20-40 seconds;
- full hardening - 24 hours;
- resistance to low temperatures, humidity;
- the possibility of using it as a sealant.
Liquid nails are applied pointwise or in a grid pattern. They are made in the form of tubes, for work requiring an assembly gun.
Ceiling tile putty
Polymer sealants have a sticky structure that does not require long-term efforts when installing panels. Applied at a temperature not lower than +10 degrees. Drying time, on average, about an hour, if the room is at +20 degrees and the air humidity does not exceed 65%.
Plaster
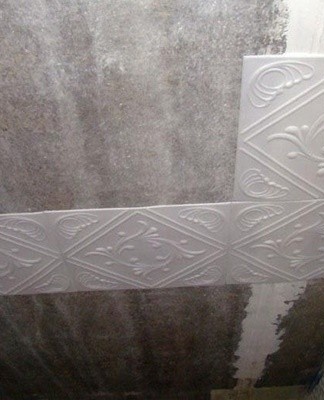
Gypsum plaster is recommended for finishing the ceiling with skirting boards. Fast adhesion requires high speed and gluing precision. Another disadvantage of the plaster composition is the instability in a humid environment. This type of finish should not be used in bathrooms, toilets and kitchens.

Perlfix
Knauf assembly glue is a type of plaster putty and is intended for gluing drywall in dry rooms. When using it, prior priming of the dust-free surface is required. Can be used to install baseboards on the ceiling.
Acrylic putty
Mastic is used to glue a thin film of polystyrene. Positive traits:
- holds panels well;
- does not show through the coating;
- withstands temperature differences;
- raincoat;
- Plastic;
- ecological;
- sustainable.
An important quality is the leveling of the ceiling and the filling of cracks.
Liter
The purpose of the glue is to glue linoleum, carpet, all types of tiles to concrete, plaster, wooden, brick surfaces.
How to properly prepare the base
Adhesives contain organic matter, which can cause fungus to appear under the tiles. To avoid contamination, before starting work, the ceiling is treated with antiseptic agents in the form of a primer. Apply adhesives to leveled and cleaned surfaces. Whitewashed ceilings are processed depending on the thickness of the layer: the thin layer is immediately primed, the thick layer is washed off with water or cleaned with a spatula. Cracks, cracks are pre-filled with putty, and after drying they are primed. The tiles are glued to the concrete ceiling without primer.
If the ceiling was covered with wallpaper, then it must be cleaned of it. If the wallpaper is neutral in color and is firmly attached to the ceiling, the tiles can be attached to it with a minimum thickness of glue.
Placement methods and markup
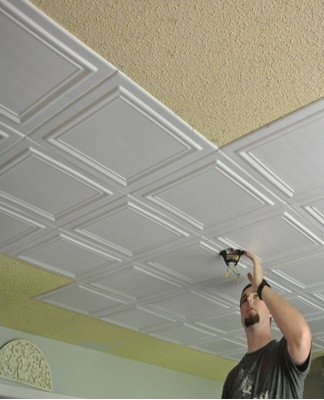
Installation work begins with the marking of the ceiling. Regardless of the method of placement, the diagonal, perpendicular lines, the center of the ceiling are determined. Lines are drawn from opposite corners, the point of intersection of which is the center in which the lamp will be located. 4 perpendiculars are restored from the center to the edges of the ceiling. The position of the first tile depends on the installation method.
Parallel
Laying begins from the geometric center, around which 4 tiles are placed along lines perpendicular to the walls. The inside corner of each tile should be aligned with the geometric center and between them.The following rows are arranged parallel to the perpendicular guides.
Diagonally
When the tiles are placed diagonally, the 4 central panels are closed by the interior corners at the geometric center. Opposite exterior angles lie on perpendiculars, which will be diagonals for the resulting square. Further installation - along the perimeter of the resulting squares with alignment of the corners along the perpendiculars. The second option is diagonal laying: from the central tile, glued at the angles to the perpendiculars along the geometric center / chandelier. The following panels are glued along its sides, filling the gaps.
staggered
In small or narrow rooms, the tiles are laid not from the center, but from the edges towards the center.
Snake
The sequence of placement from the center of the ceiling along the perpendiculars:
First row:
- 1 tile lower left;
- 2 top left;
- 3 top right;
- 4 bottom right.
Second row:
- 5 lower right;
- 6 lower left;
- 7 lateral lower left;
- 8 lower left;
- 9 top left;
- 10 top left;
- 11 top left;
- 12 top right;
- 13 top right...
Continuation of the movement along the perimeter.
With offset
The central row is glued so that one of the perpendiculars "divides" the tiles in half, and the central row is at their intersection. The following rows on both sides are staggered symmetrically by ½ tiles.
Criss-cross
The first 4 tiles are glued in the same way when laid parallel to the walls. The next double rows are placed along the perpendiculars to the walls, forming a cross.
Corner rows
In the hallways, the ceiling finish starts from the corner in which the first tile is placed, and from it they are laid on the sides.
Rhombus
Diamond collage starts from the wall. The first tile is laid at an angle to the wall along the perpendicular. The second and third tiles are placed on the sides of the panel, the fourth next to the third. The fifth is glued between the second and the third, the sixth is adjacent to the second, the seventh to the sixth. The following lines are filled in order.
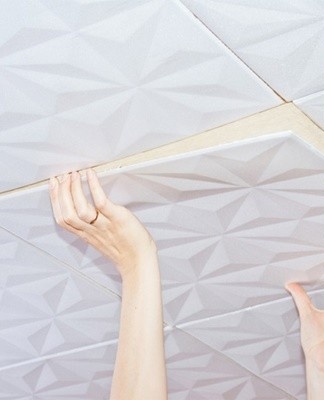
Do-it-yourself ceiling gluing technology
The process of decorating the ceiling depends, first of all, on the condition of its surface: flat or curved. In the first case, installation is much faster and does not require additional alignment efforts.
Where you should start installing the tiles depends on the type of room and the installation method. During the installation process, the aesthetic appearance of the coating should be monitored. The joints between the tiles are covered with mastic or mastic. Excess glue that protrudes at the joints must be removed with a damp cloth, without waiting for complete drying.
On a flat ceiling
Before gluing the tiles, you need to check the ceiling surface with a level to make sure there are no height differences. For concrete and plasterboard ceilings, this procedure is not required. The method of applying the mounting compound depends on the type of glue. Usually the tiles are clad along the perimeter and diagonals. Water-based adhesives, including liquid nails, are applied to the panel in large drops, pressed against the ceiling for even distribution. Then set aside for polymerization for 3-5 minutes and finally put according to the instructions.
Ceiling and tile surfaces are impregnated with liquid adhesives. Putty is applied to the area under a tile with a thin, even layer. Continue after attaching the panel.
If the ceiling is uneven or crooked
It will not work to glue high-quality decorative panels on a curved and cracked surface. It is necessary to fill gaps or level the ceiling. One of the most effective ways to line up big differences is to install drywall in the ceiling. Minor deviations are corrected with a putty.
Where to start
The location of the first tile depends on the configuration of the room and the location of the light fixtures.
Center of the room
It is more convenient to start installation from the geometric center of the ceiling, which is determined by the intersection of the diagonals. This takes into account that at this stage there will be a chandelier, so the panels are placed around it, trimming the edges for the threads.
central tile
The second option - the tile is placed according to the marks in the center of the ceiling with a hole for the lamp wires.
luster
In order not to touch the chandelier, markings are made from its base, placing panels around it.
From the neighborhood
In narrow, asymmetrical rooms, installation starts from the corner opposite the door.
Cleaning and sealing
The joints must be covered with a sealant or mastic to prevent water vapor from entering the ceiling. For patterned colored coatings, colorless compositions are used. For coatings with subsequent painting, white solutions are used. For sealing, it is more convenient to use assembly guns, which make it possible to apply the composition exactly along the contour of the panel, without staining it. Putty and filler are cleaned with a damp cloth, thus avoiding drying out.
Common Mistakes
A common mistake is based on advertising the characteristics of tiles and adhesives, the opinion that it will not be difficult to glue panels to any surface. In order for the ceiling handle to be durable, it must be prepared. The complexity of the process depends on the type of ceiling tile: minimum for concrete, maximum for plaster.
Before installation, the panels should be kept in a dry room for several days so that the moisture evaporates. Damp tiles will shrink during the drying process after installation, resulting in gaps. It is necessary to work on the ceiling by turning off the room. From the beginning of installation and until complete drying, drafts should not be allowed in the room.
For any type of installation, a marking on the ceiling is necessary to avoid distortions in the rows.
When laying, the panels must be tightly glued to each other. Pressing the tiles against the ceiling with your hands can damage the polystyrene structure. The wooden block as a press will preserve the surface of the coating. Cutting tiles at the edge of the ceiling should not exceed 15 millimeters, otherwise they will not be covered with a plinth. Panels to be painted must be pre-primed. There should be at least 2 layers of coloring.
Rules of care
Ceiling panels eventually become covered with dust, traces of insects, tobacco smoke, in kitchens - grease stains and vapors. Tiles are maintained wet and dry. Dry - dusting with a vacuum cleaner or special brushes. The power of the vacuum cleaner is determined experimentally from the minimum level. The vacuum cleaner should remove the dust without deforming the coating. Dusting brushes are just as effective, but much safer.The fibers have a static charge which attracts dust particles and prevents them from flying through the air.
For wet cleaning, you need water with a dishwashing degreaser or a gel for washing clothes. Before use, the product is whipped into a foam and applied with a sponge to dirty areas, lightly pressing the tile. The remaining water and foam are removed with an absorbent cloth. Instead of foam, you can try a stationery eraser. Grease stains are best removed with an anti-grease cloth. White tiles can be cleaned with an aqueous solution of bleach or rubbing alcohol.
Tips & Tricks
In order for the ceiling to look beautiful, you need to take into account the lighting in the room. The closer the installation is to the window, the smoother the installation should be, with the smallest gaps. The side opposite the window is in the shade, here it is allowed to lay the tiles by means of scraps.
The leveling of the ceiling depends on the thickness of the tiles. If it is flat and less than 5 millimeters, defects in the base of the ceiling will be noticeable through the panels. For thicker tiles, with a grooved pattern, just clean and cover the cracks. Irregularities will be pressed into the tile once glued and will become invisible.
Tiles can be quickly laid on the ceiling, subject to mandatory preparatory work and the purchase of high-quality products: the same shape, same size. Even in the same batch, they may have differences that will need to be corrected, adjusted during the installation process.
Jointless tiles have uneven edges so that no border is visible, so the shape requirements are not as strict as for jointed tiles. Panels should be cut on the floor, with a sharp knife on a cardboard liner.The method of applying glue / putty / mastic is indicated in the instructions for use, which must be observed.