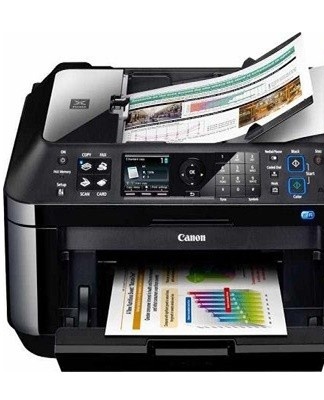
Step-by-step instructions on how to quickly clean a printer of different models
After prolonged use of the printers, black streaks may appear on the surface of the sheets after printing. The overall print quality also deteriorates, and images and text print poorly. All of these problems appear due to contamination of the printhead and therefore, to get the device to start printing properly again, you need to figure out how to clean the printer.
Content
- 1 Causes and signs of contamination
- 2 Printhead flushing
- 3 How to clean
- 4 How to reinstall correctly
- 5 Cart Calibration
- 6 How to Clean a Laser Printer
- 7 Why You Shouldn't Clean Your Laser Printer Yourself
- 8 How to clean the absorber
- 9 How to flush Canon Pixma MP 250, MP 230 inkjet printer cartridge
- 10 Prophylaxis
- 11 Conclusion
Causes and signs of contamination
Laser and inkjet products have various signs and causes of contamination.
Jet
Inkjet printers are already considered obsolete devices and are therefore not used as often. The main disadvantage of these printers is that they break down quickly.The most common problem with inkjet models is dark streaks appearing when printing. They appear due to dirt on the printer. It is believed that the main reason for machine contamination is the use of inappropriate ink. Therefore, before using the ink, you must ensure that it is compatible with the inkjet machine.
Laser
Most often, laser models are used for printing, which differ from inkjet models in better print quality and durability. However, even such devices sometimes have problems with paper smudges. Dark streaks and spots appear on the paper when the machine has not been used for a long time. This causes the ink to dry out and clog the printhead quickly. It may also get clogged if you don't clean it for a long time.
Printhead flushing
There are several methods of rinsing the head that you should familiarize yourself with.
Material
Some people prefer to restore the operation of the printing device using a hardware method.
Using Operating System Tools
Built-in operating system tools allow you to standardize printer performance. To do this, you will need to follow these steps:
- connect the device to a personal computer and install all necessary drivers;
- make sure the cartridge contains enough ink to print;
- load several A4 sheets in the tray;
- via the "Start" menu, enter the "Devices and Printers" submenu;
- select the required printer, right-click on it and open "Properties";
- go to the "Equipment" subsection and select deep cleaning of the device;
- wait for the end of the procedure and try to print a page with text;
- if the sheet is again covered with dark spots during printing, the cleaning is repeated.
Using advanced printer features
Some modern models have built-in additional cleaning functions. To use them, you will need to install special software provided on the disk with the printer.
Manual
Sometimes cleaning the hardware does not help remove the dirt and you have to deal with manual cleaning.
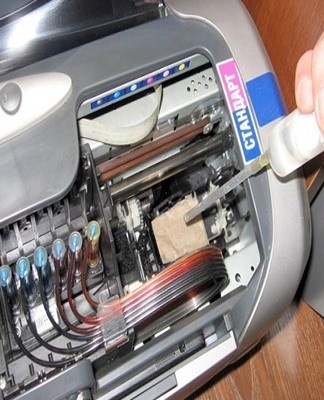
How to remove the head
Before cleaning, you will need to manually remove the printhead. To do this, open the top cover and remove the truck from the parking area.
The device is then disconnected from the power source and the ink cartridge is removed.
The printhead is attached using special clips that must be detached beforehand. On the right is a locking lever that rises upwards. The head can then be carefully removed from the printer.
How to clean
It is recommended that you familiarize yourself in advance with how to quickly clean up dirt.
Tool
There are several tools to help you clean ink and other debris from your device.
Lint-free material
Many people think that fluffy cloths should be used to clean the printer cartridge and other parts of the machine, but this is not the case. To work with such a technique, materials are used on the surface of which there will be no fluff. Lint cloths are not suitable for printers because the lint will start to stick to the surface being wiped. Therefore, when cleaning, use coffee filters or ordinary thick paper.

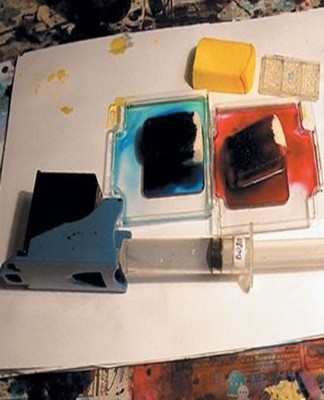
Syringes with needles
Some experts recommend using medical syringes to rinse buds. They should not be too large, the standard 2-3 milliliters will be enough. Syringes are used to draw up the cleaning fluid and inject it into the soiled head.
To get the liquid inside, you will need to put a needle on the syringe. At the same time, experts advise using special ink needles. You can put them on the syringe using an adapter.
Plastic container with low sides
If the part is to be washed with a damp cloth or damp paper, you will need a container for the cleaning fluid. It is necessary to use a plastic container with low edges, as it is the most convenient. Concave lids, small food containers and trays are often used as such containers.
Distilled water
Some people don't want to use special chemicals to clean printers and instead use milder products. One of them is distilled water. It is contraindicated to use plain water and alcohol, as these liquids can damage the print head.
Distilled water can be used separately from other detergents or, conversely, mixed with them.
Cleaning agent
There are special products for cleaning dirty printers.
service tools
Effective remedies for removing dirt from printers include:
- CL06-4. It is an effective cleaning liquid specially used for printing machines. The advantages of this tool include the fact that it can be used to clean both laser and inkjet models.
- PCS-100MDP. An essential tool in the fight against traces of dried ink. The liquid contains trace elements that corrode any dried dirt.
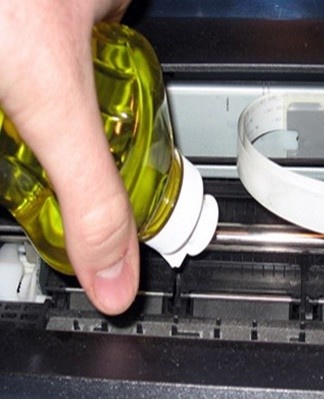
With your own hands
It is very easy to use a cleaning agent to remove dirt with your own hands. To do this, it is enough to take a piece of paper or a cloth and moisten it in liquid. Then, using the moistened material, gently wipe the dirty cartridge and head.
How to clean
To thoroughly clean the printing device and remove dirt, the following steps are followed:
- moisten a cloth with cleaning fluid;
- wipe any ink residue from the contacts on the head;
- rinse and dry the sealing gum;
- wipe down the intake grilles;
- collect the detergent solution in a syringe and squeeze it into the head;
- wipe down all treated surfaces with distilled water.
If there is a strong blockage
Sometimes the nozzles and head get so dirty that they stop flowing. If it is heavily clogged, you will not be able to clean the printer with the usual method. To clean it, you will need to cut the dropper tube into several pieces 5-6 centimeters long. Then, the cut material is carefully placed on the tubes responsible for receiving the ink. After that, a cleaning solution is poured into the tubes, which will remove blockages.
Dip the nozzle plate
Sometimes printer owners are faced with the fact that routine flushing does not help to restore the device. In this case, you will have to deal with the soaking of the nozzle plates. To do this, take water heated to forty-five degrees in a small plastic bowl. Then the liquid is mixed with the washing solution and the plate is placed in it. It is soaked for half an hour, after which it is wiped with a cloth and dried.
Dip Intake Holes
Sometimes, even after cleaning the nozzle plate, the locks do not allow fluid to pass well. This may be due to clogged intake holes.To clean them, a tube is placed over each of the holes, the length of which should not exceed five centimeters. Then the detergents are poured into the tubes and left there for 3-4 hours. After that, the tubes are removed and the intake holes are flushed with water.
Pinout
Sometimes the pull method is used when cleaning printers. To do this, you need to take a small piece of fabric and press it against the print head nozzle. Then a medical syringe is inserted into the tube, with the help of which a cloth is pulled out.
Pumping
If none of the cleaning methods helped remove the blockage, you can pump out the dirt with a syringe. Before this, the nozzles are carefully pressed against a cloth soaked in detergent, after which the liquid is sucked out through the syringe. When the tube is completely filled, the extrusion begins in the other direction.
It is necessary to draw the liquid with a syringe carefully so that some air remains between it and the rinsing agent.
Extreme methods
There are several extreme cleaning methods that are rarely used:
- Squeeze the blockage with an airless syringe. It is necessary to use this method carefully so as not to damage the head.
- Spray nozzle. It is treated with hot steam for about 20-30 minutes, after which it is washed off with water.
- Soak the printhead. It is immersed in a hot boiled liquid for ten minutes.

How to reinstall correctly
After cleaning, the printer needs to be assembled. For this, the cleaned head is put on and secured with a retainer. Then the cartridge is installed. It should be adjusted carefully, checking the markings on the carriage.
When the cartridge is installed, you can close the lid of the device and connect it to the power source. If the printer is working, cleaning and collection have been completed successfully.

Cart Calibration
If, after the first power-up and test print, curved lines are printed on the sheets, you will need to calibrate the carriage. For this, the following actions are performed:
- Fill the cartridge with ink.
- Place 3-4 clean sheets of paper in the tray.
- Turn on the device and connect to the PC.
- From the Start menu, select Printers.
- Click on the PCM device and go to "Properties".
- Go to "Special Settings" and click on the "Align" option.
- The device will print sample text and automatically calibrate everything.
How to Clean a Laser Printer
Cleaning laser models is slightly different from removing debris from inkjet devices.
What is necessary
Before you start cleaning your laser printer, you need to figure out what is useful for it.
Microfiber toner collection
Some people try to remove the spilled toner with a normal cloth, rags or paper, but it is not suitable for the task. To get rid of the toner, use a special microfiber. It is a non-greasy coated fabric that attracts toner particles. Microfiber is not reusable and is therefore discarded after wiping down the printer.
Isopropylic alcohol
Water is not recommended when cleaning mechanical devices, and so some experts recommend wiping down the coating with isopropyl alcohol instead. The benefits of this liquid include the fact that it completely evaporates within 5-10 minutes of application. Many people use isopropyl alcohol for streak-free performance.
Anti dust mask
Clean printers very carefully so as not to harm your health. The greatest danger for humans is represented by the toner which, if inhaled, can irritate the mucous membranes. Therefore, before disassembling the cartridge, a special dust mask is put on to prevent toner particles from entering the mouth and nostrils.

You should also make sure beforehand that the room in which the device will be disassembled is well ventilated.
latex gloves
Care should be taken in advance to ensure that the toner powder does not come into contact with the skin. Therefore, work should be performed in long-sleeved clothes. Wear rubber or latex gloves for extra protection.
Vacuum Toner
Experts advise using vacuum cleaner models when removing toner. These portable devices are ideal for collecting toner and other small debris. The main disadvantage of vacuum cleaners is their high cost. Therefore, many decide to clean printers without it.
Methodology
Having prepared the tools for work, you can familiarize yourself with the method of cleaning laser devices.
What not to touch
This technique must be cleaned very carefully so as not to damage anything. There are several places that should not be touched with hands. Experts advise against touching the drum, which is most often found in a toner cartridge. However, it is sometimes installed separately, close to the toner. Therefore, if during the analysis a small plastic cylinder of an angry color is found, it is better not to remove it.
Stop and cool down
Some people clean the printer without turning off the electricity. This is very dangerous, and therefore, before dismantling and cleaning the device, you must unplug it from the outlet.This is done not only to turn off the device, but also to cool it down. Powered laser printers get very hot due to the fuser installed inside to melt the toner.

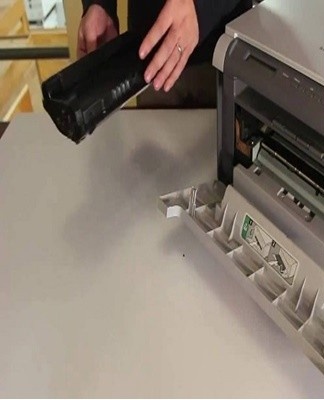
Removing and cleaning the toner cartridge
Once the printing device has cooled down, you can start disassembling it. To begin with, the rear panel is removed, after which the toner storage cartridge is disconnected from the supports. After removing it, clean up the remains of toner powder. It is best to do this with microfiber, but if it is not there, wipe the cartridge with an alcohol napkin. Wipe it at least three times.
Removing excess toner from internal components
The drum and other internal components of the machine should also be cleaned of toner. This is done with ordinary wet wipes, with which it is enough to wipe the dirty surface twice. If you need to clean hard-to-reach places, isopropyl alcohol is poured into them, which is wiped with a thin brush.
Be careful when cleaning the inside of the printer as some components are delicate.
Reassembly
After they finish cleaning the main parts of the laser printer, they assemble the device. It's easy to do, just replace the cartridge and close the lid. After collection, the operation of the device is checked. To do this, print 2-4 sheets of paper with pictures or plain text.
Why You Shouldn't Clean Your Laser Printer Yourself
Some people decide to clean the printers themselves, but experts do not advise doing it with their own hands. Especially if a person has never disassembled such devices before.
There are many fragile parts inside laser models that can be damaged during disassembly or cleaning. Therefore, it is better to seek help from professionals in the service center so that they can perform this work with high quality.
How to clean the absorber
An absorber is installed inside every modern printer, which absorbs excess ink during printing and prevents ink leakage. Over time, this joint gets dirty and you need to clean it of paint. During cleaning, the absorber is placed in a container with hot water for 5-6 hours. Then it is rinsed, dried and installed in the printer.
How to flush Canon Pixma MP 250, MP 230 inkjet printer cartridge
The cartridges of the MP 230 and MP 250 models are cleaned in the same way as for the other devices. First, the toner storage container must be removed from the device and disassembled to access the storage. The inside of the cartridge can be wiped with a damp cloth or sprayed with alcohol to remove dried toner. When the cartridge is dry, replace it.
Dismantling features
Printers from different manufacturers have teardown capabilities.
HP
Devices made by HP are not easy to disassemble. Therefore, many recommend entrusting the analysis and cleaning of such printers to professionals. To access the cartridge, you will need to remove the top cover and disconnect the toner compartment. To remove the rest of the parts, you will need to unscrew the bottom cover.
Epson
It is quite difficult to disassemble Epson equipment, since its internal parts are difficult to reach. For example, to remove the cartridge, you will need to detach the front panel with buttons. Below are the two mounting screws that secure the front cover.The dismantling of the absorber is not easy either, since it is installed at the rear of the structure and fixed with three screws.
cannon
The easiest way is to disassemble printers made by Canon. Most models are very easy to disassemble. Simply remove the top cover from the latches to pop out the cartridge. It's also easy to remove, just lift it up and pull it slightly towards you.
Prophylaxis
To prevent clogging of the print head, the equipment must be properly maintained. With regular use of the device, it should be cleaned at least once every 2-3 months. It is necessary to wipe not only the cartridge, but also other parts responsible for printing.
Conclusion
Sooner or later, printers start printing worse. Most often, the print deteriorates because the machine has not been cleaned for a long time. Before cleaning, you need to familiarize yourself with the causes of contamination and the main ways to eliminate them.