Drawings and diagrams for assembling a wooden garden table with your own hands
At the dacha, it is advisable to have more than one table so that in the summer you can sit on the lawn, on the veranda with family and guests. Natural wood products are not cheap and will last for many years due to weathering and exposure to sunlight. Instead of buying furniture for seasonal use, you can make your own wooden garden table from inexpensive materials.
Content
- 1 General Manufacturing Instructions
- 2 Varieties and instructions for making your own hands
- 3 Additional options for schematics and drawings for assembly
- 4 Tree Selection Criteria
- 5 How to choose the right paint and varnish material and glue
- 6 More examples of manufacturing from pallets
- 7 Tips and tricks from the masters
- 8 Examples of works for a garden and a summer residence
General Manufacturing Instructions
To make a painting, you need a set of tools, patience, precision, drawing and an assembly diagram. Wooden garden furniture can be made from inferior materials, scrap wood after construction or renovation, wooden pallets.
The availability of power tools will speed up and improve the quality of work:
- milling machine;
- grinder;
- jigsaw;
- Screwdriver;
- exercises.
In the absence of one of the listed tools, there are manual equivalents:
Additionally, you will need:
- level;
- tape measure or long ruler;
- corner;
- pencil;
- screwdriver;
- brushes.
Clamps are needed to get pieces of wood glued.The work begins with determining the purpose of the garden table, the dimensions. A drawing and an assembly diagram, in the absence of experience, must be in front of you. After that, they determine the amount of wood needed. Untreated boards, bars are marked and cut, leaving allowances for processing. The edges are removed from the boards, the ends are processed, the surface is leveled and polished. Bars are cut into strips, if necessary, crushed.
Parts of simple structures can be colored before assembly. In other cases, the finished products are primed and varnished. Lacquer coating will protect the table from atmospheric influences, temperature extremes.
If the table is to stand in an open space, it should be painted at least 8 times.
Using used wooden pallets simplifies the task of determining the size and shape of the table. The boards have already been treated with an antiseptic. It remains to think about the method of laying and the type of legs, to prepare and varnish the boards.
Varieties and instructions for making your own hands
The choice of a garden table for a summer residence depends on the experience with wood and the availability of tools. In order for the product to be neat, it takes time, careful implementation of all technological methods.
Big
The table, at which it will be possible to sit from 6 to 10 people, must have a shape for a place per person of at least 70 centimeters. If the table top is solid, then the edges of the inner boards are greased with glue, fixed with clamps until dry.To give rigidity, the wooden sheet is reinforced with transverse strips. The tabletop with gaps is assembled, leaving gaps between the boards of 2-3 millimeters. The connection of the canvas is carried out with transverse strips, the width of which depends on the thickness of the board. The strips are attached to the screws, starting from the edges. The distance between the inner slats is 30-40 centimeters.

Massive legs, 10 centimeters or more, are fixed to the table top with nails. For this, markings are made in the corners. The grooves for the cap are drilled, the through holes are drilled with a drill with a diameter smaller than the hairpin. The studs are screwed in by hand.
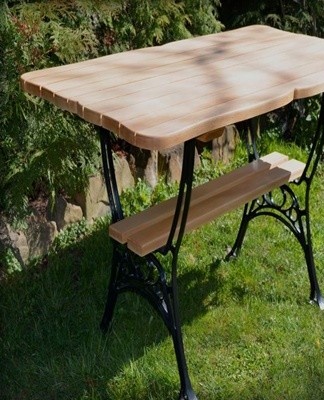
Country table with benches
A garden table with benches is made in the form of a monolithic structure. The bench is attached to the ends of the boards, connecting elements of the feet. All elements of the table and benches are made from a 50 millimeter thick board. Sequencing:
- Cutting blanks 10 centimeters wide, quantity and length (meters):
- 6 + 6 pieces of 1.5 each (table top + 2 benches);
- 4 - 0.99 each;
- 2 - 0.6 each;
- 2 to - 1.2.
- Assemble the counter.
- Cut the corners of the 99 centimeter leg bars so that each looks like a parallelogram with angles of 45, 135, 45, 135 degrees.
- Lay out on a flat surface in the shape of a trapezoid with virtual bases: 40 and 120 centimeters each.
- Connect the legs to the 0.6 and 1.2 meter crossbars using bolts. The top bars will be the base of the counter. The lower ones are attached at the midline of the trapezius. The protruding edges of the two bars must be symmetrical with respect to each other.
- Place the tabletop on the legs and secure it with the bolts.
- Secure with bolts on both sides of the bench.

Bolt heads can be hidden or left visible.
With drawer for drinks
A similar garden table can be made with a cooler. The differences are in the order of installation and the design of the countertop. Instead of 6, take 5 bars. Remove the middle of the center board, equal to the length of the box, but no more than 1/2 the length of the table top. Make a drawer that matches the cutout on the linen and is half the height of a standard bottle. Install piano hinges on the edges. Table assembly begins with the table top:
- The boards are fixed by screws on 2 transverse strips installed near the attachment point of the box.
- The box is installed by fixing the piano hinges from the bottom of the canvas.
- Step back from the edge of the table ¼ of its length. Place the block on its narrow end so that it matches the width of the worktop, and screw the boards together.
- Mount the legs:
- fix the upper part on a wide bar;
- place the lower bar in the center of the trapeze;
- reinforce the lower bar with a spacer from the table top.
At the final stage, benches are installed.
From pallets with a crate
The table is similar in design to the previous one: you have to remove the central board and attach a drawer to the bottom. The peculiarity lies in the fact that the pallet has a longitudinal fixation, therefore 2 boxes with a partition will end up in the center of the tabletop. The top rests on 4 square feet bolted to the sides of the pallet.

With succulents
Country style conservatory garden table.A box is made from old boards using self-tapping screws or glue. A planter is installed across, in the central part. Cover the space with boards of the appropriate size. Feet made of short, thick bars are screwed into the corners inside the box.
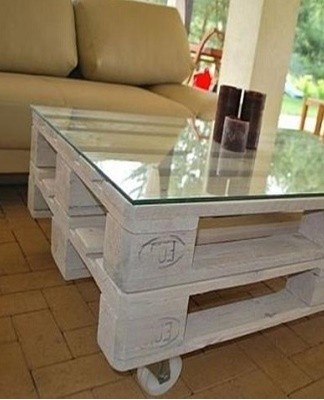
Pallet coffee table with drawer
A table of 2 pallets and legs of any material: bars, bricks, blocks. A cutout is made in the upper pallet for the finished cardboard, the height of which should correspond to the distance between the pallets stacked on top of each other. The pallets are fixed together by loops and installed on improvised feet. To add a decorative effect, the wooden table is painted in pastel colors.
Folding
The folding table is more complex from a constructive point of view than the fixed table. The easiest way to do this is to use piano hinges. Glue 3 plain patterns of the same size. Lay a piece on 4 legs or 2 rectangular frames. Attach the leg to the other two on the one hand on a folding loop, and on the other - piano loops. Connect the second and third parts of the worktop to the central part.
Folding picnic
Features of the portable wooden table:
- The top legs are bolted to the slats to support the table top.
- Between themselves, the legs are bolted in pairs, slightly above the middle.
- The lid is attached starting from the center.
- The edges are additionally fixed with boards.
- After installing the rest of the boards, the surface is leveled by grinding.
For ease of construction, the table is made of chipboard, plywood.
Round
The table top is cut according to the template. It is more convenient to use a thick stump or a log fixed in the upper and lower wooden nest as a foot.
To eat
The dining table should have a large flat glued solid wood cover. The rectangular box is glued and reinforced with self-tapping screws. Legs made of bars are placed inside the box, bolted diagonally.
High-tech styling
The high-tech table has a V-shaped top. Wide, thick boards are bolted to the top of the table with bolts between the boards. On the ground, the structure is connected to a wooden base with corners.
Edge
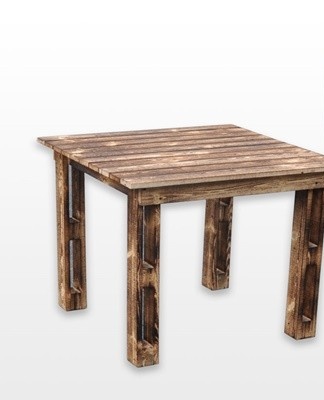
To install 4 legs, bars of equal size are nailed from the bottom of the tabletop. For greater stability, they can be made in the form of a smaller square. Leg attachment options: corners; grooves with self-tapping screws.
Versatile
A welded frame consisting of pipes and fittings with replaceable covers - a variant of a workbench-coffee table.
Additional options for schematics and drawings for assembly
The choice of model depends on the types and methods of fixing the table top and legs. For example:
- connecting the legs between the crossbars of the table top;
- the classic form of structural stiffening is a longitudinal bottom beam and two cross beams connecting the legs into a monolithic structure.
Glue, hinges, corners allow you to achieve any surface configuration.
Pallets can be used as elements of a designer, simulating tables for any purpose.
Tree Selection Criteria
The wood for the table should be easy to handle:
- stick well;
- Cut;
- bright;
- Paint.

Wood for a garden product should be resistant to atmospheric influences (temperature changes, humidity) and affordable.
Characteristics of tree species that meet the listed requirements:
- Birch.Wooden structure quite hard, dense and durable. You can cut, saw, grind, paint, glue. Disadvantage - not resistant to rot.
- Pine. Solid, light and rot-proof wood. It is well cut, sawn, glued worse.
- Tremble. Material flexible to all types of treatment, does not rot.
- Linden. Has a soft and viscous homogeneous structure. Easy to cut, saw, glue well and keep its shape. Don't give in to rot.
- Alder. Wood with good technological properties, resistant to rot.
You can use new and used lumber. In the first case, the raw material cannot be used, in the second - prone to rotting and bark beetles.
How to choose the right paint and varnish material and glue
For carpentry in the manufacture of garden products, adhesives are used on a natural and artificial basis. The main requirement is that the glue joints should withstand high humidity, temperatures below 0 and above +20 degrees.
You can connect wooden surfaces using:
- casein glue;
- AVP;
- Tibond;
- Titanium;
- Moment.
The choice of paints and varnishes depends on the stability of the coating obtained:
- abrasion;
- humidity;
- The UV radiation.
A good protective film on wooden surfaces is created by:
- greasy oil varnish;
- yacht;
- polyurethane;
- alkyd;
- water-based.
Yacht and polyurethane varnish form a protective film the fastest (from 2 to 12 hours). Water-based varnish dries the longest - it takes up to 2 weeks to harden.
More examples of manufacturing from pallets
Using pallets, you can create a table of any configuration, size and height:
- extend the tray (from 2 pallets);
- remove the side boards, increase them through several leg bars;
- reduce the palette by 2 times;
- make a support from 3 cut-out pallets.
Benches, benches, pallet seats will complete the table and make up a set of garden furniture.
Tips and tricks from the masters
For a wooden garden table to serve for a long time, you must:
- store the source material in a dry and ventilated place, avoiding warping;
- prepare casein glue in the required amount before use;
- treat the wood with an antiseptic;
- Apply varnish after priming and sanding.
With a lack of experience, the best choice would be a simple structure with a connection on bolts, self-tapping screws, dowels.
Examples of works for a garden and a summer residence
A table with a solid top and trapezoidal legs, surrounded by 4 benches in the same style, will look harmonious on the garden lawn.
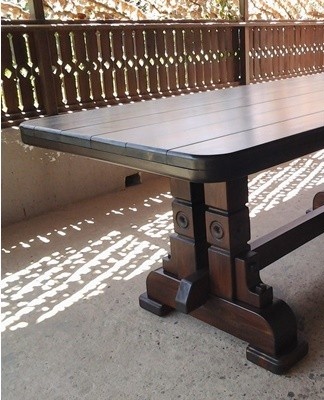
The veranda will be decorated with a table in the form of the letter P, with an elongated crosspiece. The solid table top rests on the same supports glued to the ends over the entire width. The top and the support legs represent a monolith connected by glue.