Varieties of buttons for clothes, step-by-step do-it-yourself repair instructions
Among the most comfortable and common fasteners on clothing, many prefer buttons. They are easy to operate, the appearance of the trims is aesthetic, but sometimes due to damage or poor quality, the buttons on the clothes need to be repaired urgently. It is not difficult to repair or change a new faulty binding yourself if you know the repair methods, the replacement procedure and if you have the necessary tools and materials.
Varieties
Clothing buttons differ in the material of manufacture:
- metal;
- Plastic.
By the method of fixing, they can be:
- installation - fixed with special tools;
- Sewing - you need a thread and a needle to tie them.
According to form, purpose and application, they are divided into:
- Easy;
- S-shaped;
- shirt;
- magnetic;
- klyamerny;
- case;
- bands;
- Tablet.
O-shaped
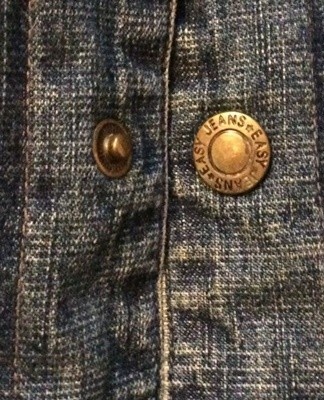
The most common type of pimples are O-shaped.They are called single, ring or flight, because the fastener first appeared on pilots' jackets and overalls. The design is simple and consists of two metal pieces that fit tightly together. The upper component is spring loaded.
Initially, the upper part was produced in an all-metal form, today the cast version is more often used.
Simple buttons are used on various types of casual wear as well as specialty textiles.
S-shaped
This type is spring type. One of the parts resembles the letter "S", therefore they are called S-shaped. Depending on the size, they are divided into several types:
- fit - the size of the tabletop is 27-40 mm;
- item - half uniform size;
- anorak - compact size;
- mini anorak - the upper part measures less than 8 mm.
The shape of the table top is varied - from flat and round to diamond-shaped, square, drop-shaped. They are fixed with seams or fasteners. The large spring can withstand heavy loads.
Shirts
Shirt-type buttons differ from the usual way of closing - not with a single pin, but thanks to 6-8 spikes. The design allows fasteners to be attached to low density fabrics. They are suitable for children's clothes, knitwear and knitted clothes, light summer jackets.

The devices are convenient to use, but quite expensive and expensive to manufacture. When laying, the material is pierced with spikes located on the ring. Their diameter varies from 9.5 mm to 40 mm. The larger ones are used on jackets.
Magnetic
Self-closing fasteners with magnets are most often used in household products - bags, outerwear, wallets.They are convenient to use, but expensive to produce. The strength of the connection is high due to the magnet, and it is very easy to open it even with one hand. The magnetic button device consists of four parts - two bases and the same number of mounting flanges. The magnet allows you to automatically select the position and close. The larger the size of the fastener, the greater the connection strength.
Case
This type has another name - tablet. They have been produced since the times of the USSR, when they were needed for fastening military haberdashery. The lower part of the structure is very similar to the part of the S-shaped device. The top of the castle is hollow inside, petal-shaped. Its size is 12 mm. When the pimple is closed, it expands and contracts. Most often, buckles are nickel-plated, but they can have two more color variations - black and brown.
clay or block
On the cover of the clamp or block button, the fixing is ring. This is the main distinguishing feature of the clasp. You can see the fasteners through the hole at the top. It is similar to its S-shaped counterpart, but much larger in size. The most common fastener sizes are 8-21mm.
What you need to install or repair buttons on clothes
To start, you need to prepare:
- awl - as an auxiliary tool for marking holes and rolling the edge;
- a punch set - to create a neat hole in the fabric;
- clamps - for fixing the fastener;
- hammer - to secure the structure;
- anvil - to place rivets on it.
It is better to buy them in a professional store, since the quality of the tools must be high. Otherwise, damage to the buttons or their unreliable fastening is inevitable.
Their durability depends on the metal of the clamp.When buying, you should pay attention to whether they bend, so that there are no problems in the future. In the absence of a special tool, you can get by with the minimum set that can be found in any house:
- pliers;
- hammer;
- awl or screwdriver;
- metal beam;
- wooden block;
- rubber.
If you need to sew on a button, you will need a needle and thread in the color of your clothes.
Button Replacement Instructions
To install a new binding, you must perform several operations:
- Dismantle the old one if it is broken.
- Use the old hole or make a new one.
- Pass the button through the hole.
- Put on the locking ring.
- Use a flat surface to install the clasp.
- Divide it into four parts with an awl.
- Roll the petals with a hammer.
It is worth having a few spare buttons so that there is something to replace the damaged ones, as the petals of the pins often break.
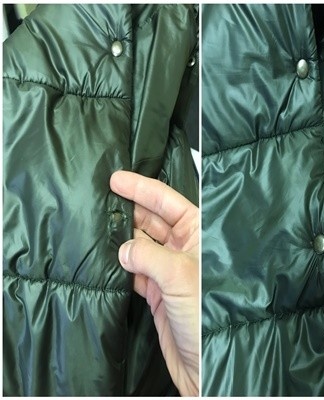
Delete an old button
Removing an old, broken push button fastener is easy, but it's important not to damage the fabric.
You need to prepare a pair of pliers and a knife that does not bend the blade.
Procedure:
- On the lower part of the clip, gently slide the blade of the knife between the button and the material from inside the product and fold down the metal edge.
- Do the same on the front of the garment symmetrically on the wrong side.
- The edge should be folded over so you can grab it with pliers.
- On either side of the fabric, grasp the folded edges with pliers and, with a slight effort, separate the two parts.
- To remove the upper part with pliers, take its front part and its seam and, twisting it, pull it apart.
paste face
To attach the front part, perform a number of sequential actions:
- Prepare a wooden board.
- Make a hole for the fastening using an awl or a thick punch.
- Insert the button cylinder into the prepared hole.
- Put the spring part from the top.
- Fold the edge using a tapered punch.
To prevent rapid eruption of the edges on the synthetic fabric or the formation of torn edges, the awl is heated over a fire before piercing the fabric.
Assembly of the rear part
To assemble the lower part, you need to prepare a small device. It is a plate with a hole the size of a slightly larger coin. A hammer with a flat striking surface is used as the tool.
The execution order of the operation is as follows:
- Make a hole with an awl or an awl.
- Insert the button into the recess.
- Pass the fabric in the second part of the back.
- Combine the two parts.
- Connect the pieces with a light tap of the hammer.
How to install a sewing variety
In addition to pierced fasteners, fasteners called sewing fasteners are used on clothing. They differ in the method of attachment, which involves the use of a needle and thread. The button has two parts. The first is sewn on the sewn side of the floor, the second on the front.
To attach parts, you must:
- Mark the seam areas with chalk.
- Sew through the special holes of the fastener with ordinary stitches (as for overcasting), gradually moving from hole to hole.
- Mark the location of the top of the clasp by rubbing the button shank with chalk and dabbing onto the garment.
- Sew the second part in the same way as the first.

To get a neat look of sewn buttons, it is worth practicing on a piece of fabric in advance.Equally important is selecting yarns that match the color of the fabric as closely as possible.
How to restore a damaged
If the metal button has ceased to perform its function and has constantly come off, an ordinary hammer can help. To do this, place the convex part of the fastener on a hard surface and carefully knock, slightly flattening the "bump". After each hit you need to try to tie. Once secure, the goal is achieved.
The plastic tie can be repaired with an iron, tracing paper or aluminum foil. To do this, the convex part is covered with foil or tracing paper and slightly melted. After the plastic hardens, they try to fix it. You can touch up the faded edges of the pimple with a nail file.
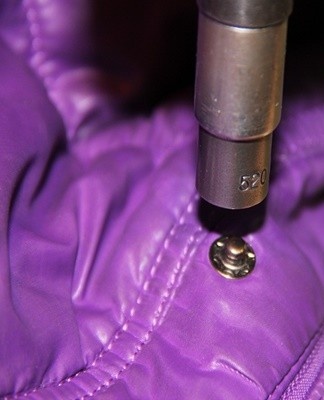
Use of a special press
The device greatly simplifies the work. Using a press, buttons, eyelets, jeans buttons, and other accessories are installed on fabric or leather.
Its main part is a metal frame, where nozzles are installed - punches, dies for buttons, eyelets, buttons.
Replacing or installing new fasteners on clothes using a press is carried out quickly, the result is beautiful, the fastener is reliable.
Additional tips and tricks
When replacing or installing knobs yourself, a few expert tips will come in handy:
- do not make holes with a knife or scissors;
- the size of the hole should be half the diameter of the block;
- when fastening the buttons, you cannot stretch the fabric;
- in order not to disable the punch, the holes are made not on metal, but on a wooden board;
- before installing the push buttons on the knit, it is reinforced with adhesive tape to prevent falling.