Do-it-yourself installation rules for sandwich panel slopes and how to finish
Multi-layer structures allow you to combine different materials, reduce installation time. Sandwich panels are a typical example of a rational approach. They have been used in construction for a long time, using them to repair old houses and build new ones. It is not so difficult to assemble window slopes from sandwich panels with your own hands without the help of professional finishers. We study the topic, delve into the intricacies of installation.
Purpose and features of finishing plastic windows with sandwich panels
When the old windows, tired of drafts, have safely gone to the landfill, and double-glazed plastic windows have been installed in their place, it's time to think about the proper finish. Fortunately, modern materials and technologies allow you not to worry about plastering the resulting irregularities, returning planes to their normal state.
Most often, the slopes are lined with plasterboard.The disadvantages of this method are obvious: high labor intensity, hygroscopicity, lack of insulation. The situation is completely different with plastic. This material is aesthetic, moisture resistant, easy to clean and wash.
The combined solution, a combination of plastic and an insulating layer, is called sandwich panels ("sandwich"). Installation does not require in-depth knowledge or special skills. And all the materials can be found in the construction supermarket.
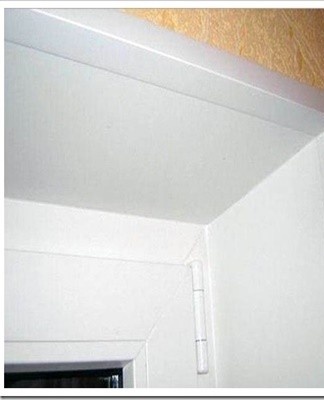
Panel mounting options involve fixing into pre-installed U-tracks or installing on foam. The latter case is more complicated, requires careful step-by-step execution. The finished sandwich panel decorates the slopes, retains heat and closes the sections of the walls adjacent to the window (if potholes, irregularities, defects are present in them). It turns out to be simple and reliable.
Varieties
The advantages of a sandwich panel are obvious: light, ready to install, insulated. There are two modifications (by the number of components) - two and three layers. In the first case, it is a "sandwich" consisting of plastic and insulation, in the second an additional plastic plate is added. The three-layer panel is considered more rigid.
Dual layer
The most common panels. As a heating element, polystyrene foam, a polymer with low thermal conductivity, is used. It's the same polystyrene, only modified. The top layer color can be whatever you want. This is convenient when choosing a panel for the interior of the room, the color of the window frame.

three layers
An extra layer of plastic has been added to this modification.This increases the rigidity of the panel, while isolating the insulation from external influences - moisture, condensation, pollution. The thickness of the slabs produced is 10 to 32 millimeters.
What is needed for installation
If you decide to mount the sandwich panels yourself, without the involvement of a specialized organization, then you will need to prepare materials and tools for work.The plates themselves, even cut to size, will not be installed in place without mandatory assistance.
Depending on the installation option you choose, you may need:
- plastic profile;
- wooden slats;
- liquid Nails;
- polyurethane foam.
And, of course, the plastic panels themselves, the thickness of which is determined in advance, so that you do not have to redo, add, change anything.
Tools
A minimal set of tools is also a must. Even if everything is calculated and measured in advance. This will be a miter box, spatulas, hacksaw, drill or screwdriver, tape measure and level. Additionally, a unit for working with cylinders (construction gun), a furniture stapler may be required.
Miter box
This is the name of a device for marking and cutting at a certain angle boards, dies, especially plastic panels. It is more convenient to work with it than with a protractor: the hacksaw walks along the guide grooves in the walls, the cut is obtained at exactly the required angle.
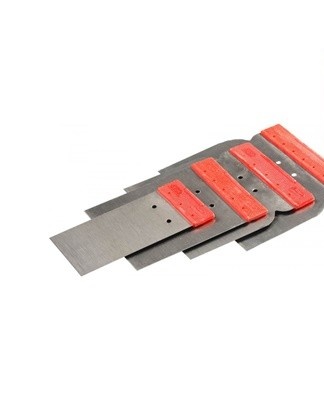
Set of spatulas
Spatulas of different thicknesses are needed for applying solutions, leveling surfaces. Along with the grout, they are the main tool of the plasterer.
Hacksaw for metal
A hacksaw for metal comes with fine-toothed blades. This means that it gives a smooth and almost treatment-free edge to the panel.You can replace it with a hacksaw for wood, but then you have to choose the smaller one.
Screwdriver
It is convenient to use a cordless or mains screwdriver not only for fixing surfaces with quick-mounting dowels, self-tapping screws, but also for drilling holes in soft materials, plastic panels.
Level and tape measure
In order for the planes to be visually even, with straight corners, if necessary, a level is used. The installer's task is to achieve the equilibrium of the bubble, its position in the middle of the viewing window. The required length of the panels is measured with a tape measure, the material consumption is calculated. A 3 or 5 meters is enough.
Construction gun for applying liquid nails
A lever device, or conversely, a gun, allows you to squeeze the mixture, packaged in tubes, into carefully measured portions. It is used in plumbing and finishing works.
Stapler
The stapler uses strong staples to target materials up to 5 millimeters thick. The result is an instant and reliable installation. Sometimes without him, like without hands.

Materials (edit)
The list of required materials includes the sandwich panels themselves, fasteners and sealant. If all the slopes in the room or apartment are of the same type, close in size, then you can order plastic cutouts from the seller. Sometimes they provide such services. But for this you need to know the exact dimensions of the panel parts.
When choosing fasteners for a U-profile, you will need to stock up on them. To fill large cavities, cracks, you will need polyurethane foam. Its consumption can be checked in store.
Small spaces are closed with liquid nails; it is inconvenient to use this sealant for processing large areas.
If the panel is to be mounted without plastic edging, on a rail, a quick setting compound is required. Self-tapping screws and dowels for express assembly, staples for a stapler will be required if the appropriate option is selected. It is determined in advance, because a universal repair solution has not yet been invented.
How to prepare the surface
Reserve immediately: sterile cleanliness, preparation of the treated surface is not necessary. It will be enough to remove debris, carry out dusting, spill concrete or loose mortar. Before applying polyurethane foam, it is recommended to slightly moisten the surface - this will increase adhesion. It is forbidden to work on dirty walls covered with fatty deposits, soot, mold. Otherwise, the results of such an express repair will not be long in coming: everything will have to be redone.
Installation methods
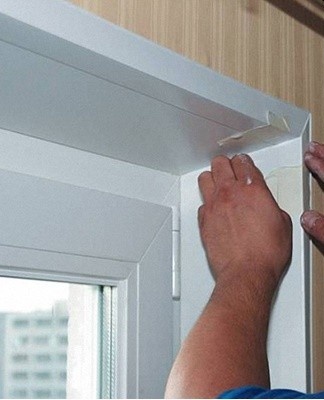
Professional installers use a special profile.First, it is fixed along the perimeter, and then a panel cut exactly to size is “pushed” into it. This approach requires some skills, experience with the tool. And the main thing is the required profile.
In domestic conditions, it is permissible to fix the panel on foam, adding it in small portions. It is also possible to stick on liquid nails. And already quite a "folk" method - on wooden slats. Let's discuss each of these methods separately.
Polyurethane foam
So you decided to attach the marked cut panels with polyurethane foam. This material has a decent grip, so it will make a real super glue. Surfaces are thoroughly cleaned before gluing, where necessary - leveled.Considering that the foam expands considerably during polymerization, it is applied in small portions, controlling the position of the panel. For this, beacons, temporary fixtures, accessories are used. The method is complicated, but it also has the right to exist. At the same time, an additional insulating layer is created: the foam has low thermal conductivity.


Liquid Nails
A popular sealant used to seal seams, wall and ceiling decals in foam moldings. The weight of the plastic panel does not differ significantly, so this method is suitable for home use. But before starting work, you will need flat surfaces (to avoid overspending the mixture), cleaned of dust, dirt, greasy deposits, dried from moisture. The sealant is applied with a construction gun around the perimeter and several points along the plane. The panel is slightly dented. After a few hours, the plane is firmly fixed.
Installation with wooden slats
The wooden frame is used as a super-budget option. At the same time, the surface is leveled, the required angles and slopes are created. The track is fixed to the walls with quick-adjust dowels. It remains to fix the pre-cut pieces of the sandwich panel on the resulting frame. This is done with self-tapping screws (trying not to catch the hats using countersunk screws).
If you use a staple gun, there is a risk of ruining the panel when punching with a staple.
How to do it yourself
Making a full-fledged panel, "just like a factory panel" at home will not work. You can try using a combination of plastic sheet of the desired tone and foam.The most important point is to ensure contact between the layers so that air and moisture do not enter the gaps. In this case, the components are glued (attached) in stages: first the foam, then the panel plastic.
If a ready-made panel is used, then it is fixed according to one of the selected options, taking into account the requirements for accuracy, step-by-step compliance with the installation technology.
Common Mistakes
The most common errors in the installation of "sandwiches" are manifested by improper surface preparation, incorrect choice of installation method, marking errors. Some of them are fatal and cannot be changed.
Applying polyurethane foam to the gap without considering its expansion is the same mistake as the others. In this case, a deformation of the panel is possible, which is likely to cause its damage.
Additional tips and tricks
The main advice concerns the use of quality components and materials. The success of the repair and installation depends on it. Then - strict observance of the rules for cutting, instructions on the packages with components. And finally, self-confidence, based on sober calculation and an understanding of the importance of the process.