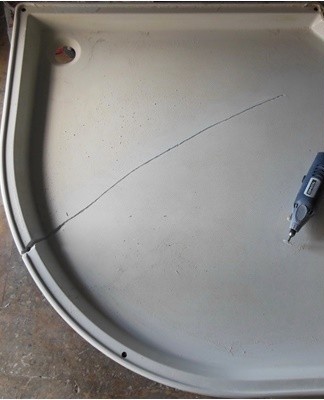
Better to seal the crack in the acrylic shower tray with your own hands
How can you glue a crack in an acrylic shower tray, they usually only think about it after a breakdown. In fact, it is much easier to prevent damage than to repair it. But if a breakdown has occurred, an adhesive of different degrees of strength will help to put the pallet in a suitable form.
Hardware Features
Acrylic is a material that is now very often used for the production of sanitary ware. Besides, it looks great. Acrylic remains snow-white for a long time, sediment does not accumulate in it, it does not become covered with yellow spots, traces of rust and dark spots.
Unlike steel, acrylic options are lightweight. It will not be difficult even for a novice master to ride them. A wide selection of different shapes and sizes will allow you to choose the right tray for any shower enclosure in the bathroom. It's also noise resistant (meaning if you drop something in the palette it won't ring loudly, alerting everyone to its fall). It, unlike metal, is resistant to the effects of corrosion, that is, it does not need to be replaced due to the appearance of rust spots.
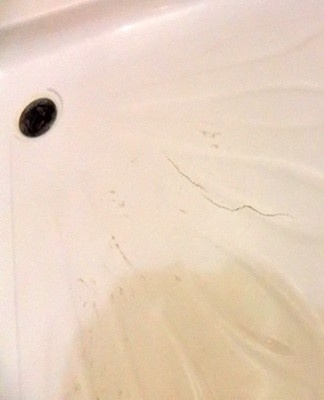
But, alas, acrylic also has its drawbacks, which does not allow us to call it a universal option for the manufacture of pallets. The fact is that they are not as shock resistant. Like, say, the same steel or the same cast iron. That is why the demand on how to seal a crack in an acrylic palette is the highest among consumers. An unpleasant situation often happens, and it is enough to even drop an ordinary shower head or ladle.
Acrylic shower trays have weight limits for the person taking the shower. For example, if it is designed for taking a shower by a person weighing up to 90 kilograms, performing indoor hygiene procedures for a person weighing more than 100-120 kilograms may cause a breakdown. If this does not happen immediately, the pallet will certainly eventually bend, and under the weight, the next time it will simply break or crack.
Sometimes special frames are installed in acrylic pallets, which increases their functionality and, accordingly, their service life.
How to disassemble
Before gluing the crack, it is necessary to remove and then disassemble the pallet. It is not recommended to work directly with plumbing equipment in an assembled and active state. This not only will not give the desired results, but can also lead to an even more serious failure. You will need to take:
- sharp knife;
- screwdrivers (2-3 different);
- adjustable and plumbing wrench;
- Thinner (available in specialized stores)


The first step in the analysis is the shutdown of plumbing communications. The shower cubicle is disconnected from the network. Only then can you continue working.
In addition, all hot and cold water valves are carefully moved, that is, the water supply to the apartment stops. Then you need:
- disassemble accessories - these include mirrors, watering can holders, lights, hooks; in some cases you will have to remove a shower divider and a faucet with a mixer;
- remove silicone sealant - a special solvent is used, which is evenly applied to the seams;
- remove doors, glass panels, remove frame.
Only after these manipulations can the pallet be removed. If you start cleaning it right away, the shower enclosure and the accessories it contains may be damaged.
Suitable adhesives
For repairs it is recommended to purchase such compositions.
Desmocol
Desmokol is used in the footwear industry. This effective product bonds not only polymers, but also wood, leather, iron and other materials. Suitable for repairing a shower enclosure only if it does not bend afterwards. Otherwise, the result will be short-term.
gelcoat
Its gel-like structure is convenient. First, a layer of fiberglass impregnated with the composition is laid out. Then it is covered with another layer. Wait for the complete drying.
epoxy adhesive
Epoxy glue differs in that it consists of a resin of the same name and a hardener. It can be monocomponent (immediately ready for use) and bicomponent (must be mixed in certain proportions with other formulations). In order to glue a pallet to them, you need to take:
- fiberglass;
- solvent;
- polyurethane foam;
- respirator;
- putty knife;
- the scissors.
The main thing is that you first need to degrease and then dry the surface. The epoxy adhesive is poured for 24 hours, left, glued to the surface and left again for this period.
Work instructions
Follow the step-by-step instructions.
Light damage
If the pallet is slightly cracked, but no significant damage has appeared, it is recommended to immediately repair the crack. Otherwise, it will start to crawl and cause big trouble. A step-by-step algorithm of actions in this case:
- Wipe the moisture from the palette, wipe off the liquid with a clean cloth and let dry - with minimal cracking, it does not need to be removed.
- Wipe the area of the crack and the crack itself with a cotton swab dipped in alcohol.
- Apply regular acrylic glue.
- Allow the required time to dry.
- Apply a second coat.
The minimum amount of glue should be applied at each stage, a few millimeter layers. In this case, it is better for the composition to last at least a day, and only after that apply the second and third layers. To polish the surface, if traces of the composition are visible on it, you can use fine sandpaper. But you should not try hard - sandpaper can cause new scratches, which will lead to cracks.
Deep damage
Gluing the pallet, if the damage is deep, is not as easy as it seems at first glance. You will need:
- Dismantle the plumbing.
- Treat two surfaces with a cotton swab soaked in ethyl alcohol.
- Brush glue along the furthest spots.
- Gradually leveling the plane, make sure that the distance between the edges is the same on all sides.
- Fill the crack with glue.
Here too, the rule applies: you should apply less glue, but leave it longer.It will be great if a person engaged in repairing a pallet with his own hands cannot use it for at least a week.
Do-it-yourself elimination of through holes
Repairing a pallet if a through hole appears on it is the most difficult thing. But with persistence, it can be done. You will need:
- Disassemble the pallet, removing all devices that could be damaged in the event of a fall or impact.
- Use a sander or drill to chamfer to sharpen the edge.
- Wipe off dust and dirt, use alcohol wipe to remove grease.
- Cut fiberglass or acrylic patches.
- Saturate the parts with resin.
- Attach them to the previously cleaned edges.
- Flip the pallet over and fill the crack.
Of course, the pallet cannot be used with a through hole. It is not always possible to achieve positive results even during repairs in the service. Therefore, in many cases it will be easier to buy a new pallet, if it is not expensive, than to face a long and expensive repair of the old one.
Leak test
The tightness test of the connection is carried out in a state not yet reassembled. It is necessary to first draw hot water into the pan after complete drying. The device is placed on a floor covered with some kind of cloth or paper, so it is easier to see if there is any moisture left. If it is not there, you can proceed to the second test - filling with ice and hot water. If the palette reacts normally to water at different temperatures, then you need to check its exposure. It is necessary to stand, walk around, that is, apply the maximum weight with which they will affect the plumbing.
Additional tips and tricks
Plumbers insist that absolutely not all faults can be repaired. In many cases, especially when it comes to a palette of a low price category, which is made of practical, but short-lived acrylic, it is easier not to waste time, but to buy immediately a new copy. But if the pallet is quite expensive, and most likely the cracks themselves can be repaired, then it makes sense to start repairing using expensive adhesives.
It is also recommended:
- Carefully select the means for cleaning and degreasing the pallet.
- Carry out work only in a ventilated area.
The device is used when completely dry. For branded adhesives, this period is approximately 1-2 days.