DIY toilet tank repair rules at home
Plumbing is an irreplaceable thing in the house that facilitates a person's daily life. Due to constant use, plumbing often breaks down, forcing owners to spend energy on its restoration. Most often, toilet tanks break, refusing to drain water or, conversely, causing a leak. Let's see how to fix a broken toilet tank at home and what tools you might need for it.
Content
- 1 Device and principle of operation
- 2 Coaching
- 3 Major malfunctions
- 4 Possible reasons
- 5 Intake valve replacement
- 6 Replacement of the drain valve
- 7 Water level adjustment
- 8 How to Repair or Replace a Float
- 9 Features of repairing products with water supply from below
- 10 How to repair a built-in tank with your own hands
- 11 Rules of operation
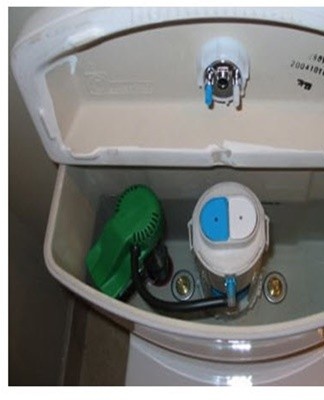
Device and principle of operation
Before eliminating the problem, you need to understand the device and the principle of operation of the device.Depending on the technical equipment, some models may have additional parts, but most standard designs are made according to the following scheme:
- bells;
- waves;
- pears.
The operating principle is as follows:
- Water is sucked into an empty tank until its level reaches a certain level.
- The water level is regulated by a special float.
- As soon as it reaches the desired mark, the filling valve closes and the device is ready to drain.
- Water is drained through the drain valve, which is partially or fully opened by pressing a special button.
Bell
An old and reliable design, which was actively used in the Soviet years. Consists of:
- a cistern located much higher than the toilet itself;
- a steel chain attached to a cork bell blocking the evacuation of water.
The only drawback inherent in structures of this type is the unreliability of the rubber seal, which eventually fails. Replacing it is not difficult. We can say that the disadvantage is not significant.
Ripple
A less reliable design relies on plastic bellows to close or unlock the drain as needed. Due to frequent use, the corrugation wears out quickly at the folds, losing its integrity. As soon as it fails, the tank begins to leak and the drain does not work as it should. It is not expensive to fix the problem, but it will take a lot of time and effort.
To note! Plumbing, arranged according to the principle of corrugation, rarely serves more than 5 years without breakdowns.
Pear
Convenient design used in most modern technologies. Its operating principle is thought out as follows:
- the user presses the emptying button or pulls the lever;
- the rubber bulb covering the outlet valve leaves its seat and the water rushes into the toilet.

Despite its modern design, it has many flaws, including:
- stem deformation;
- the material from which the pear is made loses its properties, which causes leaks;
- violation of the integrity of the thread on the rod.

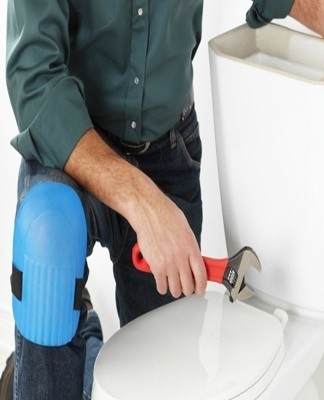
Coaching
Preparation for troubleshooting begins with dismantling the tank. The algorithm of actions will be different depending on the drainage system installed by the plumbing manufacturer:
- with just one button;
- double button;
- old-fashioned drain system.
Each device has its own nuances in preparation, which must be considered separately.
A button
Disassembling a tank with one button is no more difficult than the old-fashioned drainage system, but there are some differences to consider. Owners will need:
- turn off the water supply to the tank;
- empty the tank;
- with gentle movements, unscrew the plastic nut that secures the tank cover to the drain mechanism;
- remove the cover.
The algorithm of actions is quite simple, even a person ignorant of plumbing can handle it.
Double button
The double button differs from the single button only by the device for draining the water from the fittings. The product is more complicated than the one-button version, and it will take a little longer to disassemble. If improperly attached, the outlet device will not work properly, draining all the liquid at once.
Keep this in mind and try to be careful when repairing this type of plumbing.
The rest of the preparation process does not differ from the standard process; to disassemble the tank, you do not need to perform particularly complex operations.
old sample
Old-fashioned plumbing is famous not only for its reliability, but also for its simplicity of design. The cistern is easy to prepare for repair. It needs:
- block access to water;
- remove the cover, which in most cases is not attached to the main structure;
- drain excess water;
- the device is ready to be repaired.
Major malfunctions
The number of faults varies depending on the complexity and equipment of the plumbing, but in most designs the following options appear:
- Water is constantly seeping from the cistern into the toilet and there is no way to block it.
- The outlet water pressure is not strong enough or is completely absent.
- The drain mechanism is broken and does not respond to attempts by third parties to activate it.
The tank constantly leaks
The most common problem is a tank leak, when water constantly flows out, preventing the tank from filling to the desired level. There can be several reasons for the failure:
- the float that regulates the water supply process is faulty;
- the locking device has failed, due to which a gap has formed in the exhaust valve.
The problem is not serious, but annoying, because the toilet makes a constant noise when sucking liquid.
No water pressure at outlet
The water pressure directly depends on the amount of water collected in the tank. If the float fails, it may begin to turn off the mechanism sooner than it should, preventing the tank from filling to the required volume. In this case, the problem is eliminated by adjusting this part.

In older mechanisms, it is enough to bend the wire to which the float is attached upwards.In new designs, everything is a little more complicated, but the problem is still solved. If the float is ok, check the drain hole. It may be clogged.
Uncontrolled drain mechanism
The most annoying problem. Its elimination will require a significant investment of time and effort. The fact is that when the drain mechanism fails, it is difficult to determine the problem without having enough experience and education. In this case, there is only one way out - to call a specialist or buy a new part.
To note! If you are unable to determine the cause of the breakdown, contact a specialist.It will cost a little more, but you will not spoil anything, and subsequently you will not have to change the entire tank.
Possible reasons
The causes of the above problems can be:
- The plug is not snug against the drain hole.
- The regulator does not shut off the water supply.
- A crack has formed in the tank or seals that ensure tightness have exhausted their service life.
- The inlet valve does not provide sufficient water pressure.
The plug is not firmly attached to the drain hole
If the plug does not fit tightly into the drain hole, water will constantly seep in, preventing the container from filling to the required volume. As a result, the water supply valve does not close, which creates:
- excessive noise in the bathroom;
- rusty coating on the surface of the toilet bowl, where water is supplied.
The consequences are not dangerous, but inconvenient for others, therefore it is better to eliminate the breakdown in time, without postponing the matter indefinitely.
The regulator does not shut off the water supply
Dangerous breakdown, as an overflow of the tank threatens to flood the apartment and cause serious damage to repairs in your apartment, as well as in the neighbors living below.
The problem is solved as follows:
- remove the regulator and try to clean it from dirt;
- if cleaning does not help, you will need to replace the faulty part with a new one.
To avoid serious trouble, it is not worth delaying the repair.
Crack in tank or leaking seals
Leaking joints are not a serious threat to plumbing, and the problem is solved by replacing old joints with new ones. With a crack in the tank, everything is more difficult, because it is not always possible to buy a new water tank. A special sealant or glue can come to the rescue, but this will not completely solve the problem, because a crack can form anywhere else.
If the integrity of the tank is seriously damaged, do not assemble it yourself. Get rid of your used part and buy a new one.
Low head through intake valve
The most harmless trouble, which is expressed in the long filling of the tank with water. It is not critical, and if necessary, the plumbing can work for a long time without major repairs. Try to clean the inlet valve from dirt that has accumulated during operation. This is usually enough to return the technique to full functionality.
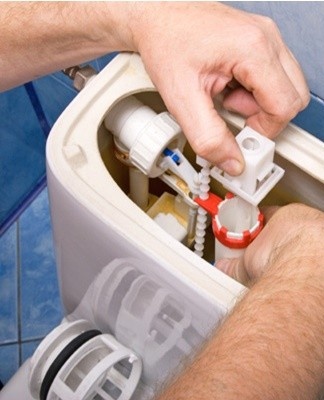
Intake valve replacement
If the intake valve cannot be repaired, it must be replaced. Algorithm of actions for self-replacement of the intake valve:
- we close the water flow in the tank;
- disconnect the tank liner;
- drain the water;
- carefully dismantle the structure and dismantle the old valve;
- install a new part;
- we collect the tank;
- check for leaks;
- if no leaks are detected, we use the plumbing as usual.

Replacement of the drain valve
To replace the drain valve, you must:
- turn off the water supply;
- disconnect the hose from the tank;
- drain the water;
- disconnect the toilet tank;
- dismantle a draining device that does not work;
- install a new drain valve;
- check the system for leaks;
- assemble the structure together.
Water level adjustment
Consider the process of adjusting the water level for the one-button toilet:
- shut off the water supply;
- we drain excess fluid;
- we find the float;
- it has a special screw with which the water level in the tank is regulated;
- at the end of the adjustment, check the result. If everything is fine with you, we recover the plumbing in its original position.
To note! Depending on the model of the toilet, the setting can be done differently. In one case, tightening the screw will reduce the water level, in others, on the contrary, it will increase.
How to Repair or Replace a Float
To repair the float or replace it with a new one, you must:
- block the system's access to water;
- disassemble the device;
- remove the float.
If there is a small crack on it, it can be covered with a sealant, in other cases a new part is simply installed.
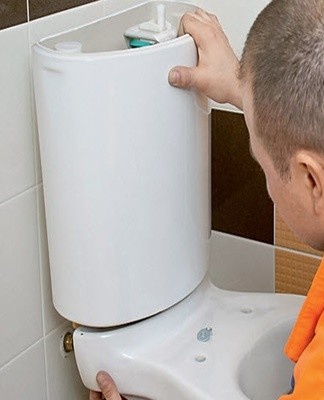
Features of repairing products with water supply from below
Features of the repair of products with an inferior water supply include:
- It is necessary to completely disassemble the tank and remove it from the toilet in order to troubleshoot the system.
- After repairs, it can be extremely problematic to adjust the correct water level in the tank.
- Repair takes time.
How to repair a built-in tank with your own hands
Repairing a wall cistern is a lot easier than you think.Hosts don't have to take down the wall if something goes wrong. The fact is that the design of the built-in tank is different from the usual one. There is only one part inside that can break - the drain device. It can be easily removed through the hole in the tank, after which a new part is installed. Collecting plumbing will also not be difficult.
Rules of operation
To increase the life of plumbing and avoid malfunctions, follow the rules of operation:
- Periodically disassemble the tank, cleaning it from accumulated dirt.
- Do not use the drain button unnecessarily, as constant manipulation leads to rapid depletion of parts.
- A toilet tank is fragile. Rough handling will cause cracks and leaks.