What you need to make a robot vacuum cleaner with your own hands and working schemes
The idea of creating a working robot vacuum cleaner with your own hands is not new. As soon as homemade products appeared on the Arduino microcontroller platform, hobbyists began to develop more serious things on their basis. For example, a "smart home" housing management complex or a house cleaner. In addition, in an economical version, it can be ridden literally on your knees, in a few evenings.
What you need to make a homemade device
It doesn't take much to make a robot vacuum as good (but cheaper) than a factory vacuum. One of the amateur designs of the vacuum cleaner is assembled from packaging made of corrugated cardboard, which is used for packaging goods. Boxes are made of it. But for a normal aesthetic impression, something more is needed. It can be a vacuum cleaner body glued from plastic or a ready-made element borrowed from a worn-out factory assistant robot.
So what will he need in the first place:
- Arduino microcontroller.
- Bread cutting board.
- Rangefinders.
- Motor control device.
- Engines.
- Wheels.
- Computer cooler.
- Turbine.
- 18650 batteries.
- Thread.
This is the minimum configuration for a vacuum cleaner.In the future, the robotic complex of the vacuum cleaner can be modernized, adapted to a specific situation.
We make the case
If you wanted to do everything immediately, you can't do without a case for our vacuum cleaner. For this we need plastic - polystyrene, polyvinyl chloride.
First you need to determine how the filling will fit inside the case. If you follow the path of least resistance, you can go with the ergonomics of any vacuum cleaner out of the box. They are usually disc-shaped, about the same size. This means that you will need to cut out (make) 2 circles of the same diameter and a side wall (full strip) of the vacuum cleaner.
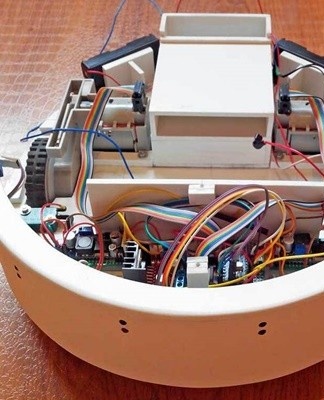
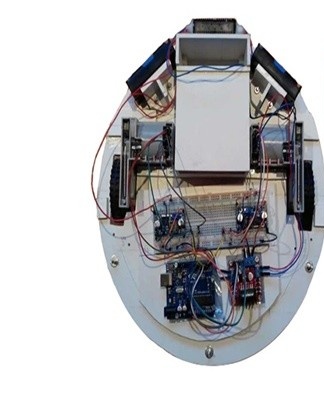
A battery compartment is allocated according to the power supply. It is best to use the widely used 18650 batteries - these are found in laptops, toys and power banks. Motion sensors are located on the front, they are responsible for the "behavior" of the vacuum cleaner. Be sure to consider the location of the wheels, their drives, the central board (Arduino) and the turbine with the dust collector.
It depends on the correctness of the calculation, the thoroughness of the arrangement of the parts, soon it will be necessary to radically change the design of the vacuum cleaner or be limited to a small modernization. The dimensions of the case are related to the type of microcontroller, additional boards.

The original Arduino offers 3 gradations: "Uno", "Pro", "Leonardo", as well as boards with additional connectors ("Mega", "Due"). There are also more compact options - "Nano", "Micro". And that's not counting the many Chinese clones, which are no worse in terms of functionality. But it is often much cheaper.
Therefore, it is better to predict these factors in advance. And only then begin to implement your idea, creating a vacuum cleaner body. Do not make a diameter less than 30 centimeters. Otherwise, nothing will fit. Better then use the free space to add a battery or extend the dust bag.
Also, the design of the case should take into account the possibility of dismantling, repairing the vacuum cleaner, therefore, it is recommended to make removable covers or hatches to provide access to the interior. It will take a little longer than just making the plastic parts. You may even need to make a model of a vacuum cleaner first, draw a robot on paper.
But such a tactical gesture will save you from many problems associated with rearrangement, tampering with the vacuum cleaner. Often, eliminating such difficulties requires more effort than the initial calculation, placement of nodes, taking into account the listed requirements.
It also does not hurt to take into account that the Arduino microcontroller will require modification of firmware and software. To do this, it is imperative to take out the connector by which the "brain" of the robot will be connected to a large PC. And after all the main points have been identified, you can begin to translate the idea of a vacuum cleaner into reality.
When choosing a case made of PVC, polystyrene, an adhesive of the appropriate composition is used for assembly. It is not suitable for bonding epoxy molded parts. And for "epoxy" tiles, the glue must also have its own. This is important to understand.
It is possible to assemble the body of the vacuum cleaner even from thin plywood (up to 5 millimeters). A greater thickness will increase the weight. Less will not provide the required rigidity.Woodworking is not a difficult task: the pieces are cut with a jigsaw, sanded, fitted to size and glued.
In this case, it is permissible to deviate from the disc configuration and make the robot vacuum cleaner square at the base.
And, finally, an option for the laziest is to find a case from an unusable robot vacuum cleaner or buy a ready-made one in one of the chain stores. But in this case, you need to select the components in advance, taking into account the dimensions. Otherwise, you will have to change one thing: either the body or the details.

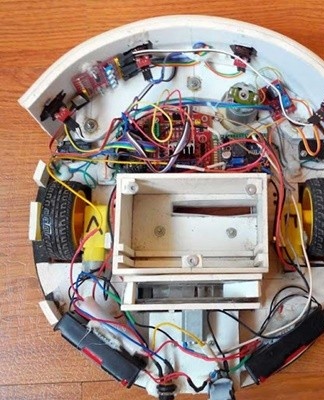
Robot assembly
The assembly process includes not only installation, placing all parts in the designated places, but also cutting windows, holes, forming the side wall of the case. The polystyrene sheet bends easily when heated. You can use a pot of hot water or a hair dryer.
When gluing, the parts are fixed for the entire setting time of the composition. More detailed instructions are given on the glue tubes. This is usually 24 hours. For epoxies and other brands of components, prep time may differ.
To fix the boards, individual units inside the body of the vacuum cleaner, it is permissible to use a heat gun with glue sticks. But fasteners on self-tapping screws will become more reliable and flexible. The mechanical part of the installation does not pose any difficulties.
It is accessible to everyone who in childhood has undergone the practice of assembly and disassembly on the Lego constructor. If no error has crept into the calculations, all the details fall into place.It is important that the electronics, motors and wheels are protected from dust. For this, the dust collector must be isolated from the other compartments. Solution options are below. You will also find a diagram of the vacuum cleaner there.
What way to move - everyone decides for themselves. If you want to create a simple home assistant, you can do it with minimal detail without overloading the structure.
Perfectionists can choose a more complicated version of the vacuum cleaner: add a charge indicator, rotating brushes, “conjure” with wheels, providing the required speed of movement.
The same goes for increasing (decreasing) the capacity of the battery, replacing the Arduino board with a more compact one, including additional sensors. And the basic version of the vacuum cleaner can be assembled literally over the weekend or 2-3 evenings.
Where to get and how to download the firmware
Software, or firmware, is something without which our robot vacuum cleaner will not move, will not fulfill its functions as a home assistant. You can get it on the same resource where the Arduino board was purchased, or on one of the amateur sites where homemade products are collected.
In one of the solutions, the author of the development kindly shared with readers a program designed for the simplest and most chaotic cleaning. In general, Arduino is a platform where enthusiasts create solutions for their own needs. Therefore, there are 2 ways: write software yourself (if you know how to program) or use someone's help, get a ready-made one.
Basic knowledge of Arduino, PC, the principle of their interaction is essential. For those who are not confident in their own abilities, it is better not to take risks.There are several ways to synchronize the Arduino microcontroller, download the software:
- using the Arduino IDE;
- programmer;
- connection to another Arduino board.

The first is to download (or use online) the Arduino IDE. The software works on most modern operating systems - Windows, Linux, Mac OS. Before taking action, it is strongly advised to understand exactly what is being done.
Doing something blindly with the Arduino through trial and error is strongly discouraged. It is best to order a ready-made and sewn board. You also need to prepare a USB connection cable in advance. All information about working with Arduino, its software environment is on the net. It is not difficult to master it, there would be a craving.
The Arduino IDE interface is quite simple and intuitive. If something doesn't work, you can always turn to the dedicated section of the Arduino Wiki for help.
The next way is to use a programmer. This is a special device sold separately. But it allows you to work with different Arduino boards, upload software to them.

The latest proposal uses one of the Arduinos as the programmer. The method is no worse than the others, it is quite effective. To implement each of the proposed options without disassembling the vacuum cleaner each time, you need to provide access to the board connector in the case. It can be a window, an extension cord with a USB connector, taken out from under the cover of the vacuum cleaner, or your own method. If only it was convenient to use.
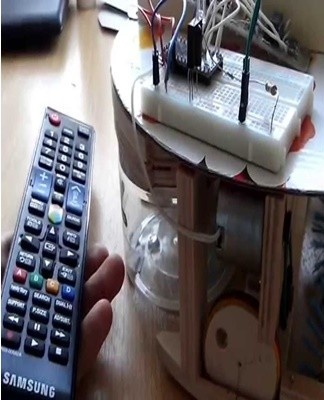
Product testing
As a rule, the assembled vacuum cleaner does not require special break-in. After charging the battery, it is immediately "combat-ready".The very first few minutes of operation will reveal other units that need to be upgraded. For example, the wheels of a vacuum cleaner. Or replace gearboxes and motors with slower, more reliable ones.
In basic mode, the vacuum cleaner should at least move around the room without any problems, identifying obstacles. And if he also picks up trash, that means the idea was 100% successful.
Modernization possibilities
There are no limits to perfection. Upgrading a robot vacuum can affect both the mechanics (wheels, installing additional rotating brushes) and the electronics (replacing the Arduino board, sensors, charge controller, etc.).
It is possible that during operation the owner of the vacuum cleaner will want to paint the body; nitro spray enamels are suitable for this. Or replace the software by adapting it to the Android environment to make the vacuum even smarter. And it could be controlled using a smartphone. There are already ready-made ideas and solutions. And you can create something by yourself, the Arduino platform was created for this.