How to glue deflectors on a car correctly and do it yourself
Deflectors (visors) are not included in the standard equipment of most cars and are often not offered even as an additional option. However, this part is able to solve a number of problems that arise during the operation of the machine. On the market there are visors of different designs. But, despite this circumstance, the solution to the question of how to glue the deflector to the car yourself is the same in any case.
Functional purpose of the visor
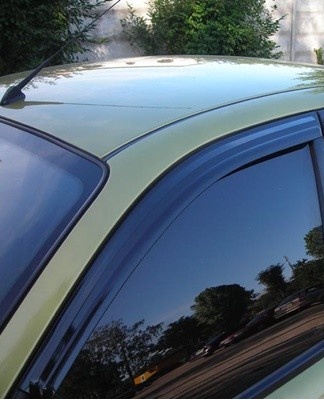
The deflector is a compact cover that is mounted on the hood and side windows of the car. This device performs the following functions:
- protects the body and glass from dirt, stones, insects and other small particles which, together with oncoming air, hit the car;
- prevent the penetration of raindrops when the window is open;
- avoid the appearance of drafts in the passenger compartment, thus improving the ventilation of the interior space;
- provide additional cabin sound insulation.
Visors are fitted in areas that have the maximum air pressure while riding. Therefore, the deflectors must be fixed with reliable fasteners. The visors are plug-in and hanging.The first option is suitable for those who do not want to waste time installing a baffle. However, this type of visor is not suitable for all vehicles and does not have a reliable fastening. Air deflectors are glued on and last longer.
Preparing the machine surface before installation
Most face shield designs are made with an adhesive base designed to secure this device. Otherwise, it is necessary to purchase specialized adhesive tape, which is preheated with a construction hair dryer.
It is also recommended to prepare the latter if deflectors with an adhesive layer are used.
In addition to a hair dryer, you will need a dry cloth and technical solvent for fixing plastic coatings. After preparing the specified components, you will need to perform the following steps:
- Wash the car body and windows, paying particular attention to the areas where the plastic covers need to be glued.
- Treat the body and the visor with a technical solvent, removing the layer of grease.
- Carry out an additional treatment of the body, covered with polishing wax or paraffin wax.
If the car has old deflectors, then to dismantle the worn ones you will need:
- Open and lock the side door.
- Heat the connection between the deflector and the body with a construction hair dryer. This procedure should be performed with extreme caution. Overheating will cause the paint to peel off the surface of the body.
- Remove one end of the old tampon and insert the line.
- Run the line along the entire deflector, detaching the trim from the body.Care should also be taken during this procedure to avoid contact with the surface of the body.
- After dismantling the old visor, treat the surface with a solvent.
If the old visor is pluggable, disassembly is carried out in two stages. First you need to lift one edge of the baffle, then pull the plate towards you. At the end of this procedure, it is also necessary to clean the surface of the body.
It is possible to install new deflectors provided that the ambient temperature is above +10 degrees. It is forbidden to carry out the procedure in winter. In cold weather, the glue does not harden, which is why the deflectors will fall off a few hours after installation.
Procedure
To stick the new deflectors on the car yourself, you will need:
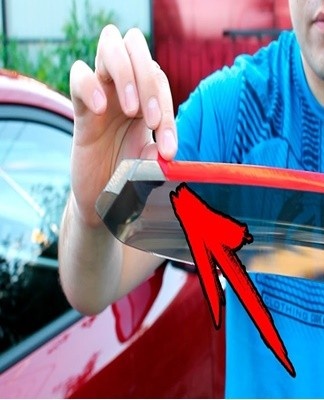
- Remove the protective film from the visor without removing the film covering the adhesive.
- Place the tool on the future installation site and mark directly on the body. This must be done from both sides, pressing as hard as possible on the deflector.
- Remove 3 to 4 centimeters of protective film from the front and back parts.
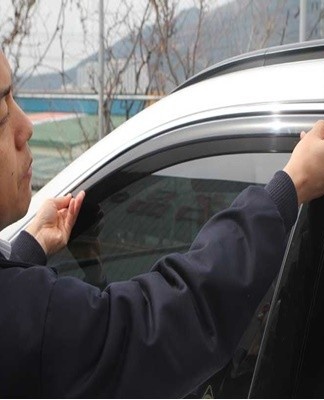
- Lift the protective film, put the visor on the body and press the edges.
- Remove the rest of the protective film and press the strip to its full length.
The deflector should be held in this position for five minutes. During this time, the adhesive composition will gain enough strength. Installing a visor on the hood has its own characteristics. This device is subjected to relatively high stresses, for which the attachment point must be reliable. It is recommended to place the deflector at a distance of 10 millimeters from the hood, and to use brackets for fixing.
The procedure for installing visors in this case is as follows:
- Wipe down the front of the hood with a degreaser and mark the mounting locations for the brackets.
- Install the plastic seals according to the applied marks, which protect the body.
- Attach the deflector to the hood and mark through the holes to precisely position the fasteners.
- Install the brackets on the hood so that the fixing points of the plastic trim exactly coincide with the marked marks.
- "Pillows" are glued to the back of the liner in the places indicated in the instructions.
- Remove the protective film from the "cushions" and secure the plastic cover to the hood with the brackets. The attachment points are then closed with appropriate plugs.
Some models are completed with a plastic button, which is inserted into the hole located where the brackets are attached.
How to install properly without using glue
Some car models can be equipped with adhesive-free flaps. In this case, you will need:
- Lower the side window.
- Remove the seal at the top with a thin metal plate.
- Slightly bend the visor in the center and insert it under the gasket.
- Raise and lower the glass several times, leveling the position of the plastic cover.
The putty in this case is glued to the old anti-corrosion coating. If this does not happen, you need to apply a new coat of sealant.
How to avoid problems
The adhesive composition of some deflector models does not allow reliable fixing. Double-sided tape, which should be attached to the inside of the fairing, helps solve this problem. Then, after removing the protective layer, it is necessary to install the plastic plate on the door.
Before buying deflectors, it is recommended to try several models by attaching each attachment to the car.You can avoid problems during and after installation if you perform the described manipulations together. Thanks to this, the plastic plate will be fixed more securely.
Once the operation is complete, it is recommended to heat the fixing points with a hair dryer on site. This will make the mount stronger. In addition, at the end of the procedure, contact of the fairings with water must be avoided for at least one day.