How to make a brick path in the country with your own hands, step by step instructions and examples
Laying a brick path in the country with your own hands will not only improve the appearance of the site. Thanks to this design, gardeners can reach any area, regardless of weather conditions. The choice in favor of brick is also due to the fact that this material allows you to create various patterns. However, this last option requires certain skills.
Advantages of bricks for making garden paths
Brick is a relatively inexpensive and affordable material, the scope of which is not limited to housing construction. A path laid using such masonry has the following advantages:
- long life expectancy;
- low price compared to other similar models;
- suitable for any design of the territory;
- able to play the role of a drainage system;
- respect the environment;
- if necessary, the track can be dismantled and moved to a new location.
To lay paths in the garden, you can use any type of brick, including those that remained after the construction of the house. Despite its increased strength, this material can crack during prolonged contact with water and snow, as well as when exposed to extreme temperatures.
To avoid such consequences, it is recommended to use brick or silicate stone, previously treated with a hydrophobic solution or waterproof varnish, for laying paths.
Basic styling methods
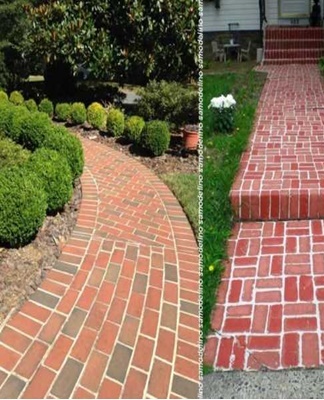
People who have no experience in paving paths are recommended to lay bricks longitudinally, that is, parallel to each other, or transversely, when the resulting seams between the stones are perpendicular to the direction of the path. But there are other installation methods that increase the duration of work, but improve the appearance of the site:
- chaotic (used if bricks of different colors are used);
- "Herringbone" (the bricks are laid at an angle to each other, and the resulting pattern goes in the same direction as the path);
- braid (alternate longitudinal and transverse poses);
- alternating vertical and horizontal style.

When paving a curved path, a combination of whole and broken bricks can be used. These help to fill the gaps that form with this installation method.
with dressing
Paving with bandages makes it possible to get an original pattern on the way. This option allows you to lay bricks with an offset (a stone in one row is further away than in the next). This pattern can be formed both along and across the track. In this case, it is recommended to mount the curb also from bricks installed on the edge.
Flat and lateral
The best quick way to pave is to lay the brick flat. This option is preferable because less stone is consumed.However, by placing the brick to the side, the life of the track can be increased.
Work instructions
Compliance with the following rules helps to increase the life of garden paths:
- do not lay stones in the area of irrigation and placement of communication networks;
- ride in places with natural water flow (recommended at higher elevations);
- paving away from trees, including the area of possible root germination;
- the width must correspond to the dimensions of the garden cart.
In addition to compliance with these rules, the service life of a garden path largely depends on the quality of manufacture of the substrate (base).

To lay bricks on the site, you will need the following tools:
- shovels and bayonet shovels;
- rammer;
- container for mixing cement;
- tape measure (10 meters recommended);
- pegs and cord for marking;
- rubber (mallet) and ordinary hammers;
- construction trowels of different sizes.
In addition, you will need an angle grinder (grinder) with a diamond wheel for processing stones.
markup
For marking on the site you will need pegs of sufficient height (at least 50 centimeters) and a strong rope. It is recommended to ride in the boards at a distance of 5 meters. In places where you plan to turn the track, you need to drive into more stakes. The rope should be pulled so that it does not sag.
Base preparation
This step is considered the most important. Without a high-quality foundation, the garden path after the first season will "go" in waves. You need to start excavation work at a depth of 20-25 centimeters. The base thus obtained must be leveled. Then pour a layer of sand 2-3 centimeters thick on top and tamp the material.In this case, it is recommended to use a specialized vibration plate technique. Such a machine will provide the densest base.

Then you need to lay out a layer of geotextile on top of the sand. The material should cover the entire base, both in length and in width. The geotextiles will wick excess moisture away from the walkway, preventing the sand from getting wet and washing away. In addition, the material prevents weeds from growing.
At the end, a layer of sand 2-3 centimeters thick and crushed stone - 10 centimeters is covered with the geotextile. After that, the base is rammed again. In this case, the crushed stone acts as a drainage layer, also preventing erosion of the base.
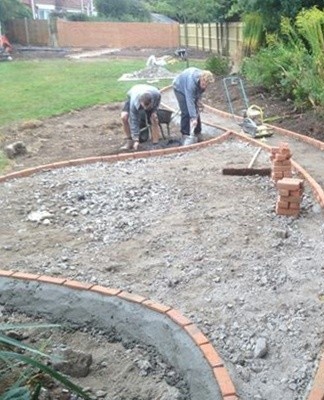
After the completion of the described work, sand is poured again and geotextiles are laid on top. Only then can curbs be installed along the edges of the future path. To fix the latter, use a cement mortar or steel reinforcement, which is driven directly into the ground.
It is recommended that the edging be made of durable materials, since the "sides" of the track constantly experience increased loads. If in this case a brick is used, the stone must be laid on a cement mortar. This will increase the overall strength of the structure. At the end, sand is poured over the geotextile (it can be combined with dry cement). This layer is again tamped and leveled with a ruler (long block of wood). At this point, it is important to consider the direction of natural water flow.
how to style
To create a garden path, it is enough to arrange the bricks alternately according to the selected pattern on the prepared base. Each stone should be hammered into the base with a rubber mallet.Sagging bricks must be removed, after which the missing amount of sand is poured. After that, the stone is put back in place, hammered with a mallet.
If the width of the path is more than one meter, then the paving is done level. A small gap should be left between adjacent elements, which does not need to be filled with cement mortar (leave empty).
Finishing
Gaps between individual elements left after paving must be repaired. Otherwise, dirt will accumulate in the seams over time, in which weeds will sprout in the future.And these plants destroy the bricks and, as a result, shorten the life of the garden path.
To avoid such consequences, it is necessary to pour a dry mixture of cement and sand on the surface of the paved path. After that, the material is compacted into the cracks with a mop or sand. At the end, the path is abundantly sprinkled with running water. The next day it is recommended to repeat this procedure. Such an algorithm will prevent future distortion of the track.

Features of paving a path from old or broken bricks
Paving a garden path using old or broken bricks is carried out according to the algorithm described above. That is, in this case, the organization of the base from several layers of drainage, sand and geotextile will also be required. Difficulties arise when laying the material.
Broken or old bricks have uneven edges. This means that during laying uneven voids will definitely remain, which must be filled with the appropriate mixture.Therefore, when working with such materials, you must first lay out all the bricks on a prepared base, thereby choosing a suitable pattern and reducing the size of the gaps. After that you can start paving the way.
The second nuance that should be taken into account when working with broken and old bricks is also associated with the peculiarities of the structure of the material. When paving such stones, it is often difficult to level the surface. You can only solve this problem by constantly adding the missing sand.
Another nuance that should be taken into account is that broken and old bricks are less resistant to increased loads than new ones. Therefore, after laying, it is recommended to grind it in the joints with a sand-cement mixture, which will increase the overall strength of the track.
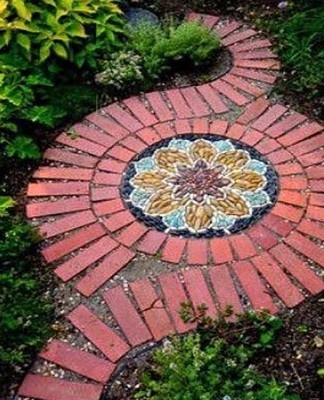
Examples of ready-made solutions
The choice of a garden path design is largely due to the layout of the site and the size of the budget allocated to such work. But in the garden, the paths are more beautiful, the stones contrast with each other.
Using a border of a different color achieves this effect. This option also allows you to visually highlight the track against the background of the rest of the site. In addition, flower beds are often framed with a contrasting border, located in the immediate vicinity of the path.
An original solution would be to use bricks of two different colors, stacked in a checkerboard pattern. A similar effect can be achieved if you open a path with stones that differ only in shade (red-burgundy, etc.).