Rules and best ways to sew a shirt one size smaller with your own hands
Buying things without trying them on often results in things measuring several inches. This becomes possible due to inconsistencies in the dimensional grids of different manufacturers. A shirt or blouse can be sewn in one size to make it smaller and fit the wearer in terms of basic parameters. To do it yourself, you need to follow a few simple rules.
Content
- 1 What you might need to work
- 2 How to sew the sleeves of a men's and women's shirt correctly
- 3 What to do if the product is too wide at the shoulders
- 4 How to shorten the sleeves
- 5 Sew a women's and men's shirt on the sides
- 6 How to reduce product length
- 7 How to adjust the collar
- 8 Features of working with European quality products
What you might need to work
To modify the finished product, you need to find free time and prepare special sewing accessories:
- A centimeter and a ruler. These elements are necessary to take measurements. In some areas of the finished product, you need to step back a few millimeters or centimeters, strictly adhering to a straight line. This applies to basting side seams, as well as drawing a line to finish the hem of a shirt or blouse.
- Pins or needles. With the help of pins or small needles, parts of the shirt are fastened where it is necessary to connect the sections before continuing the basting.
- Chalk.A section is outlined with chalk, which is then secured with pins and laid out with threads.
- Sharp scissors. Scissors are needed to make cuts, cut parts of the shirt. The sharper the scissors, the less likely they are to ruin the product.
- Son. Colored threads are used for basting: they show up better on the fabric. Only threads that match the color of the shirt fabric are suitable for sewing.
- Needles. The brushing is done with a needle. After the parts of the shirt are machine-sewn, the hand-sewn seam is removed.
- Sewing machine. When reducing the size of the product, it makes more sense to use an automatic sewing machine. An automated process will produce straight seams indistinguishable from factory quality seams.
Reference! In addition to chalk, you can also use a small bar of dry soap.
How to sew the sleeves of a men's and women's shirt correctly
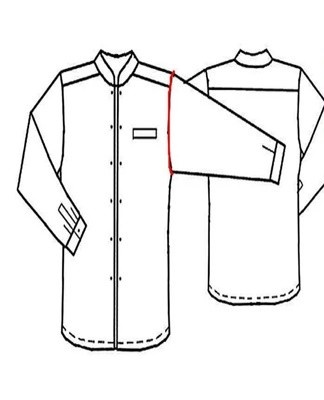
Sometimes during the test it turns out that the sleeves of the shirt are wide at the armhole. The general appearance suffers. The armhole is reduced by suturing the area between the upper and lower points of the middle part of the shirt. To reduce the armhole, one cannot do without tearing the sleeves. After cutting the sleeves with a pin, the armhole is fixed by measuring the distance necessary for the suture and the fitting is carried out. Then the sleeves are sewn along a new line, and the fabric is smoothed from the inside.
When the armhole is reduced, you may also need to reduce the width of the sleeve along the entire length of this part of the product. There are 2 ways to reduce the sleeve width on the reworked armhole:
- when weaving the sleeves to the narrowed armhole, make a vertical fold on the sleeve, which, after sewing to the armhole, must be carefully ironed;
- if the way of touching the folds is not suitable, the sleeve is sutured along the seam, redoing the slit and suturing the cuffs.
Advice! With a complete change in the width of the sleeves, the wrist does not need to be reduced. To make it narrower, it is enough to move the button a few millimeters to the left.
What to do if the product is too wide at the shoulders
If the product is large in the shoulders, then it immediately becomes noticeable. There are several ways to sew a shoulder seam. First method:
- On the owner of the shirt, measure the required distance from the collar to the line of the shoulders. This line is marked with chalk or pins.
- The shirt is removed, laid out on a flat table, a line of the proposed future seam is drawn along the marked line.
- The product is folded in half, so that the sleeves are symmetrical to each other.
- A clean cut is made along the drawn line.
- After that, the central part of the product and 2 sleeves remain on the table, several millimeters are cut off from each sleeve.
- Each sleeve is tied in the center of the shirt.
- After the fitting, the sleeves are sewn by machine.

The second method is to rip the seam along the shoulder line, folding a few inches of the fabric along the seam line. After these manipulations, the fitting is carried out. If the product fits the size, then the sleeves are sewn with a machine seam. After sewing the line, the fabric is carefully ironed along the line of the shoulders.
How to shorten the sleeves
Before starting work, the condition of the finished product is analyzed.The easiest modification option is to shorten the sleeves of a men's or women's shirt. Some classic options for shirts are sewn with a margin along the sleeve. Therefore, the case when, with other parameters of suitable size, the product is large along the length of the sleeve, occurs quite often.
The sleeves are wide if, in a static position with the hands down, the sleeve is gathered at the elbow, as well as the fold in the segment where the edge of the cuff begins.
To determine the optimal length of a shirt sleeve, it is necessary to measure the condition of the sleeve in a static position with the hands down. In this case, at the elbow, it is necessary to leave a reserve equal to several millimeters, which is necessary for comfortable bending of the arm and natural tension of the tissues.
The sleeves are shortened in stages:
- carefully remove the cuff;
- measure the segment to be cut;
- cut off excess fabric;
- sew the wrist.
This method is suitable only when the sleeve needs to be shortened by no more than 1-2 centimeters. If the sleeves are too long, the shirt is modified at the same time as the modification of the slits on the sleeve.
Sew a women's and men's shirt on the sides
To reduce the width of the product, it is necessary to know exactly the parameters of the owner of the product.

The width reduction process is quite simple:
- the product is laid out on the table;
- measure on the sides an equal distance necessary to reduce the size;
- using a tape measure, chalk and ruler, draw lines indicating the new volume of the shirt;
- along this line the product is sewn on a sewing machine;
- excess fabric is cut with sharp scissors;
- the edges of the cut fabric are overlocked;
- the seams are ironed.
Another option for changing the width of the product is the dart sewing method. This is especially in demand in female models. You can make darts only on shirts sewn according to standard patterns. If a strap is inserted in the back, as in American shirts, this option of product shrinkage is impossible.
How to reduce product length
If the shirt fits the shoulders, looks good in width, but is long, then shortening it is quite simple. After trying, determine how much fabric to cut. In this case, it is taken into account that the edge of the product should be processed with the help of a bend, therefore, an additional distance is left. According to the rules, from 0.8 centimeters to 1 centimeter is left on the fold. The exact calculation depends on the material of the shirt. For heavier fabrics, leave more fabric for the hem, and for thin fabrics, the minimum is sufficient.
According to the measurements, a straight line is drawn using chalk or a piece of soap, a rough seam is sewn along it with colored thread.
After trying, a seam is sewn on a typewriter. The final stage of the procedure is to gently remove the seam that has been mastered with colored thread. The final step includes full steaming of the bottom seam. When you shorten a shirt with side curves, it can be difficult to follow the lines exactly. In this case, when taking measurements, it is necessary to measure the line of shortening from the bottom edge, and also accurately align the seam lines when folding the product.
Women's shirts with a decorative pattern at the bottom are more difficult to alter than classic men's shirts with a straight edge. When resuming women's products, decorative elements (lace, rhinestones, fringe) are first removed, then the product is shortened and the decorative elements are sewn back on.

Reference! When measuring the required length, when planning the shortening, consider the location of the last button.
How to adjust the collar
The shirt can be wide along the collar. This is determined by evaluating the overall appearance with the button down shirt.
- if you can fit an index finger between the collar and the throat, the collar does not need to be modified;
- if the collar presses on the throat, skin folds can be seen above the edge of the collar, then the size is small;
- if several fingers can be passed between the collar and the throat, and the edges of the collar rest on the shoulders, then such a collar is large.
It is almost impossible to carefully modify the collar on your own. To reduce the volume of this part, you will have to completely tear out several main seams, which form the basis of the entire product. In addition, the collar of the shirts is lined with interlining and sewn on industrial equipment. The only thing you can do yourself to correct the condition of the collar is to reduce the length of the collar by at least 12 millimeters, up to a maximum of 20 millimeters. In this case, a necklace shortened in length will visually seem smaller in size.
Information! Only an experienced tailor can completely change the shape of the collar, make it narrower in width.
Features of working with European quality products
It is not easy to remake European quality shirts. This is due to the peculiarities of machine sewing. Some brands use double seam technology.A machine-sewn double-sided seam using two needles is difficult to open.
Such a seam must be replaced with a similar seam, but this cannot be done manually. Lines made on a machine with a single stitch, if there are double stitches in other parts of the product, can spoil the overall look. Consequently, Italian or English shirts are often taken back to the workshop to be reworked.


